
PUBLIC
Document Version: 2.9 – 2022-xx-xx
Focused Build for SAP Solution Manager
© 2022 SAP SE or an SAP aliate company. All rights reserved.
THE BEST RUN
Content
1 Focused Build for SAP Solution Manager..........................................5
1.1 Implementation Considerations for Focused Build 2.0 SP 10...............................5
1.2 What's New in Focused Build 2.0 SP 10..............................................7
1.3 In-App Help for Focused Build Applications..........................................14
2 End-to-End Implementation Process.............................................15
2.1 Process Overview............................................................16
Structure Elements of Focused Build Projects......................................17
Project Management Oce (PMO)..............................................18
Explore Team (Business).....................................................19
Build Team (Architects)..................................................... 19
Build Team (Development)...................................................20
Test Management..........................................................21
Release Management.......................................................21
2.2 Document Management in Focused Build Projects.....................................22
PMO Documentation.......................................................22
IT Documentation.........................................................23
Documenting Work Packages and Work Items..................................... 24
Solution Documentation - My Documents........................................34
Displaying Deleted Documentation Objects in a Work Package or Work Item................35
Documentation Reporting Dashboard...........................................35
2.3 Modeling Business Processes in Solution Documentation................................37
2.4 Release Management - Release Planning........................................... 38
2.5 Release Batch Import - Scheduled Jobs............................................40
2.6 Release Batch Import - Trigger...................................................40
2.7 Release Batch Import – Log.....................................................42
2.8 Managing Projects...........................................................43
Project Templates and Project Types............................................44
Project Management - Focused Build Projects..................................... 45
Creating Focused Build Projects............................................... 47
Assigning Build Projects to Main Projects.........................................50
Assigning Projects and Waves to Releases........................................ 51
Scheduling Projects........................................................52
Adjusting the Project Structure for Waves and Sprints................................53
Simplied Task Management for Additional Task Types...............................56
Multi-Language Maintenance of Projects.........................................59
Managing Risks and Issues...................................................60
2
PUBLIC
Focused Build for SAP Solution Manager
Content
Adding Work Packages to the Project Structure.................................... 62
Solution Readiness Dashboard................................................62
2.9 Managing Requirements.......................................................67
Dening Requirements......................................................69
Assigning Requirements to Business Processes....................................72
My Requirements..........................................................73
Creating Work Packages for Requirements........................................75
Creating Work Packages Without Requirements....................................76
Assigning Work Packages to Requirements........................................76
2.10 Managing Work Packages...................................................... 77
Dening Work Package Details................................................ 78
Dening the Scope of Work Packages by Creating Work Items..........................79
Scheduling Milestone Dates for Work Packages.................................... 80
Changing the Work Package Status .............................................81
2.11 Managing Work Items.........................................................81
Creating Transport Requests for Work Items.......................................83
2.12 Mass Change Operations...................................................... 84
2.13 Release Dashboard...........................................................85
2.14 Focused Build Test Suite Extensions...............................................87
Test Steps Designer........................................................88
Test Plan Management Extensions............................................. 92
Test Steps Parameters......................................................95
Test Suite Dashboard.......................................................96
Test Suite Dashboard (Obsolete)...............................................98
My Test Executions........................................................101
2.15 My Defects and My Defect Corrections............................................103
2.16 Fix Pace..................................................................109
My Requests for Change....................................................110
My Change Documents.....................................................111
3 Conversion to SAP S/4HANA................................................. 112
3.1 Simplication Item Management for System Conversion................................113
Upload Analysis..........................................................114
Conversion Activities.......................................................115
Follow-Up Activities........................................................117
4 Focused Build Standalone Extensions...........................................120
4.1 ScoreCard................................................................ 120
4.2 Template Protection..........................................................121
Architecture.............................................................122
Scenarios.............................................................. 122
Functions.............................................................. 124
Focused Build for SAP Solution Manager
Content
PUBLIC 3
4.3 Change Request Management Dashboard..........................................130
4.4 Electronic Signature..........................................................131
4.5 Repack...................................................................132
4.6 Cross-Landscape Distribution.................................................. 134
4.7 Status-Dependent Check Framework............................................. 137
4.8 Cutover Checks and Post-Cutover Activities.........................................139
4.9 Multi-Tenancy Enhancement................................................... 140
4.10 My Checklist Steps..........................................................140
4.11 Focused Build Test Suite Extensions (Standalone).....................................141
Test Steps Designer.......................................................142
Test Steps Parameters.....................................................146
Test Suite Dashboard (Obsolete)..............................................147
My Test Executions........................................................151
4.12 Simple IT Request...........................................................153
4.13 Batch Import.............................................................. 155
4.14 Retrot Automation..........................................................156
4.15 Retrot for BW............................................................. 157
4.16 Refresh Test Systems........................................................ 158
5 Glossary.................................................................159
4
PUBLIC
Focused Build for SAP Solution Manager
Content
1 Focused Build for SAP Solution Manager
Focused Build is an add-on for SAP Solution Manager.
Focused Build consists of a precongured end-to-end implementation process and standalone extensions for
SAP Solution Manager. You can also use the standalone extensions separately to enhance the standard
capabilities of SAP Solution Manager.
For more information, see https://support.sap.com/solution-manager/focused/focused-build.html .
Related Information
End-to-End Implementation Process [page 15]
Focused Build Standalone Extensions [page 120]
1.1 Implementation Considerations for Focused Build 2.0
SP 10
Focused Build 2.0 SP 10 is an add-on to SAP Solution Manager 7.2 SPS 15.
Prerequisites
● You have installed and congured SAP Solution Manager 7.2 SPS 15.
● You have installed the SAP Solution Manager Focused Build add-on as described in SAP Note 3192866 .
● You have congured Focused Build as described in Customizing and in the Focused Build for SAP Solution
Manager Conguration Guide.
Note
You can download the software from the SAP Software Download Center at https://support.sap.com/
SWDC . Search for component ST-OST 200.
Focused Build for SAP Solution Manager
Focused Build for SAP Solution Manager
PUBLIC 5
Features
Focused Build integrates the following functions:
● Project Management
Project Management helps you to plan the project timing and resources. You use can use project templates
for dierent project types to structure and schedule your projects.
● Solution Documentation and Requirements Management
You can design business models collaboratively between business and IT. The resulting requirements are
documented in Solution Documentation of SAP Solution Manager. This process supports a standardized
work packages process without media breaks.
● Issue and Risk Management integrated in Project Management (cProjects)
● Change Request Management
You can handle all activities related to software changes and transports to any follow-on systems. The
Focused Build process uses normal changes, general changes, and defect corrections.
● Release Management
You can plan, manage, and coordinate your release activities.
● Solution Readiness Dashboard
You get an automated project progress reporting based on live-system data. The dashboard oers
aggregated information on the current project.
● Document Management
You can create, change, and store documents per drag and drop, using new user interfaces for work
packages and work items.
● Test Management
With Focused Build extensions to the test suite of SAP Solution Manager, you can check that all changes
have been made correctly and do not negatively impact other business processes before you transfer them
to your productive system.
More Information
For information about standard SAP Solution Manager 7.2 features, see SAP Help Portal at http://
help.sap.com/solutionmanager72.
For information about the conguration of Focused Build, see the Focused Build for SAP Solution Manager
Conguration Guide.
6
PUBLIC
Focused Build for SAP Solution Manager
Focused Build for SAP Solution Manager
1.2 What's New in Focused Build 2.0 SP 10
General
Function
Type of
Change Description
Harmonized business partner search Changed Unied, easier, and more detailed search for business partners for
all business partner elds:
● Search help for business partner elds
● Default setting for the Business Partner Category eld: Person,
Organization, and Group
Process Management
Function
Type of
Change Description
My Work Items app New The system detects manually assigned structures or documents in
the Release of manually assigned structures and documents in the
My Work Items app.
Release of manually assigned structures and documents in theRe
lease the manual assignments to the production branch by assign
ing the status Hand over to release.
Detection of manual editing in SOLDOC
for work items
New When you edit documents directly in the development branch in
Solution Documentation, the work package automatically detects
manual editing. The deltas can then be made visible in the
Documentation tab of the work package.
Automatic creation/assignment of
documents popup
Changed Already existing documents are displayed and automatically as
signed to the work package. You can individually enable or disable
the document creation or assignment for each document.
Display KPI document title and type in
the Business Process Readiness dash
board
New The Business Process Readiness dashboard displays document ti
tles as well as the document type for KPI-relevant documents for
the KPI rating relevant to work packages or work items.
Focused Build for SAP Solution Manager
Focused Build for SAP Solution Manager
PUBLIC 7
Function
Type of
Change Description
Filter option in Business Process
Readiness dashboard
Changed The lter now considers not only the selected requirement, work
package or work item status lter criteria but also the structure at
tributes and a new logical operator, which considers dependencies
between the selected status values of the requirements, work pack
ages, and work items.
Release Management
Function
Type of
Change Description
Release Batch Import - Trigger SAPUI5
app
New The report is now available as an SAPUI5 app. It allows you to trigger
and schedule your release imports. It provides the same funtions
and checks as the SAPGUI report.
In-app help is available for this app. To display the in-app help,
choose the
icon.
Project Management
Function
Type of
Change Description
Simplied assignment of releases to
projects and waves
Changed Added a central dialog to assign a change control landscape to the
project header and a release number to a wave. This ensures that
higher waves can’t be assigned to lower releases.
Additional lters for projects New In the Projects list, you can now lter projects based on their se
verity rating and on whether they are synchronized or not.
8 PUBLIC
Focused Build for SAP Solution Manager
Focused Build for SAP Solution Manager
Requirements, Work Packages, Work Items
Function
Type of
Change Description
Focused Build - Requirement Approver
group, My Requirement Approvals tile
New The new My Requirement Approvals tile allows you to directly access
the requirements that need to be approved. You don't have to use
the My Requirements app and change the lter settings any longer.
Requirements Management app: lter New You can add lters for Work Package Title and Work Package ID by
choosing Adapt Filters.
Requirements Management app: as
signment of development team
New When creating new work packages, a new eld Development Team is
available in the Create New Work Package dialog box. Therefore, you
don't need to go to the My Work Packages app to assign the devel
opment team.
New report on requirement approvals
and custom elds
Report /SALM/REQUIREMENT_REPORT provides the following op
tions:
● You can display all custom eld values and process element in
formation.
● You can display all elds of the extended approval workow.
For example, you can display all requirements planned for a specic
release or a list of all approvers that have not approved their require
ments so far.
Requirement API Changed When you create requirements using the API, you can now ll the
custom elds that you have customized in requirements and modify
them with PUT or PATCH methods.
The requirement API can now create or read texts with format for
the text types customized to support rich text.
Restrict transport landscape New You can restrict the Transport Landscape Information view to the
transport track associated to the conguration item assigned to the
work item. In addition, it is only possible to create a transport re
quest for this certain development system. Reassignment of trans
port requests is restricted in the same way.
To do this, activate BAdI implementation
AIC_ONLY_DEV_IBASE_SYSTEM of BAdI
AIC_CREATE_TRANSPORT_WINDOW, BAdI: Restrict Change Doc.
System Landscape with Maintained Cong. Item).
Release manager displayed in the work
package and work item
Changed If an actual release is assigned to a work package, the release man
ager is displayed in the Parties Involved assignment block in the
WebClient UI. The release manager can be used for certain func
tions, for example, e-mail notications without maintaining this per
son manually on each work package or work item.
Focused Build for SAP Solution Manager
Focused Build for SAP Solution Manager
PUBLIC 9

Function
Type of
Change Description
Scrum Board API New The API now supports the following activities and can be imple
mented in Scrum Board applications:
● You can retrieve documents assigned in the documentation
area of a work item.
● You can retrieve and set the status of the tasks that exist in the
checklist area of a work item.
● You can retrieve work packages assigned to a project wave and
reassign a work package to a dierent wave of the same
project.
Test Suite Extensions
Test Suite Dashboard
Function
Type of
Change Description
In-app help New In-app help is now available for the Test Suite Dashboard app.
To display the in-app help, choose the icon.
New Test Suite Dashboard version New With the new Test Suite Dashboard, you have access to:
● Adaptable overview page
● Interactive details page
● Advanced customizing and sharing options
● Visualization using charts
My Test Executions
Function
Type of
Change Description
Enhancing defect description with
screen shots and formatting
Changed When creating a defect, you can now add screen shots and format
ting to the description text. You must activate this function sepa
rately.
Display test case description in My Test
Executions app
Changed The description of a test case from Solution Documentation is now
displayed on the Header tab in the My Test Executions app.
10 PUBLIC
Focused Build for SAP Solution Manager
Focused Build for SAP Solution Manager

Test Steps Designer
Function
Type of
Change Description
Mandatory eld selection New You can dene mandatory elds in the test steps table in the Cus
tomizing activity. Note that this is only eective on the Test Steps
Designer app.
My Defects and My Defect Corrections
Function
Type of
Change Description
Logical link to defects search New In the Focused Build Work Center, you can now choose the Defects
logical link if you have one of the following roles: Architect, Devel
oper, Tester, Test Manager, Project Manager, and Release Manager.
When you select the link, the new defects search opens. The
Transaction Type lter eld is automatically prelled with Defect
(S1DM).
Additional checks when creating a de
fect correction
New Introduced two checks in the My Defects app to block the creation
of defect corrections in the following cases:
● If the related wave is set to status Completed
● If the creation is not allowed for the current release phase
Set to “Retest without Transport” New When you don’t refresh after making changes to a defect correction
in the My Defect Corrections app, the system checks whether the
Set to “Retest without Transport” PPF action is executable. Select
the action menu again to display only executable PPF actions.
Rich text in the My Defects app New With the new Defect Description text type, you can add images and
formatting to the text. This has to be enabled manually. For more in
formation, see chapter 11.10 (Optional) Enabling and Displaying Rich
Text in the Focused Build conguration guide.
Focused Build for SAP Solution Manager
Focused Build for SAP Solution Manager
PUBLIC 11
Function
Type of
Change Description
Tester as required partner function for
statuses In Delivery and To Be Retested
without Transport.
New In the My Defect Corrections app, when you set a defect correction
that has been created from the scope of a work package with a
transport to status In Delivery, the system automatically checks if a
Tester is specied. Otherwise, the status of the defect correction is
reset by the system to avoid defect corrections in status Transport
to Retesting without a tester being assigned.
The same logic is applied for defect corrections with no transport
assignment.
For a defect correction with a defect as predecessor document, the
reporter of the defect is automatically assigned as the tester.
Mass Change Operations
Function
Type of
Change Description
Table display in Mass Change
Operations app
Changed The table display has been harmonized for all Mass Change
Operations apps and allows you to mass change and save statuses
of defects and defect corrections.
Conversion to SAP S/4HANA
Function
Type of
Change Description
Improved error logging during upload New If an error occurs during the upload of a readiness check, an error
message is now directly displayed in the frontend of the
Simplication Item Management app.
Specify target logical component group
for executable search
New The search for executables can now be limited to a specic target
system landscape (for example SAP S/4HANA) using the Maintain
Solution and LCG for Executable Search Customizing activity.
12 PUBLIC
Focused Build for SAP Solution Manager
Focused Build for SAP Solution Manager
Standalone Extensions
Cross-Landscape Distribution
Function
Type of
Change Description
Distribution history Changed Added Target Type, Last Workbench Target, and Last Customizing
Target to the Distribution Status Overview table.
Cutover
Function
Type of
Change Description
Refresh for post-cutover activities Changed A refresh no longer collapses the navigation tree.
User check for Synchronize Deployment New Added the new user check for the Synchronize Deployment post-
cutover activity in the cutover checks tab.
Continue post-cutover action execution
where you last stopped
New When a previous execution of the Synchronize Deployment action of
the cutover function was cancelled, you can choose to continue
where last stopped or start all over via a new popup.
Template Protection
Function
Type of
Change Description
Reorganize the template protection
standalone function
New You can use report /SALM/_TPP_REORG to delete or reorganize du
plicates of template rules.
For more information, see the report documentation.
Simple IT Request - Service Catalog
Function
Type of
Change Description
Support for multiple business partners New The Simple IT Request - Catalog app now supports partner func
tions that support the assignment of multiple business partners.
This is integrated into the harmonized business partner search.
Focused Build for SAP Solution Manager
Focused Build for SAP Solution Manager
PUBLIC 13
Simple IT Request - My Requests
Function
Type of
Change Description
Display additional business partner in
formation
New In the Parties tab of the Simple IT Request – My Requests app, you
can display additional information about business partners.
Retrot Automation
Function
Type of
Change Description
Traceability report for retrot targets New Use the new report /SALM/RETRO_AUTO_TRACEABILITY to see the
traceability of automatic retrots in a list view.
1.3 In-App Help for Focused Build Applications
For the following Focused Build for SAP Solution Manager applications, you can choose the question mark icon
in the upper right corner (within the applications) to display the context-sensitive help:
● Change Request Management Dashboard
● Documentation Reporting Dashboard
● My Checklist Steps
● My Requests
● My Test Executions
● Project Management
● Release Dashboard
● Release Batch Import - Trigger
● Requirements Management
● Service Catalog
● Simplication Item Management
● Test Suite Dashboard
● Test Steps Designer
● Test Steps Parameter
For the setup of the in-app help, please refer to Setup of In-App Help - SAP Help Portal.
14
PUBLIC
Focused Build for SAP Solution Manager
Focused Build for SAP Solution Manager

2 End-to-End Implementation Process
Focused Build enhances standard SAP Solution Manager features and processes by adding specic functions.
Innovating business processes with minimal risk to live operations is a challenge for companies seeking to
maintain and increase their competitive edge. The Focused Build approach supports customers in identifying
and selecting the right building blocks from the SAP platform and deploying them in an optimal way. For this
purpose, Focused Build enhances standard SAP Solution Manager features and processes by adding specic
functions.
Focused Build projects use a standardized methodology and an integrated tool chain, which enable companies
to build dierent and innovative software solutions on top of existing industry best practices provided by SAP –
to lower the time to market and to realize tangible value. Following this new approach, customers assess
business processes in collaboration with their business experts, start with best practices for commodity
processes, and document requirements for dierentiation and innovation. Ecient simulations of the user
experience show the business tangible results of the solutions at an early stage.
Using the methodology and integrated tool chain of Focused Build has many advantages, including the
following:
● Information ows from one phase to the next without media breaks: There is no information loss between
project phases, with clear-cut milestones for handovers from one role to the next. All sign-os are
documented to improve compliance. Once created, content is reused throughout the software lifecycle,
preventing integration gaps.
● One common language: Standardized, structured, and systematic procedure throughout the project that
includes resource planning and controlling as well as workow support. A centralized metadata repository
is provided for solutions, including documentation, test cases, and conguration information.
● Automated project status information: Clear visibility of resources, scope changes, issues, and risks, as
well as transparent and automated reporting.
● Transport automation grants the continuous integration and delivery of the software changes into the
systems.
Note
Focused Build is a precongured add-on. Although Customizing is available, we recommend that you use
the solution as it is delivered.
For more information, see https://support.sap.com/solution-manager/focused/focused-build.html .
Focused Build for SAP Solution Manager
End-to-End Implementation Process
PUBLIC 15

2.1 Process Overview
By using the end-to-end requirement-to-release processes, you can create requirements in Solution
Documentation of SAP Solution Manager and create follow-up work packages.
For the actual execution of the work package, you break down the work packages into work items. The release
can go live based on a single change, a group of changes, or a planned release following a release cycle
controlled by release phases.
The Focused Build process consists of several workows, some of which run in parallel. The overall process
runs as shown in the following graphic:
For more information about the requirement-to-release process using Focused Build, see the workows of the
following user groups:
● Project Management Oce (PMO) [page 18]
● Explore Team (Business) [page 19]
● Build Team (Architects) [page 19]
● Build Team (Development) [page 20]
● Test Management [page 21]
● Release Management [page 21]
16
PUBLIC
Focused Build for SAP Solution Manager
End-to-End Implementation Process
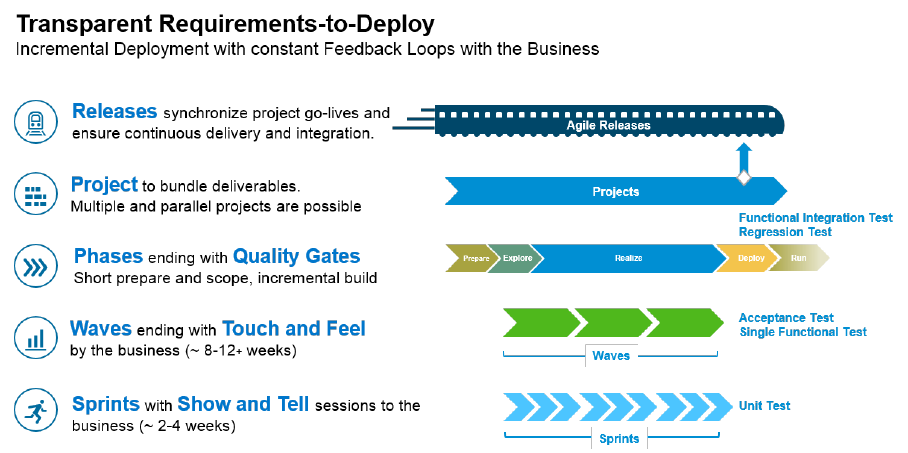
2.1.1 Structure Elements of Focused Build Projects
The following graphic shows the structure elements of Focused Build projects.
Project Phases
A project usually comprises the following phases:
● Discover & Prepare
Modeling of the business processes, denition of requirements, and planning of projects and releases
● Explore
Creation of work packages for requirements, scope denition, and breaking down work packages into work
items
● Realize
Developing and testing of the software changes
● Deploy
Finalizing of the release and hand over to the customer
● Run
Go-live of the new release and hyper-care during the introduction phase
Releases, Waves, and Sprints
A project has one or more releases.
A release is developed in several waves. A wave comprises a well-dened functional scope of work packages
that is formally signed o by key users, such as business process experts. A wave starts with a scope denition
and a functional specication. Each wave ends with a quality gate. After a wave, developers present the
changes and new features to the requesters and key users.
Focused Build for SAP Solution Manager
End-to-End Implementation Process
PUBLIC 17

The lowest level is the sprint. A sprint is a dened period of time during which the development teams have to
provide deliverables for review. The backlog of a sprint is based on the prioritized work items.
Requirements, Work Packages, and Work Items
Requirements are dened during the prepare phase of a project and describe the scope of the project. Solution
architects create work packages for the requirements.
Work packages are used for planning the technical implementation of a requirement. Work packages are
assigned to waves. Development architects divide the work packages into work items.
Work items are implementation tasks of work packages. Work items are realized during sprints.
Related Information
Glossary [page 159]
2.1.2 Project Management Oce (PMO)
Project managers perform the following tasks:
● Dene the project type and plan the project
In SAP Solution Manager, project managers use integrated project management functions to create
project plans based on project templates. These templates are delivered as part of the Focused Build add-
on. They can assign issues and risks to the project, and they can display a list of all work packages for
which the scope has been nalized.
● Initiate sprints
After project managers have prepared the project, for example, by planning the eort based on the
estimates by the solution architect, they trigger the rst sprint of the project.
● Manage project issues and risks
The project manager tracks all issues that come up during the project, and manages the risks and the
overall progress.
● Manage project documentation
All IT documents related to the project can be handled using SAP Solution Manager functionality.
● Manage quality gates and sign o
The project manager is responsible for milestone and quality gate deadlines, and signs o the tasks that
pass the gates.
● Close sprints
Each sprint ends with a review meeting, during which the nished developments are signed o, and
unnished tasks are assigned to the scope of the next sprint.
Note
You can store PMO documents in SAP Jam. You can restrict the access to protect customer-sensitive
project data. For more information on PMO documents, see PMO Documentation [page 22]
18
PUBLIC
Focused Build for SAP Solution Manager
End-to-End Implementation Process
Related Information
Managing Projects [page 43]
Solution Readiness Dashboard [page 62]
2.1.3 Explore Team (Business)
The explore team is made up of business process experts, consultants, solution architects, and method and
tool experts.
The explore team creates the business process model and identies requirements based on best practice
content, such as SAP Activate.
During explore workshops, you model your business processes in Solution Documentation and identify
requirements in a t / gap analysis. Substantial functional gaps are handed over to SAP development. The
remaining requirements constitute the scope of your Focused Build projects.
Solution Documentation provides a business process model diagrams based on the Business Process Model
and Notation (BPMN) for all business processes in your business process model. You can publish your process
model diagrams for feedback.
When you have created the business process model, you attach your requirements directly to the related
processes and process steps in Solution Documentation.
Related Information
Modeling Business Processes in Solution Documentation [page 37]
Dening Requirements [page 69]
2.1.4 Build Team (Architects)
Solution architects and development architects plan and coordinate the development.
● Create functional specication
Solution architects validate the requirements, approve or reject them, and document the requirements, the
business cases, and the required new and changed functions in detail. They then create work packages
from the requirements and write functional specications for work packages.
● Assign functional specication to work packages and process structure
In SAP Solution Manager, solution architects assign the functional specications to the corresponding
work packages. The IT scope is validated and changed if necessary by the solution architect and
development architect. The work package is assigned to a wave, which determines the schedule of the
work package deliverable. The development architect divides the work package into work items and
assigns developers to them.
Focused Build for SAP Solution Manager
End-to-End Implementation Process
PUBLIC 19
● Manage gaps
Solution architects validate perceived gaps in the system and retrieve implementation recommendations.
● Dene sprint scope
Solution architects assign the approved work items to sprints.
During the development and test process, the solution architect constantly monitors the status of the work
packages.
Related Information
Creating Work Packages for Requirements [page 75]
Managing Work Packages [page 77]
Dening the Scope of Work Packages by Creating Work Items [page 79]
Documenting Work Packages and Work Items [page 24]
2.1.5 Build Team (Development)
Focused Build supports the collaboration across distributed development teams.
● Code, customize, and congure work items
Developers call up the work items assigned to them for the relevant development sprint, and start to
implement the work items in the development system.
● Create documents and test cases
Developers document each work item that they implement and create test cases for the new and changed
functions.
● Execute tests
Developers test these new and changed functions in the test system.
● Record eort
Developers record the time that they have spent on the work items, based on the eort planned by the
solution architect.
● Hand over to release
Any changes that are tested with OK are handed over to Release Management.
Related Information
Managing Work Items [page 81]
Documenting Work Packages and Work Items [page 24]
20
PUBLIC
Focused Build for SAP Solution Manager
End-to-End Implementation Process
2.1.6 Test Management
Test managers identify which tests are required and coordinate the test activities.
● Identify the test scope and create test plan
Based on the work items implemented during the project, test managers create a test plan and test cases.
● Schedule sprint tests
The test managers schedule developer tests for each sprint. In case of large functional changes, multiple
sprints might be required to complete a change, and the test takes place after the last sprint.
● Manage integration, user acceptance, and regression test
Test activities can take place as part of each individual sprint, in parallel to sprints, or after all sprints have
nished. With an increasing number of sprints, more functional integration tests can be performed
because new features become available that are required for end-to-end testing.
● Perform release tests
The test conrmed status in the work package is the prerequisite for the changeover to release
● Sign o if the test is successful
The test is successful if all test cases have been conrmed with OK.
Related Information
Focused Build Test Suite Extensions [page 87]
2.1.7 Release Management
Release managers build, test, and validate releases.
Release managers compile the new developments and congurations that are to go live as part of the release.
New features can go live after each sprint, or the release can consist of a number of functions developed over
multiple sprints and with a dedicated go-live event.
A release type denes the size and duration of a release. In general, a distinction is made between major and
minor releases.
Related Information
Release Dashboard [page 85]
Release Management - Release Planning [page 38]
Focused Build for SAP Solution Manager
End-to-End Implementation Process
PUBLIC 21

2.2 Document Management in Focused Build Projects
Focused Build oers two basic documentation categories: PMO documentation and IT documentation.
Note
If your PMO team or development teams don't have access to SAP Solution Manager, you can use SAP Jam
or JIRA to store and share your documentation.
The IT documentation is stored and maintained in the Solution Documentation of SAP Solution Manager.
Maintaining Documents in the Solution Documentation
In Focused Build projects, you do not only document you business processes in the Solution Documentation,
but can also record, accumulate and continuously expand your data in the Solution Documentation during an
entire project. In Focused Build, the standard functionality of the Solution Documentation is enhanced by
additional functions for documenting work packages and work items that are integrated in Focused Build
applications such as My Work Packages and My Work Items. Using these applications together with Solution
Documentation, you can do the following:
● Maintain documents related to work packages and work items
● Access and upload documents easily
● Work with your own templates or predened templates that are based on attributes you have dened. In
Customizing, you can determine which document types are permitted at which structure level.
● Create new versions of documents
● Search your processes and nd related documents
● Mark documents in the Solution Documentation as relevant for work packages or work items
Related Information
PMO Documentation [page 22]
IT Documentation [page 23]
2.2.1 PMO Documentation
You can store your PMO documentation in SAP Jam, which enables you to exchange project documentation
internally among project members.
The storage structure should be dened by the PMO as it is customer-specic. You can restrict the access to
protect customer-sensitive project data, for example, detailed resource scheduling reporting.
For your PMO documentation, you can use PMO templates.
22
PUBLIC
Focused Build for SAP Solution Manager
End-to-End Implementation Process
2.2.2 IT Documentation
You can store and maintain your IT documentation in Solution Documentation of SAP Solution Manager.
IT documentation includes the following:
● Documentation, for example, process designs, specications, test cases, conguration or business test
requirements
● Technical objects, for example, transactions, TBOMs, custom codes, background jobs, system
congurations, interfaces
● System and software components (SAP and non-SAP), for example, SAP Enterprise Resource Planning,
legacy systems.
For all basic documents, you can use predened templates in SAP Solution Manager.
Note
If your build teams don't have access to SAP Solution Manager, Focused Build supports the integration of
JIRA. After going live, all IT documents to be handed over to the customer are stored in Solution
Documentation.
During a project, you create and assign various types of documents in Solution Documentation:
● Prepare and Scope Phase
Create business process models in Solution Documentation.
● Build Phase
○ Business Process Model
○ Create functional specications
○ Create single functional tests (test cases)
○ Assign documents to work packages
○ Create functional integration tests
○ Application Landscape
○ Create technical design or conguration guides.
Note
Use consistent terminology. The terminology used in these guides should also correspond with
the terminology used in related documents (for example, design, or solution proposal) and the
terms and denitions in SAP’s terminology database, SAPTerm.
○ Assign documents to work items
○ E2E process
○ Create E2E integration or user acceptance tests
Note
To ensure worldwide communication, we recommend that you use English as your documentation
language.
Automated Email Notications for Status Changes of Documents
You can congure automated email notication for specied document types:
Focused Build for SAP Solution Manager
End-to-End Implementation Process
PUBLIC 23
If a document is switched to a status dened in Customizing, the document owner or the person responsible
for the document are notied by an automatically generated email. In the email, they can use a link to navigate
directly to the document in the My Documents application.
Related Information
Documenting Work Packages and Work Items [page 24]
2.2.3 Documenting Work Packages and Work Items
You use the My Work Packages and My Work Items applications to maintain documents related to work
packages and work items and assign them to business processes (process diagrams) or other Solution
Documentation structure elements.
On the Documentation tab page of these applications, you can create, change, and store documents for your
work packages or work items in the Solution Documentation structure elements that you assign to the work
package or work item. For work packages, the structure element is usually a process or a process step.
The Documentation tab page has the following subtab pages:
● Documents - for assigning Solution Documentation structures and maintaining documents
● Current Status - for viewing the current ratings of the document KPIs (if congured)
Note
The Documentation tab page is also available in the following Focused Build apps:
● My Defect Corrections
● My Requests for Change
● My Change Documents
You can use the Documentation tab to access and change documentation. The Current Status subtab for
viewing document KPI ratings is not available in these apps.
Prerequisites
● You have congured the documentation function in Customizing for SAP Solution Manager under
Focused Build Documentation Assign Document Types to Tab Pages .
● You have maintained table /SALM/SDOC_PRJ in transaction SE30.
● You have started the My Work Packages or the My Work Items application and you have selected the work
package or work item for which you want to create, change, or assign documents.
24
PUBLIC
Focused Build for SAP Solution Manager
End-to-End Implementation Process
Activities
Documentation Documents
On the Documents subtab page, you can do the following:
● Assign Solution Documentation structure elements
To assign a process, process step, or library element to the work package or work item, choose the Assign
Structures icon and assign the relevant structure elements in Solution Documentation. For more
information, see Assigning Solution Documentation Structure Elements [page 26].
● Unassign Solution Documentation structure elements
You can unassign a process, process step, or library element from the work package or work item in the
Solution Documentation. For more information, see Unassigning Solution Documentation Structure
Elements [page 27].
● Move structures in work items
You can move structures including assigned documents between work items. For more information, see
Move Structures Between Work Items [page 29].
● Display and change the status of a test step
You can display and change the status of a test step from a work package, work item, or defect correction.
You can also change the test case categorization. For more information, see Change Test Step Status and
Categorization [page 31].
● Display the documents for the work package or work item
In the Structures section, select a Solution Documentation structure element assigned to the work
package or work item to display the documents stored in this structure element in the Assignments table.
● Create or upload documents and store them in an assigned Solution Documentation structure
element
If you have assigned a Solution Documentation structure element (process, process step, or interface) to
the work package or work item, you can store a new document for the work package or work item. You have
the following options:
○ To create a new document, choose (Create New Document). Specify the document title, select the
document type, and choose Create.
The new document, which is based on the selected document type template, is created and stored in
the assigned process structure element.
○ To upload a new document, drag and drop a document le from a local storage to the Assignments
table. Specify the document type and choose Create. The language of the uploaded document is
automatically recognized.
○ You can also upload new versions of documents.
○ On the Attachments tab page, you can attach les, such as image les or document les from a local
storage, by using drag and drop. The les on the Attachments tab page are stored only locally in the
work package or work item, not in Solution Documentation.
Note
This also applies to the creation of test steps. You can create test steps directly from work packages or
work items without having to execute the corresponding transaction in Solution Documentation.
● Link documents to a work package or work item
To use a document that is already stored in another structure element, choose (Search Documents).
Search and select the document in Solution Documentation and choose Link Documents.
Focused Build for SAP Solution Manager
End-to-End Implementation Process
PUBLIC 25
● Assign documents that are already available in Solution Documentation to the work package or work
item or cancel the assignment of the documents
In the Assignments table, you can assign the documents stored in Solution Documentation to the work
package or work item or you can cancel an assignment by using the button in the Assign column.
● Edit documents
For more information on how to edit documents, see Editing Documents for Work Packages and Work
Items [page 30].
● Change the document status
To change the document status, select one or more documents and choose (Change Document Status).
The document status reects the processing status of the document, for example, In Progress, Review, or
Released. You can prevent further processing of the document by setting the status to Released.
● Maintain and change a document owner or document responsible
By default, the person who has created or uploaded a document is the document owner.
To change the document owner or to specify or change a document responsible for a document, display
the columns Owner ID and Responsible ID in the Assignments table. Then select the document and choose
the icon for changing the document owner or responsible (Change Document Owner / Responsible).
● Delete documents
Once you have deleted a document, it cannot be restored. A dialog warns you therefore if a document is
also assigned to another work package or work item. In this case, you have the option to cancel the
assignment of the document to the current work package instead of completely deleting the document.
Note
The trac light icons in the Conict column of the Structure section or the Assignments table indicate
potential conicts for assigned Solution documentation structure elements or documents.
By clicking an icon in the Conict column, you can navigate to the Solution Documentation to resolve
conicts for the assigned Solution Documentation structure elements or documents.
Documentation Current Status
On the Current Status page, you can check the document KPIs. For more information, see KPI Ratings for
Documents in My Work Packages and My Work Items [page 30].
2.2.3.1 Assigning Solution Documentation Structure
Elements
On the Documentation tab, you specify the Solution Documentation structures that are relevant for the work
package, work item, or other Focused Build transaction types. You can assign process steps and other library
elements from the Solution Documentation. When you assign structures to a work package, the structures are
inherited by the work items contained in that work package. You can also manually assign structures to a work
item (not inherited).
Once you have assigned a Solution Documentation structure, you can view, access, and edit the documents
stored at this structure directly from the Documentation tab. You can also use the Documentation tab to create
and store new documents at the assigned structures.
1. On the Documentation tab on the Documents subtab, choose (Assign Structures) to open the Assign
Structures pop-up window.
26
PUBLIC
Focused Build for SAP Solution Manager
End-to-End Implementation Process

2. In the Assign Structures pop-up window, search for the Solution Documentation structure elements that
you want to assign. To simplify the search, you can expand the hierarchy view or use lters in the list view.
Note
Observe the following when assigning Solution Documentation structure elements to work packages,
work items, or other Focused Build transaction types:
○ If a Solution Documentation scope has been used to create a requirement, you can select only
process/library structures belonging to this scope.
○ If a requirement addresses several structures from dierent scopes, these scopes are inherited to
the successors (work package and work items).
○ If a Solution Documentation scope is assigned to a project (in a project header), the selection of a
project in a work package can be simplied by using this scope. In this case, the input help for
project selection presents only projects with the corresponding Solution Documentation scope
assigned and fades out projects with other scope assignments.
3. Select the checkbox next to the assignable elements.
The Solution Documentation elements that you have selected are displayed below. You can see which
Solution Documentation structures have been assigned from which Solution Documentation scope.
4. Save your selection.
To assign a document to a previously assigned structure:
1. Go to the Documentation tab, then to the Documents subtab.
2. In the Documents list, in the Assign/Unassign column, choose (Unassign).
The document is assigned (the icon changes to ).
You can reassign a work item to a work package in status Scoping if the following conditions apply:
● no Solution Documentation elements are assigned to the target work package
● no scope items exist for the target work package
2.2.3.2 Unassigning Solution Documentation Structure
Elements
On the Documentation tab, you can unassign process steps and other library elements from the Solution
Documentation.
Unassign Elements from Work Package (Design Branch)
The following procedure applies to work packages up to status Scope nalized. Later, you can change the
Solution Documentation scope only in status Scope extension. In this status, you can unassign only structures
that have been added in this status.
Structures that have been already handed over to a work item cannot be unassigned from the work package
anymore. For more information, see Unassign Element from Work Item and Move Structures Between Work
Items [page 29].
Focused Build for SAP Solution Manager
End-to-End Implementation Process
PUBLIC 27

To unassign a Solution Documentation structure and all related documents from a work package in the design
branch, do the following:
1. On the Documentation tab, on the Documents subtab, nd the Solution Documentation structure element
that you want to unassign.
2. For the structure element that you want to unassign, select the checkbox for Step for un-assignment in the
list.
3. Choose (Unassign selected structures).
4. The item is removed from the list.
Unassign Element from Work Item
In work items, you cannot unassign structures that were inherited from the work package and created through
the particular work item in the design branch. You can unassign only structures that were manually assigned to
this work item.
To unassign a Solution Documentation structure and all related documents from a work item, do the following:
1. Go to the My Work Items application and choose a work item.
2. Go to Documentation Documents and choose (Unassign selected structures).
3. Choose (Assign Structures).
4. In the Assign Structures window, select the element for which you want to create an unassignment
element.
○ Expand the element.
○ Select a step or process.
○ Choose Apply.
A step for unassignment is assigned to the work item.
5. Select the assigned structure.
6. Choose (Unassign selected structure).
Structures that were manually assigned to a work item (not inherited by a work package) can be removed
again. To remove an assigned structure, select it from the list. Choose
(Unassign selected structures). The
structure is removed from the list.
2.2.3.3 Where Used List in My Work Packages
The Where Used list in the My Work Packages app allows you to run a search within Solution Documentation
content to nd out where it is used. This may help to gure out where a particular transaction, process step,
conguration unit, etc. is used in a business process.
Use this feature for conversion projects. The detection of transaction assignments to business process content
allows deeper integration into the conversion project use case.
28
PUBLIC
Focused Build for SAP Solution Manager
End-to-End Implementation Process

2.2.3.4 Move Structures Between Work Items
Move structures between work items. You can move a work item's structure elements including assignments
from a source work item to a target work item directly in the source work item. You do not have to access the
standard Solution Documentation procedures anymore.
Moving structures is available only between work items. You can access a work item directly from the My Work
Items application.
Prerequisites
● You have started the My Work Items application.
● You have selected a work item.
● The work item contains an assigned structure (for example, a process step).
Procedure
Move a Structure
1. On the Documentation tab page, on the Documents subtab page, choose a Solution Documentation
structure element or process diagram to display the documents stored in the structure element in the
Documents table.
2. Select the element that you want to move.
3. To open the structure package including assigned documents, choose (Open the structure move
popup).
4. In the Move Structure window, from the Target change document dropdown list, select a target work item.
5. Select the checkbox for the element and drag the element from Source change document to the
designated
+ Drag and Drop area. You can also use the navigation arrows and to move between source
and target.
6. Choose Next Apply Close .
Result
The elements are moved to the target work item. The moved structures and assignments are added to the
work package of the target work item. The moved content is removed from the scope of the source work item
and corresponding work package.
Review and Move Remaining Assignments
When the Solution Documentation was edited directly in the Solution Documentation in context of the work
item, the elements are not visible in the general application. Changed structures are not listed in the structure
section of the work item, and created or changed documents are not automatically assigned to the work item.
To review and move remaining assignments, do the following:
1. On the Documentation tab page, on the Documents subtab page, choose Click here to review and move
remaining assignments link.
Focused Build for SAP Solution Manager
End-to-End Implementation Process
PUBLIC 29

2. In the Move Structure window:
○ Select a target work item
○ Select the checkbox for the element and drag it to the designated + Drag and Drop area
○ Choose Next Apply Close .
3. Navigate to the target work item by selecting it from the My Work Items list on the left-side panel.
4. Go to the Documentation tab page, then to the Documents subtab page.
In the Documents list, check if the moved documents are listed.
2.2.3.5 Editing Documents for Work Packages and Work
Items
You can use the Documents tab page of the My Work Packages or the My Work Items application to edit and
store documents.
Prerequisites
● You have started the My Work Packages or the My Work Items application.
● You have selected the work package or the work item.
Procedure
1. On the Documentation tab page, on the Documents sub-tab page, choose a Solution Documentation
structure element to display the documents stored for the structure element in the Assignments table.
2. Double-click on a document to download the document le to your computer.
3. Change and temporarily store the document on your computer.
4. Drag and drop the changed document from the local storage to the Assignments table.
5. Decide if the changed document is stored as a new version and replaces the existing version or as an
additional document:
○ To save the document as a new version and replace an existing version, choose New Version.
○ To create an additional document out of the upload, choose New File.
2.2.3.6 KPI Ratings for Documents in My Work Packages
and My Work Items
Document KPIs determine the following:
● Which types of documents are required for a work package or work item
30
PUBLIC
Focused Build for SAP Solution Manager
End-to-End Implementation Process
● Which status the documents/test steps must have in which status of a work package or work item
If document KPIs are congured in the Customizing (IMG), you can check the KPI ratings for the documents of
a work package or work item in My Work Packages or My Work Items on the Documentation tab page on the
Current Status sub-tab page. The Current Status sub-tab page has the following sections:
● KPI Overall
This section shows the overall ratings for the document types that are required for the work package or
work item.
If this overall KPI rating is positive for a required document type depends on the principle that has been
congured in the Customizing:
○ Best case principle: The KPI rating is positive if the rating of at least one document for the required
document type is positive. For example, the rating is positive if a test case is required for a work
package and there is at least one test case in the correct status available in one of the assigned
Solution Documentation structure elements.
○ Worst case principle: The KPI rating is positive if the ratings of all documents of a required document
type are positive. For example, the rating is positive if a test case is required for a work package and
there are test cases with the correct status available in all of the assigned Solution Documentation
structure elements.
● KPI Relevant Structure
If several Solution Documentation structure elements are assigned to the work package or work item, you
can check the document KPI ratings for each Solution Documentation structure element in a separate KPI
Relevant Structure section.
If several documents types are available for a document KPI, the column Document Type displays the entry
Several Document Types. You can move your mouse over the entry Several Document Types to display the KPI
rating for each of the document types in a popover window.
2.2.3.7 Automatic Creation of Required Documents for
Work Packages
If you work with document KPIs and have dened which document types are required for a work package, you
can activate the automatic creation of required documents.
If this feature is activated, les for the required document types are automatically created and assigned to the
relevant Solution Documentation structure elements when you create a work package or when you assign a
Solution Documentation structure to a work package. The le names and document titles of the automatically
created documents follow the pattern that you have dened for the document types in the Customizing. An
automatically created document initially has the status Draft.
2.2.3.8 Change Test Step Status and Categorization
Display and change the status of a test step from within a work package or work item.
You can view the status of a test step in the My Work Packages application and in the My Work Items
application. Navigate to the Documentation tab page and choose the Documents subtab page. The test step
status is displayed in the Documents list in the Status column.
Focused Build for SAP Solution Manager
End-to-End Implementation Process
PUBLIC 31

The following statuses are available: In Progress, Copy Editing, Review, or Released.
Prerequisites
● You have started the My Work Items application or the My Work Packages application.
● You are assigned to a work item or a work package.
● You have assigned an object of type Test Steps <Orig.> to the work package or work item.
Procedure
Note
You can change the test step status only for assigned test steps.
1. In the Documents list, select the test step for which you want to change the status.
2. Choose (Change document status).
Possible status values are loaded.
3. In the Change document status popup, in the Status column, choose an item that has an editable status.
Documents that cannot be edited are grayed out.
4. From the dropdown list, select the status that you want to set for the document.
5. Choose Change.
The status of the document is updated. The Status change operation bar turns green and displays Status
change successfully.
6. When you are nished changing statuses, choose Close.
The changed status value is not visible in the table view for the test step.
Change Test Case Categorization
You can change the test case categorization in the My Work Packages application and in the My Work Items
application. Navigate to the Documentation tab page and choose the Documents subtab page. In the
Assignments table, the categorization is not displayed. You have to select test steps and change / add the
categorization to see entries that are already assigned.
To change the test case categorization, do the following:
1. In the Assignments list, select the checkbox for the document or Test Steps.
2. Choose (Change Test Case Categorization).
3. In the Change the test case categorization popup, from the Category dropdown list, select one or more
categories.
4. Choose Change.
5. When you are nished changing categorizations, choose Close.
32
PUBLIC
Focused Build for SAP Solution Manager
End-to-End Implementation Process
2.2.3.9 Related Documents in Focused Build
There is a method and numbering of displayed related documents for an allowed structure type.
Independent of the branch, the attribute panel in the related document area shows the following items:
● Incidents (standard)
● Request for change (standard)
● Change documents (standard)
● Request for Change (Focused Build)
● Change Documents (Focused Build)
● Requirements (Focused Build)
● Work Packages (Focused Build)
● Work Items (Focused Build)
Method and Counting
Request for Change and Change Documents in Focused Build are entries counting the number of Focused
Build-specic requests for change and related change documents. These two entries are available in all
branches and count the number of Focused Build-specic request for change and change documents for the
relevant structure.
As soon as the number of counted requests for change or change documents is more than zero, the link to the
Mass Change transaction becomes active.
Requirements
This entry is shown in all branches. Due to the Focused Build methodology, you can create a requirement for a
relevant selected structure only in the design branch.
The displayed number of requirements depends on the selected branch:
● Design branch: As the design branch is the main working area for requirements, all requirements assigned
to a structure are counted and displayed in the Requirements Management app. In this app, you can create
new or process already existing requirements. You can also create new or assign already existing work
packages.
● Development branch: All requirements with at least one work package in status In Development or higher.
● Production branch: Sum of all available requirements for a selected structure.
Work Packages
This entry is shown in all branches. However, the number diers depending on the selected branch:
● Design branch: All work packages in a status before In Development, that is, without assignments in the
development branch in status Scope Extension
Focused Build for SAP Solution Manager
End-to-End Implementation Process
PUBLIC 33

● Development branch: All work packages in status In Development or later, that is, with assignments in the
development branch
● Production branch: Sum of all available work packages
Work Items
This entry is shown in the development and production branch:
● Design branch: No work items
● Development branch: All work items
● Production branch: Sum of all available work items
2.2.4 Solution Documentation - My Documents
You can use the Solution Documentation - My Documents application to manage the documents for which you
are the owner or which you last changed.
When starting the Solution Documentation - My Documents application for the rst time, you have to select the
solution for which you want to maintain documents. My Documents has to tab pages: Owned by Me and
Processed by Me.
Owned by Me
The Owned by Me tab shows all documents that you have created or for which you have been assigned as the
owner.
Note
You can assign a document owner for a document on the Documentation tab of My Work Packages or My
Work Items.
Choose a document to view all active versions of the document in all branches. You can do the following:
● Download selected document versions
● Upload new document versions on branches without change control
● Change the status of document versions on branches without change control
● Navigate to the Solution Documentation
Processed by Me
The Processed by Me tab shows the documents that have been last changed by you on a selected branch.
Select a branch to view all document versions last changed by you . You can do the following:
● Download selected document versions
● Upload new document versions on branches without change control
● Change the status of document versions on branches without change control
● Navigate to the Solution Documentation
34
PUBLIC
Focused Build for SAP Solution Manager
End-to-End Implementation Process

2.2.5 Displaying Deleted Documentation Objects in a Work
Package or Work Item
You can display deleted structures and documents (including test steps) for the following already nished
objects:
● Requirements (just documentation structure assignments)
● Work packages
● Work items
● Requests for change
● Change documents
● Defect corrections
As a prerequisite, the objects must have a nal status, and the process structure and/or process documents
must have been deleted.
The assigned structure that has been deleted in the meantime is marked with Structure deleted in the relevant
object in the structure assignment area of the column branch.
Note
As soon as you delete the assigned structure, it is no longer possible to navigate to the solution
documentation.
Documents and test steps that have been assigned directly to the deleted structure are displayed and marked
with Assignment deleted.
However, the link to the document is still active. Once you choose the link, the system opens the document
version that was valid for the work package or work item when it was released to the productive branch (the
historical version of the document is displayed with a time stamp not older than the completion time of the
work package or work item).
This document/test step display behaviour applies to all work packages and work items with nal status.
2.2.6 Documentation Reporting Dashboard
You use the Documentation Reporting Dashboard to report on the readiness from the business process
perspective.
This application is available on the following launchpad groups:
● Solution Architect
● Business Analyst
● Project Manager
Focused Build for SAP Solution Manager
End-to-End Implementation Process
PUBLIC 35
Landing Page
On the Documentation Reporting Dashboard landing page, select a solution, a branch, and a scope. The
selection initiates the calculation of requirements, work packages, and work items in the reporting tile Business
Process Readiness.
The Business Process Readiness tile displays the number of requirements / work packages and work items
being currently implemented in the current wave (development branch) or numbers for future waves (design
branch).
Choose the Business Process Readiness tile to view the main reporting page.
This page is divided into the following areas:
● Selection area: lter for Solution, Branch, Scope, Process, and Structure Attribute / Values
● Graphical area: shows the pie charts for Requirements, Work Packages, and Work Items
● Overview area: shows the table with ltered results
Note that the selection of valid values for structure attributes is restricted by the selected scope. Only attribute
values used in the scope are proposed for ltering.
Selection Area
The selection area shows the same lter menu from the landing page. You can readjust your settings here. The
results can be reduced based on selected business processes from a preselected scope. If you select a set of
business processes, the result list is adjusted to just the requirements, work packages, and work items that
refer to the selected process structures.
Additionally, you can lter as follows:
● Filter based on structure attributes:
You can dene which structure attribute / value of business process content is relevant for the report
result.
Example: You want to see all requirements and work packages assigned to business processes where a
certain user is assigned as responsible. You can combine the lter with another standard (country or site)
and customer structure attributes.
● Change the pie chart logical operator:
○ OR: The selection of the pie chart value doesn't have eect on the other pie charts. You can select
dierent status values to match other pie charts. This is the default setting.
○ AND: The rst selection for one pie chart leads to changes to displayed status values of the remaining
two pie charts showing just dependent status values.
Example: For the development branch, you select the status In Development from the work package chart.
The pie chart for requirements shows only the status value In Realization while the work item chart shows
the status values Created, In Development, etc.
Choose Go to conrm every change.
The change in the selection area dynamically changes the display of the pie charts and the associated values in
the graphical area:
● Requirements
36
PUBLIC
Focused Build for SAP Solution Manager
End-to-End Implementation Process

● Work packages
● Work items
Use these interactive pie charts for further ltering based on the status of requirements, work packages, and
work items. After every lter selection, choose Go.
The Overview shows all ltered requirements with the corresponding work packages and work items (if they
exist already). The result table displays additional information such as:
● Current standard KPI status
● Document title that is used for the KPI calculation (as well as document type and document type
description)
● Project/wave/sprint information for appropriate objects
Further Functions
● Download the list as an Exel le
● Change View Settings :
○ Add or remove columns
○ Sort by individual columns
○ Group the items within a column
Note that Requirements, Work Packages, and Work Items are not considered in this dashboard after their
corresponding structure has been fully deleted.
2.3 Modeling Business Processes in Solution
Documentation
You use the Solution Documentation to model your business processes.
The Solution Documentation of SAP Solution Manager integrates SAP Project and Portfolio Management as
well as Change Request Management of SAP Solution Manager. You use the Solution Documentation to
document your core business processes and the system landscape. In Focused Build projects, the Solution
Documentation links your business process models and application landscape to requirements, work
packages, and documentation.
During a discovery workshop, you do the following:
● Create process denitions
A process is a set of logically related activities and executes functions in systems to achieve a business
goal. You create new processes in the column browser of the Solution Documentation.
● Create process diagrams
The graphical process editor of the Solution Documentation provides process diagrams based on the
Business Process Model and Notation (BPMN) for all business processes in your business process model.
For more information about BPMN, see http://www.bpmn.org .
Focused Build for SAP Solution Manager
End-to-End Implementation Process
PUBLIC 37

For each process denition, you can create multiple process diagrams representing dierent perspectives
on the process. For example, you can organize diagrams by participant role or by system. You can publish
your process models for feedback.
Note
There is a comprehensive description available for the graphical process editor at https://
help.sap.com/solutionmanager in the application help of SAP Solution Manager Process
Management Solution Documentation Modeling Process and Collaboration Diagrams .
● Document the application landscape
The application landscape is a description of the most important applications that are part of the
implementation scope.
● Create Solution Documentation libraries (optional)
You can create libraries for re-use content, such as process steps.
2.4 Release Management - Release Planning
In Focused Build, release managers can use the Release Management - Release Planning tile on the SAP
Solution Manager launchpad to prepare the releases for a release component and switch the release phases.
By choosing the Release Management - Release Planning tile on the SAP Solution Manager launchpad, you
access release planning functions of Focused Build in the WebClient UI.
Planning Releases
To plan a release, you do the following:
1. Create and dene major and minor releases for a release component.
2. Dene the scheduling for the major release.
3. Create a release cycle for the major release.
4. Switch the release cycle to the prepare phase.
5. Create and activate a task list for the release cycle.
For more information, see the Focused Build Conguration Guide at https://help.sap.com > Focused Build for
SAP Solution Manager
.
Switching Release Phases
You can use Release Management - Release Planning to switch the release phases:
1. In the application, open the release.
2. Choose Action and select the relevant option.
A Focused Build release cycle has the following phases:
38
PUBLIC
Focused Build for SAP Solution Manager
End-to-End Implementation Process
● Created
● Prepare
● Build
● Test
● Deployment preparation
● Deployment
● Hypercare
● Operation
● Completed
After the testing phase, you switch the release to the deployment phase before you can import the changes
(the work items that have been created and tested during the project) into the production branch.
Handling of Open Defect Corrections
When you try to set a release to the Deploy phase, there’s an automatic check whether all defect corrections
with priority 1 or 2 (high priority) that were created for the Functional Integration Test or Regression Test have
the status Handed over to Release. Otherwise, the release cannot be switched to Deploy and cannot go live.
When you set a release to the Hypercare phase, open defect corrections with priority 3 or 4 (medium/low
priority) and all other open change documents (together with the related work packages) are automatically
reassigned to the next release or wave.
Note
The Early Reassignment option available in Customizing enables you to automatically reassign open
change documents to the successor release or wave already when the release is switched to the Test
phase. This is valid only for change documents that have not reached status Handed over to Release.
For the Early Reassignment option, navigate to Customizing for SAP Solution Manager Focused Build
Release Management Congurations Dene Release Management Settings .
1. Choose the Dene Release Prole Mapping activity.
2. Choose a landscape.
3. Choose Details.
4. Select Early Reassignment.
Note
The Cross Project Reassignment option available in Customizing enables you to automatically reassign
open change documents to the successor wave/release of a project dierent than the current one. Only
change documents that have not reached status Handed over to Release can be reassigned to a successor
release. With this option activated, an additional popup will appear where you can choose the target project
and wave.
For the Cross Project Reassignment option, navigate to Customizing for SAP Solution Manager Focused
Build
Release Management Congurations Dene Release Management Settings .
1. Choose the Dene Release Prole Mapping activity.
2. Choose a landscape.
3. Choose Details.
4. Select Cross Project Reassignment.
Focused Build for SAP Solution Manager
End-to-End Implementation Process
PUBLIC 39
2.5 Release Batch Import - Scheduled Jobs
The Release Batch Import – Scheduled Jobs app helps you to monitor scheduled batch jobs of your release
batch import variants.
The app provides an overview of all recurring import jobs. This view can be ltered by the following criteria:
● Release Cycle
● Date
● RBI Variant
● Time
● Created By
● Task List ID
● System ID
The current job list can be exported as a spreadsheet. To do this, choose Export to Spreadsheet.
Note
The system displays only scheduled jobs for import variants that have the Enable Automatic Rescheduling
option selected in the scheduling options. To enable this setting, do one of the following actions:
● Open transaction SE38 and execute program /SALM/BATCH_IMPORT_TRIGGER.
● Open the Release Batch Import - Trigger app.
2.6 Release Batch Import - Trigger
The Release Batch Import – Trigger app helps you to schedule an import, based on the Customizing settings.
Tip
The in-app help provides help for the Release Batch Import - Trigger app. You can display the in-app help by
choosing the
icon.
This app provides the same functions as the report /SALM/BATCH_IMPORT_TRIGGER.
Selection
General Options
● Use Release Selection
You can specify the releases for the selection of change documents and the corresponding transport
requests.
● Use Task List Selection
Species the task list for the selection of change documents and the corresponding transport requests.
40
PUBLIC
Focused Build for SAP Solution Manager
End-to-End Implementation Process

● Import into Production Systems
If you select this checkbox, you conrm that the current run is to import into the productive system.
● Import Variant
Specify the scheduling variant to be evaluated in the run. Imports are triggered as required.
● Allow Transports of Task Lists Without Change Assigned
Transports without change document assignment are also determined (for example, transports created
directly via the task list).
● Test Mode (No Import)
The current run shows the transports that are determined with the current settings and screen
parameters. No import happens when this checkbox is selected.
● Process Only Test Transports
Only test transports (transport of copies and ToCs) are to be imported for the transport selection.
E-Mail Notication
● Enable E-Mail Notication
Determines if an e-mail is to be sent in case of import errors.
Scheduling Options
● Enable Automatic Rescheduling
Reschedule jobs automatically.
● Name of Job
In case of a re-schedule, the release batch import job is run again with the job name that has been entered.
You can monitor this through the Job Scheduler (transaction SM37).
Note
The time for completing the whole run of the release batch import is calculated. This prevents
overtakes.
Check Options
● Enable Downgrade Protection
Activates the downgrade protection for the transports that are in the import selection from the Release
Batch Import job.
● Transport-Related Check Framework
Uses the transport related check framework for the downgrade protection check.
● Legacy DGP Check
Uses the legacy downgrade protection check.
● Skip Downgrade Transports
When a downgrade is detected, the release batch import job stops running and the user is requested to
correct this. You can import all the other transports that are not involved in the detected downgrade.
Note
This does not work if a productive system is detected as the target system.
● Enable Relation Checks
Enables checks for predecessor documents that are in the import selection from the release batch import
job.
● Check Change Doc Precedessors
Focused Build for SAP Solution Manager
End-to-End Implementation Process
PUBLIC 41

Checks that the predecessors of change documents that are included in the import selection are also in
the import selection of the Release Batch Import job and ready to import. This option looks for the
predecessor of the single change document in one work package.
● Check for Complete WP Import
Checks that the predecessors of all change document in a work package are also in the import selection of
the release batch import job.
● Check Work Package Precedessors
Checks that the work package has predecessors and that these are also in the import selection.
2.7 Release Batch Import – Log
The Release Batch Import – Log app helps you to monitor run batch import jobs. The log data that is provided
here is restricted to a 10-day period that you can select.
The table view on the landing page shows an overview of the run batch import jobs (SLG1) of your chosen 10-
day period. For each batch import log, information is provided about:
● Date
● Time
● User
● Number (of messages)
Each log entry in the table view is color-coded:
● Green = ok
● Yellow = warning
● Red = error
By choosing a log of a specic date in the table view, you can access more detailed information.
Note
You can Re-Run or Delete the automatic status setting job that was triggered by the batch import job. Use
transaction SE38 and execute program /SALM/BATCH_IMPORT_STAT_BUFFER.
42
PUBLIC
Focused Build for SAP Solution Manager
End-to-End Implementation Process

2.8 Managing Projects
Project managers can use the Project Management - Focused Build Projects application and the project
management functions of SAP Portfolio and Project Management (SAP PPM ) integrated in SAP Solution
Manager to plan and maintain projects.
Project Management - Focused Build Projects
The Project Management - Focused Build Projects application is designed for planning and scheduling Focused
Build projects. You can perform all essential project management activities with this application. For some
advanced activities, for example maintaining relationships between project elements, you navigate directly to
the standard Project Management UI in SAP Solution Manager.
For more information about this application, see Project Management - Focused Build Projects [page 45].
Tip
The in-app help (formerly the Web Assistant) provides help for the Project Management - Focused Build
Projects app. You can display the in-app help by choosing the icon.
Project Management in SAP Solution Manager
SAP Solution Manager is integrated with the project management functions of SAP Portfolio and Project
Management (SAP PPM). You can access the standard Project Management UI by choosing My Projects on the
SAP Solution Manager launchpad. In Focused Build, the standard Project Management UI is extended by
additional functions, such as the integration of risk management and test management and the linking with
related work packages.
The projects are structured in phases, project tasks and subtasks, and milestones. In the Focused Build project
templates, the waves and sprints are task types and the quality gates are a milestone type. When you open a
project in the Project Management UI, you can see the project structure in the Structure - Detail view. There you
can edit the structure of a project by adding, deleting, or moving the project elements and you can select and
edit individual project elements.
If you have opened a project in the standard Project Management UI, you can choose Open in UI5 App to view
the same project in the Project Management - Focused Build Projects app.
Activities
For Focused Build projects, you perform the following activities:
● Create projects
Focused Build for SAP Solution Manager
End-to-End Implementation Process
PUBLIC 43
To create a project, you have three options:
○ By template
○ By user input
○ By using the Easy Project Setup
For more information, see Creating Focused Build Projects [page 47]
● Assign build projects to main project
● Edit project structures
You adapt the precongured project structure to the actual project scope by adding or deleting waves,
sprints, or milestones. For more information, see Adjusting the Project Structure for Waves and Sprints
[page 53]
● Assign releases to the projects
You assign a release component and a release to a project and you specify the releases in which the waves
are implemented. For more information, see Assigning Projects and Waves to Releases [page 51].
● Schedule project tasks and milestones
You can schedule individual project dates manually.
● Release your projects
When you release a project, the work packages assigned to the project can be processed. Only when the
project is released, is the project data visible in the Solution Readiness Dashboard and other dashboard
applications of Focused Build.
● Manage risks and issues
For more information, see Managing Risks and Issues [page 60].
You can also do the following in the standard Project Management UI:
● Create and maintain relationships between project elements
You can map the dependencies between the project elements by conguring predecessor and successor
relationships for each project task or milestone on the Relationships tab page of the Detail view of the
standard Project Management UI. For example, you can congure that a specic quality gate has to be
nished before a new project phase starts.
● Include work packages in the project structure
You can display the work packages assigned to the project and you can add the work packages as project
tasks to the project structure. For more information, see Adding Work Packages to the Project Structure
[page 62].
Related Information
Solution Readiness Dashboard [page 62]
2.8.1 Project Templates and Project Types
To create a new project, you select a project type and template.
A project template generates the basic project structure with project phases, project tasks, quality gates (Q-
gates) and other milestones. A project template contains the typical workow of a project. You can adapt the
project structure as needed.
44
PUBLIC
Focused Build for SAP Solution Manager
End-to-End Implementation Process
There are templates for the following Focused Build project types:
● Focused Build single project
You use Focused Build single projects if you want to manage all tasks in one project.
● Focused Build main project
You use Focused Build main and build projects for larger projects that are implemented by several teams.
The main project denes the timeline and overall schedule for the project.
● Focused Build build project
Build projects can run in parallel and can be implemented by dierent teams, for example, you can set up
build projects for dierent systems.
● Focused Build maintenance project
A Focused Build maintenance project is a project that is used for correcting errors. It has only a single wave
with a single sprint.
Note
The Focused Build maintenance project type is obsolete. It is recommended to use the Fix Pace
process instead. For more information, see Fix Pace [page 109].
2.8.2 Project Management - Focused Build Projects
You can use the Project Management - Focused Build Projects application for planning and scheduling Focused
Build projects.
You can start Project Management - Focused Build Projects from the SAP Solution Manager launchpad. The
application has a landing page and a project view.
Landing Page
On the landing page, the projects are displayed in the project list. To nd specic projects, you can specify
selection criteria in the lter bar and choose Go.
Tip
You can also mark projects as favorites and then use the Favorite lter to display only the projects that you
have marked as favorites.
On the landing page, you can do the following:
● Create projects.
● Assign build projects to main projects.
● Add build projects to existing synchronized main projects.
Note
With report /SALM/FB_PROJECT_SYNC, you can do the following:
- Enable synchronization between existing Main and Build Projects for new Waves
Focused Build for SAP Solution Manager
End-to-End Implementation Process
PUBLIC 45

- Disable synchronization between projects
- Perform housekeeping for synchronization data
For more information, see the detailed documentation in the report view under .
● Open the project view for a project.
Creating and Using Variants
Filters for the project status values Created, Locked, and Released are predened in the delivered Standard
variant.
You can save the lter settings of a search as a variant:
1. Set the lters and run a search.
2. Choose the variant switch.
3. Choose Save As.
4. Enter a name for the variant.
To use a variant, choose the variant switch and select the variant.
Project View
You edit and schedule a project in the project view. To open the project view for a project, on the landing page in
the project list, choose the project ID or project name.
The project view contains the following features:
● Tree view and table view
The tree view of the project structure contains the project elements, that is, the waves, sprints, and
milestones of the project. The table next to the tree view contains elds for the start dates, the end dates,
and sort numbers of the project elements that are used to schedule the project. Other elds contain
information about the releases and the work packages and work items assigned to the project elements.
● Gantt chart
The Gantt chart visualizes the scheduling of the project elements on a timeline. In the Gantt chart of a main
project, you can expand (or collapse) the structure for the underlying build projects and edit the related
dates and project details.
● Details pane
The Details pane contains basic information about the project or the project element.
To open the Details pane for the project or for a project element, such as a wave or a sprint, in the tree view,
select the header row or select the row of the respective project element and then choose the Details
button.
In the Details pane, you can do the following:
○ Assign a release to the project and the waves.
○ Set the severity.
○ Maintain details, such as the name and a description.
○ Assign or change the person responsible for the project by rst choosing the responsible role and then
the responsible resource. To unassign a responsible resource, click on the
icon (clean) left in the
eld.
46
PUBLIC
Focused Build for SAP Solution Manager
End-to-End Implementation Process
● Link to the Solution Documentation
You can open a window to view the solution, the branch, and the change cycle of the release component
assigned to the project. From there, you can directly navigate to the solution, branch, and change cycle in
the Solution Documentation.
If you have already assigned the project to a release and thereby to a solution and a branch, you can assign
public scopes dened in the Solution Documentation to the project.
● Work Packages and Work Items
You can navigate to the related work packages or work items in the Mass Change Operations app.
● Risks
You create risk documents for the project.
● Link to the project in the Project Management UI of SAP Solution Manager
Choose the project ID to navigate to the standard Project Management UI of SAP Solution Manager if you
want to use advanced functions.
● Open the Solution Readiness Dashboard
You can open to the Solution Readiness Dashboard to check the status of the project.
2.8.3 Creating Focused Build Projects
Context
You can create projects on the landing page of the Project Management - Focused Build Projects application. To
create a project, you have three options:
● By template
You select a Focused Build project template that is suitable for the project type. A project template
contains a basic project structure of phases, waves, sprints, and milestones. For more information about
Focused Build project templates, see Project Templates and Project Types [page 44]
● By user input
You can create projects on the y by providing the most important input data, such as project type, start
date, number of waves / sprints, and project language. Moreover, the detailed schedule can be maintained
manually.
● By using the Easy Project Setup
With this wizard, you can create a synchronized schedule that has the same duration and timing for all
waves, sprints, and related Q-gates or milestones, choose Easy Project Setup. For more information, see
Easy Project Setup [page 48].
If you want to create a project with an individual schedule - either by using a template or by providing your own
input, follow the steps described below.
Procedure
1. On the landing page of Project Management - Focused Build Projects, in the tool bar, choose Create Project.
2. Choose Create Project By Template or Create Project by User Input.
3. Enter the project details.
Focused Build for SAP Solution Manager
End-to-End Implementation Process
PUBLIC 47

Note
For more information about Focused Build project templates, see Project Templates and Project Types
[page 44].
4. Choose Create.
Results
On the landing page, you can use the lters in the lter bar to nd the newly created project. By choosing the
project ID or project name you can open the project view.
Next Steps
● Assign a release to the project.
For more information, see Assigning Projects and Waves to Releases [page 51].
● Release the project.
To release the project, change the status of the project in the Details pane.
Only when the project is released, it is visible in the Solution Readiness Dashboard and you can assign work
packages to the project. You can also lock, complete, or cancel the project.
● Assign the work packages to the waves of the project. To assign work packages, you use the Work Package
Management application. For more information, see Dening Work Package Details [page 78].
● Adapt the project structure by adding waves or sprints to an existing project or by deleting them. For more
information, see Adjusting the Project Structure for Waves and Sprints [page 53].
2.8.3.1 Easy Project Setup
Easy Project Setup is a guided procedure to set up Focused Build projects.
Context
You use the Easy Project Setup procedure to synchronously schedule multiple main projects, build projects, or
single projects.
Easy Project Setup provides the following:
● Agile project approach: Timing of sprints, waves, and phases
● Timing of Q-Gates and milestones
● Creation of projects and release assignment
● Wave / release number assignment
48
PUBLIC
Focused Build for SAP Solution Manager
End-to-End Implementation Process

● Project naming and creation for main/build projects
● Option to create main/build projects as synchronized projects
Note
With report /SALM/FB_PROJECT_SYNC, you can do the following:
- Enable synchronization between existing Main and Build Projects for new Waves
- Disable synchronization between projects
- Perform housekeeping for synchronization data
For more information, see the detailed documentation in the report view under .
If you want to create an individual schedule, you can use the manual approach. On the landing page of the
Project Management app, choose Create Project. For more information, see Creating Focused Build Projects
[page 47].
Prerequisites
● You have dened a change control landscape.
● You have dened releases and assigned them to a change control landscape.
Procedure
The procedure consists of several steps. In the Easy Project Setup wizard, you can see the current step and
navigate between steps using the navigation bar at the top of the window. You can adjust the displayed default
values to your needs.
1. On the landing page of the Project Management app, choose Easy Project Setup.
The Easy Project Setup wizard opens.
2. On the Agile Project Approach tab page, you dene sprints, waves, and phase durations.
3. On the Q-Gates and Milestones Approach tab page, you dene the following:
○ Timing of Q-gates related to phase or wave end dates
○ Timing of milestones related to wave and sprint timeframes
4. On the Creation of Projects and Release Assignment tab page, you dene the following:
○ Project start date
○ Project type: Choose to create a Main Project with multiple build projects or one Single Project.
○ Number of parallel build projects
○ Choose the Synchronized date / status update via Main Project option if you want to enable
synchronizing of status, dates, and sorting number of projects, phases, and tasks between the main
project and its related build projects.
Focused Build for SAP Solution Manager
End-to-End Implementation Process
PUBLIC 49
Note
This update process works only in one direction – from main project to build projects – and only
takes place after saving the main project. Synched projects are marked with in the project list on
the landing page and in the detail view.
○ Release
5. On the Wave / Release Number Assignment tab page, you can assign dedicated releases per wave. Check if
Project Waves / End Date is consistent with the Release Go-Live Date. You can adjust either the wave
schedule in the wizard or the release schedule in Release Planning.
6. On the Project Naming and Creation for Main/Build Projects tab page, you dene the following:
○ Project IDs and project names of your projects
○ Main language and additional language for your projects (optional)
7. To start the project creation and scheduling, choose Create Projects.
2.8.4 Assigning Build Projects to Main Projects
Context
You assign build projects to main projects on the landing page of the Project Management - Focused Build
Projects application.
Procedure
1. On the landing page of Project Management - Focused Build Projects, in the lter bar, specify search criteria
to nd your main project.
2. In the result list, select the main project.
3. In the tool bar, choose Assign Build.
A window with the available build projects opens.
4. Select the build projects that you want to assign to the main project and choose Assign.
Note
This procedure also works the other way around: You can also select a build project and assign a main
project to it.
50
PUBLIC
Focused Build for SAP Solution Manager
End-to-End Implementation Process

2.8.5 Assigning Projects and Waves to Releases
Assign the project as a whole to a change control landscape. You can then assign the waves of the project to
specic release numbers.
Context
Note
You must assign a project to a change control landscape and the waves to a release number before you can
set the project status to Released. Once a project is in status Released, it is ready for you to assign work
packages to it, but in consequence, you cannot change the assignment of the change control landscape
anymore. The assignment of a wave/release can also be changed later depending on the status of the
release number.
When you assign a release to your project, you determine the following:
● You link the project to a change control landscape, which means the systems and applications of a solution
that should get the same release schedule planned via various release numbers/cycles.
● The change control landscape automatically links the project to a solution and branch.
When you have assigned the project to a change control landscape, you can assign the waves of the project to
specic release numbers.
Procedure
1. To open the project view, choose the project name on the landing page of Project Management - Focused
Build Projects.
2. To switch to edit mode, choose the edit icon in the toolbar.
3. To open the dialog for assignment of change control landscape and release numbers, choose the Solution/
Release Assignment button.
4. In the dropdown list of the led change control landscape, select the relevant entry.
5. In the Wave list you can now assign the right release number to each wave.
The dialog ensures that higher waves can’t be assigned to lower release numbers to ensure a consistent
sequence.
6. To save your settings, close the Solution/Release Assignment dialog and choose the save icon in the
toolbar.
Check the Save column next to the project name in the tree view: A warning icon is displayed in the Save
column if the settings have not yet been saved.
Focused Build for SAP Solution Manager
End-to-End Implementation Process
PUBLIC 51

Results
By selecting a change control landscape for your project, you have also permanently linked the project to a
solution, a branch. The assignment of the release number to a wave can be changed.
2.8.6 Scheduling Projects
Context
Using the Project Management - Focused Build Projects app, you schedule the project as a whole and the
individual project tasks.
When creating a project in Project Management - Focused Build Projects, you specify a start and an end date for
the project. You can change these dates in the project view. Here you also specify dates for the start and end
date for project phases, waves and sprints, and milestone dates. In the project view, the dates that you have
scheduled manully are displayed in black. Dates that have been calculated by the app are displayed in gray.
Only the manually scheduled dates are used in Focused Build, for example, for KPI ratings.
Note
You must adjust all dates manually. The dates for project tasks that are superior or subordinate in the
project structure are not automatically adjusted if the data of superior or subordinate project tasks
changes. For example, if you postpone a wave, the dates for the sprints or milestones of the wave are not
automatically adjusted.
Note
If you want to benet from automatic update synchronization between main project and build projects, you
should use the The Easy Project Setup wizard. For more information, see Easy Project Setup [page 48].
Procedure
1. To open the project view of the project, choose the project on the landing page of Project Management -
Focused Build Projects.
2. In the project view, activate the edit mode by choosing the edit icon in the tool bar.
3. To display the table next to the tree view, hide the Gantt chart.
4. In the table next to the tree view, use the elds in the Start Date and End Date columns to change projects
dates:
○ To change the start or end date of the project, select the top node of the tree view (the project name)
and change the dates in the Start Date or End Date column.
52
PUBLIC
Focused Build for SAP Solution Manager
End-to-End Implementation Process

○ To change the dates for a project phase, a wave or a sprint, select the wave or sprint in the tree view
and change the dates in the Start Date or End Date column.
○ To change a milestone date, select the milestone in the tree view and change the date in the End Date
column.
5. Save your changes.
Check the Save column next to the project name in the tree view: If the settings have not yet been saved, a
warning icon is displayed in the Save column.
2.8.7 Adjusting the Project Structure for Waves and Sprints
The project template denes the project structure with phases, waves, and sprints. You can adjust this
structure by adding or deleting waves and sprints. You can adjust the project structure as follows:
● Creating waves and sprints from scratch to be added to an existing project. For more information, see
Creating Waves and Sprints to be Added to the Project Structure [page 54].
● Copying existing waves and sprints to the project structure. For more information, see Copying Waves and
Sprints to the Project Structure [page 54].
● Deleting waves and sprints. For more information, see Deleting Waves and Sprints from the Project
Structure [page 55].
Note
For the Realize phase, it is important to keep the default structure and only add new waves, sprints, or add
common tasks at any existing structure level. Manually modifying the structure could impact the general
Focused Build integration scenario Requirements-to-Deploy. For reference, the default structure with
project element types:
● Level 1: Project
● Level 2: Phase Type - Sprint Planning
● Level 3: Task Type - Quality Gate (Phase Q-Gate)
● Level 3: Task Type - Wave
● Level 4: Task Type - Scope Denition
● Level 4: Task Type - Quality Gate (Wave Q-Gate)
● Level 5: Task Type - Summary Task for Work Packages
● Level 5: Task Type - Milestone (for Wave)
● Level 5: Task Type - Sprint Execution
● Level 6: Task Type - Summary Task for Work Items
● Level 6: Task Type - Milestone (for Sprint)
Focused Build for SAP Solution Manager
End-to-End Implementation Process
PUBLIC 53

2.8.7.1 Creating Waves and Sprints to be Added to the
Project Structure
Context
The project template denes the project structure with phases, waves, and sprints. You can adjust this
structure by deleting or adding waves and sprints. Here, you learn how to create waves or sprints from scratch
to be added to your project structure.
Note
For synchronized projects, you can add a new wave or sprint only in the main project. From there, the
change is automatically synchronized to the build projects.
Procedure
1. To open the project view of the project, choose the project on the landing page of Project Management -
Focused Build Projects.
2. In the project view, activate the edit mode by choosing the edit icon in the tool bar.
3. Select a wave or sprint in the tree view.
4. In the tool bar, choose the ( ) icon to create a new wave or sprint.
5. In the dialog box, enter the parameters that are required.
6. Choose Create.
Related Information
Copying Waves and Sprints to the Project Structure [page 54]
Deleting Waves and Sprints from the Project Structure [page 55]
2.8.7.2 Copying Waves and Sprints to the Project Structure
Context
The project template denes the project structure with phases, waves, and sprints. You can adjust this
structure by adding or deleting waves and sprints. Here, you learn how to copy existing waves or sprints to your
project structure.
54
PUBLIC
Focused Build for SAP Solution Manager
End-to-End Implementation Process

Note
For synchronized projects, adding a new wave or sprint is possible only in the main project. From there, the
change is automatically synchronized to the build projects.
Procedure
1. To open the project view of the project, choose the project on the landing page of Project Management -
Focused Build Projects.
2. In the project view, activate the edit mode by choosing the edit icon in the tool bar.
3. Select a wave or sprint in the tree view.
4. In the tool bar, choose the ( ) icon to copy a wave or sprint.
5. In the dialog box, enter the parameters that are required.
6. Choose Create.
Related Information
Creating Waves and Sprints to be Added to the Project Structure [page 54]
Deleting Waves and Sprints from the Project Structure [page 55]
2.8.7.3 Deleting Waves and Sprints from the Project
Structure
Context
The project template denes the project structure with phases, waves, and sprints. You can adjust this
structure by adding or deleting waves and sprints. Here, you learn how to delete waves or sprints from your
project structure.
Procedure
1. To open the project view of the project, choose the project on the landing page of Project Management -
Focused Build Projects.
2. Select the wave or sprint in the tree view.
3. In the tool bar, choose the ( ) icon to delete waves or sprints.
4. Choose Conrm to delete the selected wave or sprint.
Focused Build for SAP Solution Manager
End-to-End Implementation Process
PUBLIC 55

5. Check the Save column next to the project name in the tree view: A warning icon is displayed in the Save
column if the settings have not yet been saved.
Related Information
Creating Waves and Sprints to be Added to the Project Structure [page 54]
Copying Waves and Sprints to the Project Structure [page 54]
2.8.8 Simplied Task Management for Additional Task Types
Learn more about creating, editing, and deleting generic tasks in the project structure.
In Project Management - Focused Build Projects, you can use an additional task type that is called Common
Task for Focused Build projects. This generic task type enables you to dene your own custom tasks for your
projects. You can perform the following actions:
● Making Additional Task Types Visible [page 57]
● Creating Additional Task Types [page 57]
● Editing Additional Task Types [page 58]
● Deleting Additional Task Types [page 59]
Note
The optional Conrm Project Tasks SAP Fiori application, which is not part of Focused Build but can be
installed additionally, is a useful tool when you work with additional task types. For more information, see
Conrm Project Tasks.
Note
For the Realize phase, it is important to keep the default structure and only add new waves, sprints, or add
common tasks at any existing structure level. Manually modifying the structure could impact the general
Focused Build integration scenario Requirements-to-Deploy. For reference, the default structure with
project element types:
● Level 1: Project
● Level 2: Phase Type - Sprint Planning
● Level 3: Task Type - Quality Gate (Phase Q-Gate)
● Level 3: Task Type - Wave
● Level 4: Task Type - Scope Denition
● Level 4: Task Type - Quality Gate (Wave Q-Gate)
● Level 5: Task Type - Summary Task for Work Packages
● Level 5: Task Type - Milestone (for Wave)
● Level 5: Task Type - Sprint Execution
● Level 6: Task Type - Summary Task for Work Items
● Level 6: Task Type - Milestone (for Sprint)
56
PUBLIC
Focused Build for SAP Solution Manager
End-to-End Implementation Process

2.8.8.1 Making Additional Task Types Visible
Learn how to make additional task types visible in the Focused Build - Project Management application.
Context
If you want to use generic tasks in the project structure, you must make sure that they are visible in the
Focused Build - Project Management application. Perform the following steps to make the generic tasks visible.
Procedure
1. To make the additional task type visible in the Focused Build Project Management application, navigate to
Customizing for
SAP Solution Manager Focused Build Project Management Conguration Focused
Build Projects – Task Type Visibility
.
The Change View “Focused Build Projects - Task Type Visibility” opens.
2. Choose New Entries.
3. To add an additional task of type, for example, Common Tasks for Focused Build Project to the Task Type
Visibility table view, enter /SALM/TASK in the Task Type column.
4. Save your changes.
2.8.8.2 Creating Additional Task Types
Learn how to create generic tasks in the project structure.
Prerequisites
In Customizing, you have made the additional task types visible. For more information, see Making Additional
Task Types Visible [page 57]
Context
Follow this procedure if you want to create generic tasks of type Common Task for Focused Build project in the
Project Management - Focused Build Project application.
Focused Build for SAP Solution Manager
End-to-End Implementation Process
PUBLIC 57
Procedure
1. On the landing page of Project Management - Focused Build Projects, choose the project.
The project view opens.
2. To add a task to your project, select an existing project element, for example a phase, and switch to edit
mode ( ).
3. Choose the icon.
4. Choose Create Task to create a new task on the same hierarchy level or Create Subtask to create a new task
one level below the selected project element.
5. Select a task type, for example, Common Tasks for Focus Build Project.
6. Enter the information required and choose Create.
Related Information
Editing Additional Task Types [page 58]
Deleting Additional Task Types [page 59]
2.8.8.3 Editing Additional Task Types
Learn how to edit generic task types in the project structure.
Context
Follow this procedure if you want to edit generic tasks of type Common Task for Focused Build project in the
Project Management - Focused Build Project application.
Procedure
1. Choose the project on the landing page of Project Management - Focused Build Projects.
The project view opens.
2. Select the task that you want to edit and switch to edit mode ( ).
3. Open the Details pane ( ).
4. Make your changes and Save.
58
PUBLIC
Focused Build for SAP Solution Manager
End-to-End Implementation Process
Related Information
Creating Additional Task Types [page 57]
Deleting Additional Task Types [page 59]
2.8.8.4 Deleting Additional Task Types
Learn how to delete generic task types from the project structure.
Context
Follow this procedure if you want to delete generic tasks of type Common Task for Focused Build project in the
Project Management - Focused Build Project application.
Procedure
1. Choose the project on the landing page of Project Management - Focused Build Projects.
The project view opens.
2. Select the task that you want to delete and switch to edit mode ( ).
3. To delete the task, choose the icon.
You have deleted the task.
Related Information
Creating Additional Task Types [page 57]
Editing Additional Task Types [page 58]
2.8.9 Multi-Language Maintenance of Projects
Projects are by default displayed in the language that you have selected when logging on to the system.
To display the project in a dierent language version, in the project view in the Language eld, select the
language.
By editing the details of the project or project elements in the Details pane, you can maintain and translate the
names and descriptions for the project elements in the currently displayed language version.
Focused Build for SAP Solution Manager
End-to-End Implementation Process
PUBLIC 59
2.8.10 Managing Risks and Issues
Risk management helps you to stay aware of possible risks and to react appropriately to changes. After the
initial risk assessment, you monitor your risks and measures to eectively implement risk management.
You can use the following applications for risk management in Focused Build:
● Project Management - Focused Build app
You can create and maintain risks (risk documents) for a project in the Project Management - Focused Build
app.
● Standard Project Management UI
You can also use the the Risk tab page of the standard Project Management UI to create and maintain risks.
● My Risks
You can use the My Risks application to maintain the details of risks and to assign a risk owner and a risk
responsible (risk processor).
● Solution Readiness Dashboard
You can monitor the risks of a project with the Risks tile of the Solution Readiness Dashboard. The Overview
tab of the Risks tile shows the risk levels of the risks of the project.
You use issue management to document issues that come up during the project and need to be resolved. You
can create and maintain issues for a project in the standard Project Management UI. You ca check the issues of
a problem in the Solution Readiness Dashboard on the Issues tile.
You can use the following applications for issue management in Focused Build:
● Project Management
You create and maintain issues for a project in the standard Project Management UI.
● Solution Readiness Dashboard
You can monitor the issues of a project with the Issues tile of the Solution Readiness Dashboard.
2.8.10.1 Creating Risk Documents for a Project
Procedure
1. To open the project view of the project, choose the project on the landing page of Project Management -
Focused Build Projects.
2. In the header of the project view, choose Risks.
The Risks window opens.
3. In the Risks window, choose the + icon (Create Risk).
The Create Risk popup window opens.
4. In the Create Risk window, enter a name for the risk and other risk details, such as a description, priority,
and a risk owner.
You can select an estimated impact level and a probability level (low, medium, or high). The values that you
select for the impact and the probability are used to calculate the risk level.
5. Choose Create and then save your settings.
60
PUBLIC
Focused Build for SAP Solution Manager
End-to-End Implementation Process
2.8.10.2 Changing Risk Details in My Risks
Context
You use the My Risks application to update and change the details of risks assigned to you as risk owner or risk
processor. For example, you can dene the probability and impact for a risk and assign it to a risk processor.
Procedure
1. Start the My Risks application from the SAP Solution Manager launchpad.
2. In the Risks list, choose the risk.
3. To change risk details, choose the edit icon in the tool bar.
4. Change risk details.
On the Details tab, you can, specify, among other things, the probaility and impact of the risk, which are
used to calculate the risk level or you can assign a risk processor.
On the Dates tab, you can specify the date on which a solution to the risk is required. On the Texts tab and
the Attachments tab, you can can write comments or attach les to further describe the risk.
5. Save your changes.
2.8.10.3 Documenting Issues for a Project
Procedure
1. To open the project view of the project, choose the project on the start page of Project Management -
Focused Build Projects.
2. To navigate to the standard Project Managment UI, choose the project ID above the tree view.
The standard Project Management UI opens with the Detail view of the project. In the project structure, the
header, that is the project name, is preselected.
3. Go to the Issues tab page.
4. Choose Create
5. Enter a priority, a short text, and a due date. Enter a description for the issue. You can add les to
document the issue.
6. Conrm and save your settings.
Focused Build for SAP Solution Manager
End-to-End Implementation Process
PUBLIC 61

2.8.11 Adding Work Packages to the Project Structure
Using the standard Project management UI, you can display the work packages assigned to the project and add
them as project tasks to the project structure.
Prerequisites
You have assigned work packages to the project in the Work Packages Management application.
Context
If you add the work packages of a project to the project structure, you can schedule them as project tasks.
Procedure
1. To open the project view of the project, choose the project on the landing page of Project Management -
Focused Build Projects.
2. To navigate to the standard Project Management UI, choose the project ID above the tree view.
The standard Project Management UI opens with the Detail view of the project. In the project structure, the
header, that is the project name, is preselected.
3. Go to the Work Package tab page.
The Work Package tab page shows the work packages that are assigned to the project.
4. To add the work packages to the project structure, choose Create Tasks.
5. Save your settings.
2.8.12 Solution Readiness Dashboard
You use the Solution Readiness Dashboard to monitor the progress, issues, and milestones of projects.
The Solution Readiness Dashboard refers to the structure and scheduling of the project. Across all phases of a
project, status reporting is available based on extracted data from the Focused Build applications to give you
an overview of the current status of the project.
To use Solution Readiness Dashboard, you need to have dened KPIs in the Customizing for SAP Solution
Manager Focused Build Projects Dashboard Congurations .
62
PUBLIC
Focused Build for SAP Solution Manager
End-to-End Implementation Process
Tip
You can congure and save views that determine which tiles are visible on the dashboard for build projects
and main projects. When you open the Solution Readiness Dashboard, you can select the view that you
want to use. The selected view persists when you close and reopen the Solution Readiness Dashboard.
Tiles on the Solution Readiness Dashboard
In the Solution Readiness Dashboard, which can be found in the Focused Build - Architect launchpad group,
select a project and optionally a view to display aggregated information about the selected project on the tiles
specied in the view.
Choosing the refresh timer button ( ), you can trigger a onetime or frequent refresh of the dashboard data for
the following Focused Build entities:
● Requirements, work packages, and work items
● Defect corrections
● Projects and risks
The refresh function has a delay of 20 – 40 seconds. The refresh is triggered for the currently selected project.
In some tiles, you can open a detailed view. You can use the breadcrumb navigation to switch between the
detail view and the dashboard.
The following tiles are available for the Solution Readiness Dashboard:
Tiles on the Solution Readiness Dashboard
Tile Content
Overall Status This data is extracted directly from the project. You set the status value manually in
the Project Management - Focused Build application, which enables you to override
automatic reporting if necessary. Choose the Overall Status tile to navigate to the
project in the Project Management - Focused Build Projects application.
Next Q-Gate Due In The number of days until the next quality gate. All quality gates of the project are con
sidered for calculating the remaining days leading to the end date of the next quality
gate.
Focused Build for SAP Solution Manager
End-to-End Implementation Process
PUBLIC 63
Tile Content
Work Packages The number of work packages that are assigned to the selected project. Choose the
Work Packages tile to check the details:
● The Schedule tab shows how many work packages of which category are sched
uled in which wave.
● The Eort tab shows information about Planned Eort and Actual Eort per
wave.
● The Details tab shows the details of the work packages. You can see the eort in
the columns Planned Eort and Actual Eort. The actual eort includes all eorts
of the displayed work package, related work items, and related defect correc
tions.
To view a work package in the My Work Packages application, choose the work
package ID. You can also navigate to the Mass Change Operations application by
selecting several lines and choosing Go to Mass Change.
Work Items The number of work items that are assigned to the work packages of the selected
project. Choose the Work Items tile to check the details:
● The Type tab shows the work items per category.
● The Details tab displays more details of the work items.
To view a work item in the My Work Items application, choose the work item ID.
You can also navigate to the Mass Change Operations application by selecting
several work items of the same type and choosing Go to Mass Change. (The op
tion to navigate to the Mass Change Operations application is not available if you
select work items of dierent types.)
Functional Gaps The number of functional gaps that are identied for the selected project. Choose the
Functional Gaps tile to display an overview table of the functional gaps.
Requirements All requirements assigned to the selected project. There are the following status cate
gories: Unassigned, To Be Scoped, In Progress and Completed. Choose a requirements
category to check the details for requirements with this status.
Alternatively, you can choose the tile to view the complete list of requirements.
To view a requirement in the My Requirements application, choose the requirement
ID. You can also navigate to the Mass Change Operations application.
Schedule This tile shows the percentages of project tasks according to their statuses. Choose a
task status to display an overview table of the tasks with this status. To view a task in
the Project Management UI, choose the task description in the overview table.
64 PUBLIC
Focused Build for SAP Solution Manager
End-to-End Implementation Process
Tile Content
Current Wave Progress The actual completion rate in percentage across all work packages that are in scope
of the current wave. Choose the Current Wave Progress tile to check the details:
● The Schedule tab displays the progress of the work packages of a selected wave.
The display includes a timeline of sprints and milestones for single functional
tests. If you want to view a more detailed view of the current wave progress, you
can also display the progress for work items per sprint by choosing
Current Wave
Progress for Work Items.
On the Work Items (Current Wave) tab, you can view the progress of the work
items of a wave. The display includes a timeline of sprints and milestone for sin
gle functional tests. If you select a dedicated sprint from the Sprint dropdown
menu, the milestone for Unit Test Completed is displayed.
You can navigate to the Mass Change Operations application.
● In the Wave Progress diagram, the work packages or work items are grouped by
default into four dierent groups according to their status. You can customize
this mapping of work package and work item statuses to status groups as well as
the semantic color of status groups. To change the settings for predened status
groups, navigate to Customizing for
SAP Solution Manager Focused Build
Dashboard Congurations Status groups for SRD Current Wave Progress tile .
Here you can change the mapping and the color of status groups.
● The KPIs tab displays the status of the documents for the work packages of the
selected wave.
You also see the percentages of work items according to status and due date
(from milestone).
Risks The number of identied project risks assigned to the project. Choose the Risks tile to
check the details:
● The Overview tab shows a matrix that visualizes the risk levels of the risks. The
risk levels are determined by the impact and probability of the risks.
● The Details tab shows details of the risks. To view a risk in the My Risks applica
tion, choose the risk ID.
Issues The number of identied project issues. The issues are rated according to their prior
ity. Choose the Issues tile to check the details.
Scope Change The percentage of work packages that are scope changes. Scope changes are work
packages that have been newly created since the initial denition of the project scope.
Choose the Scope Change tile to display an overview table of the scope changes.
To view a work package in the My Work Packages application, choose the work pack
age ID in the table.
Focused Build for SAP Solution Manager
End-to-End Implementation Process
PUBLIC 65
Tile Content
Functional Specication availability An overview of the percentage of functional specications in the scope that are com
pleted, to be done, or overdue, or for which the milestone Functional Specication
Completed has not been set.
Choose a status category to view the details of the work packages that have a func
tional specication with the selected status in an overview table.
To view a work package in the My Work Packages application, choose the work pack
age ID in the table. You can also navigate to the Mass Change Operations application.
Technical Design availability An overview of the percentage of technical design documents created for the work
items in the scope that are completed, to be done, or overdue, or for which the mile
stone Technical Design Released has not been set.
Choose a status category to view the details of the work items that have a technical
design document with the selected status in an overview table.
To view a work item in the My Work Items application, choose the work item ID in the
table. You can also navigate to the Mass Change Operations application.
Development An overview of the percentage of work items for which the development is completed,
to be done, or overdue, or for which the milestone Build Finished has not been set.
Choose a status category to view the details of the work items with the selected sta
tus in an overview table.
To view a work item in the My Work Items application, choose the work item ID in the
table. You can also navigate to the Mass Change Operations application.
Unit Test An overview of the status of the unit tests for the work items. You see the percentage
of unit tests that are completed, to be done, overdue, or for which the milestone Unit
Test Completed has not been set.
Choose a status category to view the details of the work items that have a unit test
with the selected status in an overview table.
To view a work item in the My Work Items application, choose the work item ID in the
table. You can also navigate to the Mass Change Operations application.
Defect Corrections in Single
Functional Test
An overview of the status of defect corrections that have been created for single func
tional tests and that are also assigned to a work package. You see the percentage of
defect corrections that are completed, to be done, withdrawn, or overdue.
Choose a status category to view the details of the defect corrections created for sin
gle functional tests.
You can also navigate to the Mass Change Operations application when in views To be
done or Overdue.
66 PUBLIC
Focused Build for SAP Solution Manager
End-to-End Implementation Process
Tile Content
Test Case availability An overview of the status of work packages with single functional tests. The displayed
categories show the percentage of single functional tests that are completed, to be
done, or overdue, or for which the milestone Single Functional Test Completed has not
been set.
Choose a status category to view the details of the work packages that have the single
functional tests assigned.
Sub-Project Status Table
The Sub-Project Status table shows the status of the build projects that belong to a main project.
To get an overview of status of the sub-project, choose the sub-project name in the table. This opens a new tab
page that displays the Solution Readiness Dashboard tiles for the selected sub-project and the Category Status
table.
In the Sub-Project Status table or the Category Status table, you can select individual table entries to display
further details on the status of documents or project tasks.
2.9 Managing Requirements
Business analysts and project managers can use the Requirements Management and the My Requirements
apps to plan their project backlog and maintain requirements. In business language, a requirement describes
IT-related developments or congurations that need to be done to implement a new SAP or non-SAP solution.
Requirements Management
The Requirements Management app is designed to create requirements and work packages. It includes a lter
section where you can search for requirements in a specic context. You can save these lter settings in
customer-specic or public views. You can add lters for Work Package Title and Work Package ID by
choosing
Adapt Filters.
If you need additional requirement attributes, you can customize these in customer-specic elds.
In the Realize phase of the project, it may be necessary to rearrange requirements and their related work
packages. Therefore, you can assign work packages to requirements and unassign work packages from
requirements.
Tip
In-app help is available for the Requirements Management app. You can display the in-app help by choosing
the icon.
Focused Build for SAP Solution Manager
End-to-End Implementation Process
PUBLIC 67
My Requirements
After you create the requirements, you can maintain them in the My Requirements app. This app has a similar
UI to the ones in the My Work Packages and the My Work Items apps, which are the follow-up documents.
My Requirement Approvals
You can access requirements that you need to approve.
Activities
For requirements, you can perform the following activities:
● Create requirements
To create requirements, you have the following options:
○ Out of Solution Documentation structure, scope, or process diagram
○ In the Requirements Management app
○ Mass import by using XLS les
● Maintain requirements
To maintain requirements, you have the following options:
○ Requirements Management app
○ My Requirements app
○ XLS download and upload
○ Mass Change Operations app
● Create work packages
● Assign and unassign work packages
● Approve requirements
To approve requirements, you have the following options:
○ In the My Requirement Approvals app
○ Through the action in the Requirements Management pop-up
○ Through the action in the My Requirements app
○ Through the action in the Mass Change Operations app
○ Through the extended requirements approval workow
● Display custom eld values, process element information, and elds of the extended approval workow
Use report /SALM/REQUIREMENT_REPORT. For example, you can display all requirements planned for a
specic release or a list of all approvers that have not approved their requirements so far.
68
PUBLIC
Focused Build for SAP Solution Manager
End-to-End Implementation Process
2.9.1 Dening Requirements
The discovery team formulates requirements to describe new functions or features that are to be
implemented.
Prerequisites
● You have modeled and analyzed your business processes.
● You have documented the application landscape.
● In a t / gap analysis of your business processes, you have identied the need to implement new functions
or features or to change existing functions or features.
Context
In Focused Build, you can create requirements from within the Solution Documentation by adding them to
business processes or process steps. For this purpose, you use the Requirements Management application, a
user interface for documenting and assigning requirements.
If you have not yet modeled your business processes and only start with a list of requirements, you can create
the requirements directly in Requirements Management. Later, you can use this app to assign the requirements
to the structure elements of the Solution Documentation.
Architect Mode
In the architect mode, architects can enter the project and wave that is relevant for a requirement. You can
activate the architect mode in the Customizing (IMG).
Creating Requirements from Within the Solution
Documentation
Prerequisites
● You have already modeled your business processes in the Solution Documentation.
Procedure
1. In the Solution Documentation, in the Design Branch, select the business process or process step related
to your requirement.
2. In the attributes pane, at Related Documents, choose Requirements.
Focused Build for SAP Solution Manager
End-to-End Implementation Process
PUBLIC 69
The Requirements Management application opens in a separate browser window.
3. In Requirements Management, choose Requirement. In the menu, choose Create New Requirement.
4. Specify the header data, such as title, priority, and requirement owner, and requirements team, and add a
description for the requirement.
You can also specify the following:
○ Specify the category of the requirement and the classication of the work packages for the
requirement.
○ Select a solution. By default, the selection is blank (no solution assigned). You can later search for
requirements that have no solution assigned and change the assignment.
○ Specify the requirement as local.
○ Enter value points or eort points. Value and eort points can be used for the release planning. For
example, if the estimated value is high and the estimated eort is low, you can give the requirement a
higher priority.
○ Maintain customizable text or numeric elds and ags. The elds can be:
○ provided with self-dened value helps
○ ltered, sorted, and saved in user-specic views
5. Save your settings. You have the following saving options:
○ Choose (Save) to keep the Create new requirement window open and send the requirement for
approval (set the requirement's status to To be Approved).
○ Choose (Save and New) to close the Create new requirement window and create another
requirement.
2.9.1.1 Uploading Requirements
You can upload requirements by using the /SALM/Requirement_Import report in transaction SE38.
Prerequisites
You have prepared an XLS le in one of the following ways:
● If the process structure and requirements have already been dened in another SAP Solution Manager
system:
You can upload requirements with Solution Documentation structure information (for example, process,
process step, library) to the design branch of the on-premise SAP Solution Manager system with
automated assignment to the process structure.
To download requirements from Solution Documentation, proceed as follows:
1. Create a scope for the process structures to be transferred:
2. When selecting the structure, select the Include Originals checkbox to transfer the library elements as
well.
3. When saving the scope, decide if it should be visible to all Solution Documentation users (public) or
only to you (private).
4. Export the process structure (from Solution Documentation):
In the Solution Administration application, choose the Imports tab.
70
PUBLIC
Focused Build for SAP Solution Manager
End-to-End Implementation Process
5. Choose the Global Functions icon and then Export.
6. In the popup, to establish the linkage to the library elements, select the Map deployment to origin
checkbox.
7. Export the le to a share or your frontend.
8. Import the Solution Documentation process structure (JSON le) from the frontend or share to the
target SAP Solution Manager system.
9. Export requirements from the Requirements Management application in your source SAP Solution
Manager system to your frontend as an XLS le.
● If the process structure and requirements have not been dened in another SAP Solution Manager system:
You can download an XLS le (without Solution Documentation structure information) and populate it with
requirements from an external data source.
To prepare an XLS le:
1. To get the upload XLS structure, export the requirements list from your SAP Solution Manager system.
There must be at least one example entry.
2. Populate the XLS le with data from a source XLS le or document.
Context
Procedure
1. Run the report in test mode.
2. Correct the requirements with warnings, for example, for:
○ Duplicates (for example, if several work packages are assigned)
○ No work package assigned
○ Mandatory elds not lled, for example, Solution
○ Solution Documentation element not available in target system
3. Choose how to handle the Requirement Owner eld (check, overwrite, keep existing value).
4. Select Source Language and Target Language.
5. Run the report in regular mode (Test Mode checkbox deselected).
Results
All requirements are uploaded, linked to process elements, and set to status Draft in the target system.
Focused Build for SAP Solution Manager
End-to-End Implementation Process
PUBLIC 71

Next Steps
Maintain process structure/diagrams: Open each requirement. On the Documentation tab, assign process
structure elements.
2.9.2 Assigning Requirements to Business Processes
Context
A requirement should be assigned to a solution and a process structure element, that is a process or a process
step in the Solution Documentation. If you have created a requirement from within the Solution Documentation
by selecting a business process or process steps, the requirement is automatically assigned to the process
structure elements.
You can also create requirements directly in the Requirements Management app without assigning them
immediately to a solution and a process structure element.
If you have created scopes in the Solution Documentation, you can assign the requirement rst to a scope and
then to Solution Documentation elements from this scope.
To create or change an assignment of a requirement in the Requirements Management app, do the following:
Procedure
1. Start the Requirements Management app on the SAP Solution Manager launchpad.
2. Use the lters to search for the requirement.
Note
A requirement can be classied as WRICEF. Select WRICEF in the Requirement Classication eld next
to this eld to lter your requirements. You can select one or several of the followingWRICEF Sub-
Classication parameters:
○ Workow (W)
○ Report (R)
○ Interface (I)
○ Conversion (C)
○ Enhancement (E)
○ Form (F)
If several sub-classications parameters are selected and the result list is sorted, the entries are listed
in the same order as in WRICEF:
○ W, R, I
72
PUBLIC
Focused Build for SAP Solution Manager
End-to-End Implementation Process

○ W, R
○ W
○ R, I
3. In the search results table, select the requirement.
4. Choose Requirement. In the menu, choose Assign Process Structure.
5. Assign the requirement to a solution, a branch, and a process structure element (process or process step).
6. Conrm your settings.
2.9.3 My Requirements
You can use the My Requirements application to further specify and process requirements assigned to you or
your team.
In My Requirements, you can nd the requirements assigned to you or your team. You can further specify the
requirements by adding texts, attaching les, or assigning Solution Documentation elements. To process a
requirement, you change the status of the requirement, for example, you can it send for approval or approve or
reject it.
Specifying Requirements
In My Requirements, you can select a requirement from the list and then specify and document it further by
using the following tabs:
● Details
○ Assign a business process expert and requirement owner.
○ Categorize the requirement.
○ Specify priority and a value or eort estimation. Value and eort points can be used for the release
planning. For example, if the estimated value is high and the estimated eort is low, you can give the
requirement a higher priority.
○ Maintain customizable text or numeric elds and ags in the Custom Fields section in the Details tab.
The elds can be:
○ provided with self-dened value helps
○ ltered, sorted, and saved in user-specic views
● Text
Add texts, such as an extended requirement or solution description or comments.
● Attachments
Attach les, such as image les or document les, by using drag and drop or the upload function.
Files that are attached to a requirement are automatically copied to the work packages that are assigned to
the requirement.
● Documentation
Assign Solution Documentation structure elements, such as business process steps, to the requirement.
You can also use this tab to create an assignment to documents, for example test cases, that are stored in
the Solution Documentation.
Focused Build for SAP Solution Manager
End-to-End Implementation Process
PUBLIC 73

The Relations tab shows the work packages created for the requirement.
Processing Requirements
To change the status of a requirement, choose Action in the tool bar and then the relevant status.
A new requirement has the status Draft. After you have specied the requirement, change the status to To Be
Approved. The approver, that is, the solution architect or the project manager, can then decide to approve,
reject, postpone, or request a revision of the request. You can also postpone an already approved requirement.
If a requirement is set to Approved, it is planned in for the next release and you can create work packages for
the requirement or assign work packages. To do this, use the Requirements Management app.
Advanced Approval Process
Prerequisites
● The requirements approval workow must be enabled in Customizing (transaction SPRO).
● A business partner must be authorized to approve requirements before he can be assigned to an approval
step as a Requirement Approver.
Note
If the My Requirements app appears empty, go to the lter menu ( ) and change the criterion Approver to
Yes and the criterion Assigned to to All.
In the Approval tab, dene mandatory and optional approval steps. Mandatory approval steps are maintained
via a central Customizing and optional steps can be added via the app ( ). You can maintain complex
approvals with several steps, sequences, e-mail notications, etc., based on the CRM standard approval
customizing workow.
Note
You need to assign an authorized business partner for each step before the process can be executed.
A requirement can be in status Draft, To Be Approved, Rejected, Canceled, Postponed, or Approved.
If there are several approvement steps, the status is changed as follows:
● When all steps are set to the same status, the status of the requirement is matched accordingly.
● If there is a mixture of Approved and Postponed, the status is changed to Postponed.
● If there is a mixture of statuses and at least one is Rejected, the status is changed to Rejected.
74
PUBLIC
Focused Build for SAP Solution Manager
End-to-End Implementation Process
2.9.4 Creating Work Packages for Requirements
Solution architects create work packages to manage and document the implementation of requirements.
Prerequisites
● The requirements have been validated and documented. Substantial functional gaps have been handed
over to SAP development so that the remaining requirements constitute the scope of your Focused Build
project.
● The requirements have the status Approved.
Context
When the requirements have been specied and approved, you create work packages for the requirements.
The work packages are used to manage and document the implementation of the requirements. To create the
work packages, use the Requirements Management app.
Procedure
1. Start the Requirements Management app on the SAP Solution Manager launchpad.
2. In the Requirements Management app, search for unassigned requirements that have the status Approved
or higher. Use additional lters to nd relevant requirements.
3. In the results table, select a requirement.
4. In the tool bar, choose Work Package. Then choose Create New Work Package. You can also create a work
package by opening the requirement and choose Create New Work Package ( ) from the toolbar. The
requirement needs to be in status Approved or In Realization.
5. Enter the header data for the work package. Select the work package type (regular work package,
maintenance work package, or scope change), enter a title, select a work package owner and a work
package classication.
6. Choose Create to create the work package.
The work package has the status Created and can be processed in the My Work Packages application.
You can also navigate directly to the newly created work package using the link shown in the popup
window.
Information from the requirement, such as the assigned process steps in the Solution Documentation and
les that are attached to the requirement are automatically copied to the work package.
If the release is an actual release, the release manager is automatically copied to the work package.
Focused Build for SAP Solution Manager
End-to-End Implementation Process
PUBLIC 75
2.9.5 Creating Work Packages Without Requirements
Context
Usually, you create work packages for a specic requirement in the Requirements Management app. You can,
however, also create work packages without related requirements in the Requirements Management app.
Procedure
1. Start the Requirements Management app on the SAP Solution Manager launchpad.
2. In the tool bar, choose Work Package. In the menu, choose Create New Work Package.
3. Enter the header data for the work package. Select the work package type (regular work package,
maintenance work package, or scope change), enter a title, and select a work package owner.
4. Choose Create to create the work package.
The work package has the status Created and can be processed in the My Work Packages application.
If the release is an actual release, the release manager is automatically copied to the work package.
2.9.6 Assigning Work Packages to Requirements
Context
You can assign an already existing work package to a requirement. If a work package is assigned to a
requirement, les that are attached to the requirement are automatically copied to the work package.
Procedure
1. Start the Requirements Management app on the SAP Solution Manager launchpad.
2. Use the lters to search for the requirement.
3. In the search results table, select the requirement.
4. In the tool bar, choose Work Package. In the menu, choose Assign Existing Work Package.
5. Search for the work package. When ltering for a project, activate or deactivate the Consider
documentation Scope option.
6. Choose Assign.
76
PUBLIC
Focused Build for SAP Solution Manager
End-to-End Implementation Process

2.10 Managing Work Packages
As a solution architect or a project manager, you use the My Work Packages application to specify and manage
work packages.
A work package is a container for information about the implementation of a requirement. You check,
document, and maintain this information in My Work Packages. A work package combines the following
information:
● Status of the overall implementation of the work package
● Information about the work items derived from the work package
● People involved in development and testing
● Project and wave during which the work package is implemented
● Milestone dates for the implementation of the work package
● IT documentation, such as the functional specication or test cases
● Planned and documented eorts
● Status of related test packages and test plans
Tasks
To manage a work package, you do the following:
● Dene the work package details
For more information, see Dening Work Package Details [page 78].
● Assign the work package to a project and a wave
● Analyze the implementation scope of the work package and break it down to implementation tasks by
dening work items
For more information, see Dening the Scope of Work Packages by Creating Work Items [page 79].
● Attach les
On the Attachments tab page, you can attach les, such as image les or document les from a local
storage by using drag and drop. The les on the Attachments tab page are stored only locally in the work
package, not in the Solution Documentation.
● Create, store, or link to IT documents for the work package in the Solution Documentation on the
Documentation tab
Note
For more information about how to create, edit, and store documents for work packages in the Solution
Documentation, see Documenting Work Packages and Work Items [page 24].
● Specify dependencies between the work package and related work packages or defect corrections
To do so, go to the Relations tab page and choose Add Dependency. Select a work package and assign one
of the following relationship types:
○ Predecessor for work packages that need to precede the current work package
○ Parallel work package for work packages that are developed simultaneously with the current work
package
○ Follow-Up for work packages that succeed the current work package
Focused Build for SAP Solution Manager
End-to-End Implementation Process
PUBLIC 77
● Change the work package status
For more information, see Changing the Work Package Status [page 81].
● Schedule milestone dates for the work package
For more information, see Scheduling Milestone Dates for Work Packages [page 80].
● Document the time that you have spent for the implementation and documentation of the work package
On the Eorts tab page, you can specify planned and actual eorts.
● Read and create comments and notications for the work package
On the Text tab page, you can check system notications, such as status changes, that the system creates
automatically when the work package is processed. You can add your own comments or other texts to log
the work package process.
● Check test packages and test plans related to the work package
On the Test Management tab page, you can open test packages and test plans that are related to the work
package and check their status. You can assign or unassign test packages and test plans to the work
package.
● Use checklists
If checklists have been dened, you can select a checklist on the Checklist tab.
Related Information
Dening Work Package Details [page 78]
Dening the Scope of Work Packages by Creating Work Items [page 79]
Changing the Work Package Status [page 81]
Documenting Work Packages and Work Items [page 24]
My Checklist Steps [page 140]
2.10.1 Dening Work Package Details
You use the My Work Packages application to specify and maintain work package details.
Procedure
1. Start My Work Packages on the SAP Solution Manager launchpad.
2. In the My Work Packages list, select a work package.
By default, the My Work Packages list displays only the work packages that are assigned to you. You can
use the lters to search for specic work packages or to nd work packages that are assigned to your team
or are unassigned.
3. To specify work package details, go to the Details tab page and choose Edit:
○ Description
Enter a descriptive work package title.
78
PUBLIC
Focused Build for SAP Solution Manager
End-to-End Implementation Process
○ Priority
Select the priority level of the work package.
○ Value Points and Eort Points
Optionally, you can specify value points and eort points.
○ Classication
Select the work package classication, such as WRICEF, t, gap, or non-functional.
○ Category
Select the category, such as applications, IT infrastructure, or end-user workspace, or a more specic
sub-category.
○ Project
To assign the work package to a project, select a project.
○ Wave
Select the wave in which the work package is implemented. Only if the work package is assigned to a
wave, you can start dening the work package scope by creating work items for the work package.
○ Assign the Focused Build roles, such as the SAP business process expert, the work package owner, the
developer team, or the tester to the people responsible.
○ Update the completion rate
2.10.2 Dening the Scope of Work Packages by Creating
Work Items
Development architects dene the scope of the work packages by creating work items and assign the work
items to developers.
Prerequisites
● The work package is assigned to a project and a wave.
● The work package has the status Scope Analysis.
Context
When the work package has been set to Scope Analysis, you analyze the requested feature in terms of planned
eorts, budget, and resources, and you dene the work package scope by dividing the work package into
development tasks that you assign as work items to developers or development teams.
When the work package has been set to the To Be Tested status, you can also create defect correction for the
work package in My Work Packages. Unlike defect corrections that are created from defects in the My Defects
app, these defect corrections are not associated to a test plan execution.
Focused Build for SAP Solution Manager
End-to-End Implementation Process
PUBLIC 79

Procedure
1. Start My Work Packages on the SAP Solution Manager launchpad.
2. In the My Work Packages list, select the work package.
3. Go to the Scope tab page.
4. To create a new work item, choose Add.
5. Specify the work item type:
○ Normal change (NC)
The work item uses a transport request for changes in the software code.
○ General change (GC)
The work item that doesn't use a transport request. For example a new workow, a change in 3rd party
software or administration changes
○ Defect correction
When the work package has been set to To Be Tested, you can also create a defect correction to correct
an known error.
6. At Title, enter a descriptive work item title.
7. At Sprint, select the sprint in which the work item has to be developed.
8. At Productive System, select the system or component that will be changed by the work item.
9. At Classication, select the work item class.
Which work item class can be selected depends on the classication of the related work package.
The work item class Non-Functional is meant for changes in non-SAP software. Non-functional work items
do not require a technical design document.
10. Under Partners, add the required partner functions, such as the development team, developers, and
testers, and assign them to the people and teams responsible.
11. Under Solution Documentation, assign a Solution Documentation structure element to the work item.
12. Save your settings.
The work item has been created and can be processed by the assigned developers and testers in the My
Work Items application.
2.10.3 Scheduling Milestone Dates for Work Packages
You can specify milestone dates, for example, deadlines for the functional specication, the implementation, or
the testing of the work packages.
In My Work Packages, you specify dates of important milestones on the Dates tab page.
Note
Milestone dates can be set in the Project Management - Focused Build Projects app or in My Work Packages:
The milestone dates on the Dates tab are initially and automatically lled with the dates maintained by the
project manager in the Project Management- Focused Build Projects app. These milestone dates can be
changed by the architects in the My Work Packages app (default setting).
80
PUBLIC
Focused Build for SAP Solution Manager
End-to-End Implementation Process
2.10.4 Changing the Work Package Status
You change the status of a work package to enable further processing of the work package or to extend or
reject the work package.
You change the work package status in the My Work Packages application. To move a work package to a new
status, choose Action in the footer tool bar. Then choose the next action or next work package status. For
example, if you choose the Dene Scope action, you change the work package from the status Created to the
status Scope Analysis.
To reject a work package, you change the work package status to Rejected.
You can change the statuses of several work packages at the same time in the Mass Change Operations
application. For more information, see Mass Change Operations [page 84].
2.11 Managing Work Items
Developers and testers use the My Work Items application to document and process work items.
Using My Work Items, you call up information about the work items assigned to you and document the
implementation of the work items. You can also create transport requests for work items for normal changes.
Tasks
You start My Work Items on the SAP Solution Manager launchpad. In the My Work Items list, you see the work
items that are assigned to you as a developer. You can use lters to search for specic work items.
The tab pages of My Work Items provide the functions for maintaining work item data and transport requests:
● Details
Read or specify the work item details.
The Details tab page displays basic information about the work item. To complete or change this
information, choose Edit. You can, for example, set the priority, story, or value points. You can also
document the completion rate.
● Dates
Check milestone dates for the work item, such as deadlines for the design or the implementation.
The dates are initially and automatically lled with the dates maintained in the Project Management -
Focused Build Projects app.
● Texts
The Text tab page displays system notications, such as status changes, that the system creates
automatically when the work item is processed.
You can also add comments or texts, such as descriptions or test instructions for the work item. To do so,
select a template for the relevant text type and add your text.
● Attachments
You can attach les, such as image les or document les, from a local storage by using drag and drop or
the upload function. The les on the Attachments tab page are stored only locally in the work item, not in
the Solution Documentation.
Focused Build for SAP Solution Manager
End-to-End Implementation Process
PUBLIC 81

● Documentation
Create, store, or link to documents for the work item in the Solution Documentation
You can use the Documentation tab page to store new documents in Solution Documentation or link to
existing documents in Solution Documentation. For more information, see Documenting Work Packages
and Work Items [page 24].
● Transport
Manage transport requests
The Transport tab page displays information about the transport landscape, that is the relevant systems
and their transport relationship, and your transport requests.
You can log on to the systems or you can create transport requests directly in My Work Items. For more
information, see Creating Transport Requests for Work Items [page 83].
In the Requests table, the Transport Requests and Transport of Copies columns enable you to access more
detailed information by choosing an element in one of these columns.
● Tasks
You can use the Tasks tab page to specify and log tasks that need to be done for the work item.
● Eorts
You can use the Eorts tab page to document the time that you have spent on development or testing
activities for the work item.
● Checklist
If checklists have been dened, you can select a checklist on the Checklist tab.
Changing the Work Item Status
To change the work item status, choose Action in the tool bar. In the menu, choose the next work item action or
status.
To withdraw a work item, choose Action in the tool bar. In the menu, choose Withdraw.
Note
You cannot withdraw work items if Solution Documentation elements are assigned to them. If there is at
least one changed element, the system blocks the withdrawal. You have to discard changed elements or
move them to another work item to complete the withdrawal.
You can change the status of several work items at once in the Mass Change Operations application. For more
information, see Mass Change Operations [page 84]
Related Information
My Checklist Steps [page 140]
82
PUBLIC
Focused Build for SAP Solution Manager
End-to-End Implementation Process
2.11.1 Creating Transport Requests for Work Items
You can create transport requests for work items for normal changes directly in the My Work Items application.
Prerequisites
● You have started Work Items from the SAP Solution Manager launchpad.
● You have selected a work item.
● The work item has the status In Development or higher.
Procedure
1. Go to the Transport tab page.
2. At Requests, choose .
3. In the Create Transport pop-up window, select the request type and enter a description.
You are preselected as the request owner. You can change the request owner and you can create transport
tasks for other developers.
Results
The requests for the work item are displayed under Requests. To access more detailed information, choose a
request ID. When you select a request, the transport tasks of the request are displayed under Transports.
Note
To display detailed information about a transport of copy that is related to a request shown in the Requests
table in the Transport tab page (for example, for a non-imported copy of transports), choose the
corresponding element in the Transport of Copies column in the Transport tab page. The next view provides
you with information on the following elements:
● ID
● Status Text
● Source System
● Source Client
● Release Date
● Release Time
● Transport Target
● Newest Request
Focused Build for SAP Solution Manager
End-to-End Implementation Process
PUBLIC 83

Next Steps
If you want to create a transport of copies for a transport request, select the request and choose Create TOC.
If you want to create an additional transport task for a request, select the request. At Tasks, choose and
select a task owner.
2.12 Mass Change Operations
You can view and change several or all work packages, work items, defect corrections, or other types of
transactions used in Focused Build of a release or a project at the same time by using the Mass Change
Operations app.
Context
As a solution architect, a project manager, or a release manager, you can use the Mass Change Operations
application to change the status or other attributes of several work packages, work items, defect corrections,
or other types of transactions used in Focused Build at one go. Using Mass Change Operations, you can display
all work packages, work items, defect corrections, or transactions that are related to a release or project and
use additional lters to nd transactions with specic attributes.
Note
Focused Build architects can view and change all types items in the Mass Change Operations app. Other
roles can also access the app to view and analyze items, but these business partner functions have only a
limited authority to change items in the app. For example, test managers can only change test documents.
They can also view all other items, but cannot change them. Developers cannot make any changes and can
access the app only in the display mode.
To change several transactions of a type a project or release at the same time, do the following:
Procedure
1. Specify the type of transaction that you want to display or change, for example requirements, work
packages, work items, or defect corrections.
2. In the lter bar, use the attribute lters to specify search criteria. For example, to search for work packages,
you can specify the project, release, status, or priority of the work packages that you want to change. To
start the search, choose Go.
The search results are displayed in a table.
3. In the search results table, select the items that you want to change.
84
PUBLIC
Focused Build for SAP Solution Manager
End-to-End Implementation Process
Note
Choose Select View ( ) to save or manage your viewing settings.
4. Choose Mass Change.
5. In the menu, select what you want to change for the selected items.
You can change the following:
○ Status
Note
To perform a mass change of the status, you need to select items that have the same status. For
example, you can change several work packages with the status In Development to the status To be
Tested.
○ Priority
○ Category
○ Partner function
○ Project date
○ Project and wave
6. Save your changes.
The Save Status column displays which changes have been saved and if changes could not be saved due to
an error.
2.13 Release Dashboard
As a release manager, you monitor the progress of a release with the Release Dashboard.
To use the Release Dashboard, you must have dened the KPIs and other settings in the Customizing (IMG) for
SAP Solution Manager Focused Build Dashboard Congurations Release Dashboard Customizing .
On the entry screen of the Release Dashboard, you select a change control landscape and a release to get an
overview of the current status of this release on various cards.
In some cards, you can open a detailed view. You can use the breadcrumb navigation to switch between the
detail view and the dashboard.
Tip
The in-app help (formerly the Web Assistant) provides help for the Release Dashboard app. You can display
the in-app help by choosing the icon.
Focused Build for SAP Solution Manager
End-to-End Implementation Process
PUBLIC 85

The Release Dashboard displays the following information for the selected release:
Cards on the Release Dashboard
Card Content
System Landscape The number of systems related to the release
Choose this card to get an overview of the number of work packages, work
items, defect corrections, or transports related to the systems. You can also
make settings to display additional columns. Choose a number in the table to
display details of the work packages, work items, defect corrections, or trans
ports in a separate view. Only work packages, work items, and defect correc
tions are shown that contain transport requests.
Transports The number of transport requests related to the release
In the Transports view, you can display an overview table of the transport re
quests related to the release. Optionally, you can specify additional selection
criteria, such as the development teams or specic systems.
To check and edit a transport request in Transport Organizer (transaction
se09), choose the transport ID in the search results table.
Work Packages The number of work packages related to the release
In the Work Packages view, you can display an overview table of the work pack
ages related to the release. Optionally, you can specify additional selection cri
teria, such as the development teams or specic systems. You can do the fol
lowing:
● To check the rating details of work package, choose the overall rating of a
work package.
This opens the Status Details view, which displays the ratings for the test
ing, the document, transport rating details, and other status details for
the work package.
● To navigate to a work package in the My Work Packages application,
choose the work package ID in the table.
Work Items The number of work items assigned to the work packages for the release.
In the Work Item view, you can display the details of the work items assigned
to the work packages related to the release. Optionally, you can specify addi
tional selection criteria, such as the development team or specic systems.
In the table, you can choose work item IDs to open the work items in the My
Work Items app or you can select several work items and change them in the
Mass Change Operations app.
86 PUBLIC
Focused Build for SAP Solution Manager
End-to-End Implementation Process
Card Content
Defect Corrections The number of defect corrections related to all releases of the release compo
nent
In the Defect Corrections view, select at least one release to display an over
view table of the defect corrections related to the releases. Optionally, you can
specify additional selection criteria, such as the development teams or spe
cic systems.
To view or edit the details of a defect correction in the My Defects application,
choose the Object ID of the defect correction in the search results table.
FB Requests for Change The number of requests for change
Choose this card to get an overview of all FB requests for change.
FB Changes The number of changes
Choose this card to get an overview of all FB changes.
Teams The number of development teams working on the releases
Choose this card to check the number of work packages, work items, defect
corrections, transports, test packages or test plans, or all documents per
team in a table. You can also make settings to display additional columns.
Choose a number in the table to display details of the work packages, work
items, defect corrections, transports, test packages or test plans, or docu
ments in a separate view.
Transports Without Assignment The number of the transport requests that are not assigned to work items
In the Transports without Assignments view, you can display an overview table
of the transport requests without assignment to a work item in the selected
release.
Tip
In views in which you dene selection criteria, you can save the selected criteria as a variant that you can
use again later.
In views in which you can select several criteria, you can choose Selection Summary to expand a diagram
displaying the numbers of work packages, work items, transports, and other data for the selected release.
2.14 Focused Build Test Suite Extensions
In Focused Build, the test suite of SAP Solution Manager is extended by additional applications and functions.
For test management, you can use the following Focused Build applications:
● To create Test Steps test cases, use the Test Steps Designer application.
Focused Build for SAP Solution Manager
End-to-End Implementation Process
PUBLIC 87

● To create test plans for projects or to assign test plans to projects, use the Test Management - Assignment
Analysis and Test Plan Generation and the Test Plan Management - Project Assignment applications.
● To dene parameters used as placeholder in test cases or test steps, and the respective variable values for
a test plan, test package, or tester, use the Test Steps Parameters application.
● To monitor the status of the testing, use Test Suite Dashboard.
As a tester, use the My Test Executions application to document the execution of test cases. With My Test
Executions, testers can also create defects, which then can be documented and corrected with the My Defects
and the My Defect Corrections applications.
2.14.1 Test Steps Designer
Use the Test Steps Designer to create and maintain Test Steps test cases, and to describe test activities. In Test
Steps test cases, the test steps (test activities) are assigned to process steps in the Solution Documentation.
You can start the Test Steps Designer from within a solution in Solution Documentation or from the SAP
Solution Manager launchpad.
Features
With the Test Steps Designer, you can do the following:
Create and edit individual test cases
● Create Test Steps test cases based on process steps in the Solution Documentation
Recommendation
It’s recommended that you create Test Steps from within a solution in Solution Documentation
because this method automatically provides the solution context, which is a prerequisite for the
selection of executables.
● Create Test Steps test cases directly in the Test Steps Designer and later assign them to executables in the
Solution Documentation
● Edit Test Step test cases
● Find all test plans, test packages, and sequences that contain the selected test case.
● Copy test cases ( ): Assign a new test case name, select a destination folder, select a status schema,
and a branch. You can also activate the function Copy Solution Assignment to link the test case directly into
the same position in solution documentation.
Manage multiple test cases
● Use parameters as placeholder for test plan-specic values in text elds in the header section of a test
case, or in a test step
● Create template test cases, which make it easy to create, maintain, and update Test Step test cases with
similar content
● Upload test cases from CVS les
88
PUBLIC
Focused Build for SAP Solution Manager
End-to-End Implementation Process
● Mass update the header details of multiple test cases.
Use Groups and Folders
Groups and folders help you nd your test cases in the Test Steps Designer app.
There are several groups, for example:
● My Test Cases: Test cases owned or changed by you
● Favorite Test Cases: Test cases bookmarked as favorites
● Recently Changed Test Cases
When creating or editing a test case in the Test Steps Designer, you can select a folder in which the test case
can later be found.
Related Information
Linking Test Cases to Solution Documentation Processes [page 89]
Editing Test Step Test Cases [page 90]
Test Steps Parameters [page 95]
Template Test Cases [page 91]
2.14.1.1 Linking Test Cases to Solution Documentation
Processes
If you want to add executables to a test step, it must be assigned to the Solution Documentation process step.
Recommendation
While you can create a test case directly in Test Steps Designer and assign it later, we recommended
creating it from within a solution. This method automatically provides the solution context for the test
steps.
To create Test Step test cases from within a solution in Solution Documentation, do the following:
1. In the Solution Documentation, navigate to the business process, subprocess, or process for which you
want to create a test case.
2. To create a new test case, right-click on the Solution Documentation elements for which you want to create
the test case and, in the context menu, choose New Test Cases Test Steps (Create) .
The Test Steps Designer opens and you can edit the test case. For each process step, there is a test step on
the Test Steps tab. The executables of the process steps are automatically assigned to the test steps.
3. In the Test Steps Designer, edit, and complete the test case.
You can also assign an existing test case to process steps in Solution Documentation. To do so, in the context
menu, choose New Test Cases Test Steps (Assign) and select the test case that you want to assign.
Focused Build for SAP Solution Manager
End-to-End Implementation Process
PUBLIC 89

2.14.1.2 Editing Test Step Test Cases
In the Test Steps Designer application, each test case has the following tab pages that you can use to change or
further specify the test case:
● Header
Edit general properties and settings, such as the version, version title, testing mode, status, priority, owner,
strict step sequence, duration, description, prerequisites, or exit criteria. Wherever you can enter a long
text, you can use the parameters you dened in the Test Steps Parameters app.
You can edit multiple test cases at once with the mass update function.
Recommendation
It is recommended to add only Test Step test cases with the status Released to test plans.
● Test Steps
Each step is dened with a description, instruction, and expected result. Wherever you can enter a long
text, you can use the parameters you dened in Test Steps Parameters. If the test case is assigned to
Solution Documentation, you can add an executable. You can also do the following:
○ Create substeps
○ Set a ag that the testers must provide evidence for certain steps (for example, by attaching a
screenshot)
○ Set additional test result attributes
You can specify for which test step a result attribute is relevant, whether the result attribute is
mandatory, and for which step it is mandatory. You can set result attributes to Inactive if they are not
used anymore. You can also dene result attributes as Public to make them visible in Test Sequences.
Public result attributes are also shown as Previous Results from Test Sequence in the My Test
Executions app.
○ Upload an attachment for the step. You can use the drag and drop function to upload les and images
and attach them to the step.
● Attachments
You can upload images or document les on this tab page.
● Notes
You can add notes.
● Where-Used (only relevant if you are using template test cases)
In a template test case, you see the test cases derived from the template.
In a test case derived from a template, you see the related template.
● Change Log
You see the changes that were made for the test case.
Adding New Solution Documentation Content to Test Steps
If the Solution Documentation content has been changed, you can display the changed Solution
Documentation content to update the test case. For example, if new process steps have been added, you can
create new test steps accordingly.
To display the Solution Documentation content, on the Test Steps tab page, choose Add from SolDoc and
select the new Solution Documentation content that you want to use in the test case.
90
PUBLIC
Focused Build for SAP Solution Manager
End-to-End Implementation Process

Related Information
Test Steps Parameters [page 95]
2.14.1.3 Uploading Test Cases from Files
You can upload test cases that you have prepared as Excel or CSV (UTF-8 encoding only) le to the Test Steps
Designer app. The Test Steps Designer converts them to a Test Step test case, which, for example, can be
executed with My Test Executions.
To upload a test case, on the start page of the Test Steps Designer, simply choose (Upload New Test Case
from File) and follow the steps in the wizard.
Tip
You can download a sample CSV le and use it as a template for your test cases:
1. Choose (Upload New Test Case from File).
2. In the Upload Test Cases wizard, choose Download Sample File.
With the upload function, you can also create new versions of existing test cases that have been created with
the upload function: If you update the test case in the CSV or Excel le and then upload this le with the same
test case title as the existing test case, Test Step Designer creates a new version of the test case.
2.14.1.4 Template Test Cases
Template test cases make it easy to create, maintain and update test cases with similar content:
The Relationship tab page of a template test case displays the test cases that have been created based on the
template. On the Relationship tab page of a test case derived from a template test case, you can choose the
corresponding template test case and choose Pull Updates to import changes made in the template into the
derived test case.
Creating Template Test Cases
You create template test cases as follows:
1. In the Test Steps Designer application, choose + ("Create new test case").
2. In the Test Case Properties, turn the toggle switch at Template Test Case to Yes.
3. Select a solution and a branch.
Focused Build for SAP Solution Manager
End-to-End Implementation Process
PUBLIC 91

Note
The solution and the branch are copied into all test cases that are created based on this template test
case.
4. Choose Create.
5. Dene the properties and test steps of the template test case.
6. Release the template test case.
Template test cases are not used for testing. When you change or update a template test cases, the updates
can be imported into all test cases that have been created based on the template test case.
Creating Test Cases Based on Template Test Cases
For the actual testing, you create new test cases based on the template test case.
To create a new test case based on a template test case, do the following:
1. Open the template test case in the Test Steps Designer application.
2. In the tool bar, choose Create New Test Case from Template.
3. Choose whether you want that updates in the template are automatically pushed into the new test case
4. Choose Create.
2.14.2 Test Plan Management Extensions
In Focused Build, two applications extend the test plan management of SAP Solution Manager: Test Plan
Management - Assignment Analysis and Test Plan Generation and Test Plan Management - Project Assignment.
In Focused Build, the test suite is integrated with the project management. You create test plans for projects or
you can assign test plans to projects.
Note
Creating a test plan for a project or assigning a test plan to a project automatically creates a project task
and a test request.
In Focused Build projects, you create test plans with Test Plan Management - Assignment Analysis and Test Plan
Generation. With this application, you can check the test plan coverage of the work packages of a project and
create a test plan based on the test cases assigned to the work packages.
You can also create test plans in the standard test plan management of SAP Solution Manager and then use the
Test Plan Management - Project Assignment application to assign the test plans to projects and waves. Using
Test Plan Management - Project Assignment, you can adjust the start and end dates and other test plan
attributes to match the project data.
92
PUBLIC
Focused Build for SAP Solution Manager
End-to-End Implementation Process
Related Information
Test Plan Management - Assignment Analysis and Test Plan Generation [page 93]
Test Plan Management – Project Assignment [page 94]
2.14.2.1 Test Plan Management - Assignment Analysis and
Test Plan Generation
To create and maintain test plans for the work packages of a Focused Build project, you use the Test
Management - Assignment Analysis and Test Plan Generation application.
In the application, you select a project and a wave and, if congured, a view. Test Management - Assignment
Analysis and Test Plan Generation comprises the following tab pages:
● Work Packages without Test Coverage
● Assignment Analysis and Test Plan Generation
Work Packages without Test Coverage
You use the Work Packages without Test Coverage tab page to nd out which work packages of the wave are not
yet covered by a test plan. You use this information to create test plans on the Assignment Analysis and Test
Plan Generation tab page.
Work Packages without Test Coverage displays the work packages that are not included in a test plan in an
overview table. The table provides information about the work packages, such as the work package status or
the test cases assigned to the work pages. You can print or download the overview table.
Assignment Analysis and Test Plan Generation
The Assignment Analysis and Test Plan Generation tab page displays a tree structure with the Solution
Documentation folders for the scenarios, processes and process steps, and the Solution Documentation
libraries of the solution. You can expand the folders to check the work packages. The Work Packages without
Assignment folder lists the work packages that are not assigned to a Solution Documentation structure
element.
On the Assignment Analysis and Test Plan Generation tab page, you can do the following:
● Find work packages that do not have a test case assigned
You can choose Highlight Work Packages / Test Cases and select Work Packages without Test Case to
highlight the work packages without test cases.
● Assign test cases to work packages
You can assign test cases stored in Solution Documentation to work packages without test cases. To do so,
select the work packages and choose Assign Test Case. Select the test case and choose Assign.
Focused Build for SAP Solution Manager
End-to-End Implementation Process
PUBLIC 93
● Create new test plans
To create a test plan, select the work packages for which you want to create a test plan and choose Save as
a New Test Plan. Enter the test plan attributes, such as a description, a start and an end date, a test
classication, and a release schema and release status.
Note
Make sure that the work packages have test cases assigned.
To create a test plan for all work packages of a wave, you can choose Select all Work Packages with Test
Cases.
● Navigate to Test Plan Management to check and edit test plans
The test plan ID of the last test plan that you have created for the wave is displayed on the Assignment
Analysis and Test Plan Generation tab page. You can choose the test plan ID to check and edit the test plan
in Test Plan Management.
Note
If you have created more than one test plan, you can choose Load Test Plan and select a test plan to
display the test plan ID of the test plan on the Assignment Analysis and Test Plan Generation tab page.
2.14.2.2 Test Plan Management – Project Assignment
If you create test plans in the standard test plan management and want to assign these test plans to projects
and waves, you use the Test Plan Management – Project Assignment application.
To assign a test plan to a project and a wave, do the following:
1. Start the application by choosing Test Plan Management – Project Assignment on the SAP Solution
Manager launchpad.
2. To search for the test plan, select the solution, branch, and (if congured) the view.
3. Select the test plan.
4. Assign test plan to a project and a wave.
When you save the test plan assignment to the project, a test request and a project task are created
automatically.
You can do the following:
● Choose the test request for the test plan to edit the test request in the WebClient UI.
● Open Assigned Project
Navigate directly to the assigned project in the project management WebClient UI.
● Unassign Project
Cancel the assignment to a project.
● Adjust Test Plan Dates to Wave
Adjust the test plan start date and end date to the dates scheduled for the wave.
● Maintain Test Plan Attributes
Change attributes of the test plan, such as the test plan classication category.
94
PUBLIC
Focused Build for SAP Solution Manager
End-to-End Implementation Process
2.14.3 Test Steps Parameters
When you design Test Steps test cases, enter parameters as placeholders to put test data values directly at the
right place for the right tester during test execution. Use this application to manage the parameters and check
missing assignments.
Basic Terms and Concepts
Parameters make it easy to reuse one common test case with slightly dierent information. You don't need to
create a separate test data sheet with specic instructions for dierent test packages or testers. Instead, you
use the parameters as placeholders in a Test Steps test case and assign specic values to it.
For every test plan that uses a parameter, at least one value must be assigned. You can dene several values for
the same parameter and distinguish them based on test packages and testers. During test execution, the most
specic value is shown. For example, if you assigned dierent values for testers and test packages, the testers
see the value individually assigned to them, regardless of the general test package value.
For test cases with testing mode Shared Results, the value assignment of the test plan or test package level is
considered only. Value assignments on tester level will be ignored. This ensures that testers work with the same
parameter values as they share instructions and results in this kind of test case.
For better overview, every parameter must be in a group. When you design a Test Steps test case with
parameters, groups help you nd and add them.
Prerequisites
● You have installed Focused Build SPS06 or higher.
● For value assignments, there is at least one test plan, containing one or more Test Steps test cases with
parameters.
● To see the change log of value assignments in a test plan, you have been assigned authorization object
FB_TS_CLOG.
Features
The Test Steps Parameters application gives an overview of the test steps parameters that have been created in
SAP Solution Manager, and helps you to nd missing value assignments and empty values.
If a Test Steps test case with parameters is used in a test plan and has no value assigned, the tester only sees
the parameter name in brackets instead of a specic value during test execution. The tester can refer to the
parameter name to inform the test manager about a missing test data value.
Parameter Overview
● You see the existing parameters in their groups, and whether there are test plans without assigned value.
Focused Build for SAP Solution Manager
End-to-End Implementation Process
PUBLIC 95
● You can add new groups and parameters, and directly access the value assignment.
● You can delete empty groups.
● You can search for parameter names or parts of names.
Parameter Details
● For each parameter, you see a list of the test cases that use it, and the test plans that contain those test
cases. You can also search for specic test cases and test plans.
● You can directly access to the Test Steps test cases that contain the selected parameter.
After selecting a parameter, under Test Plan Assignment, you can lter the test plan list to nd the test
plans that are missing a value.
● When you select a test case, you go directly to the Test Steps Designer application and you can use the
parameters in long-text elds within the header and test steps.
● You can delete parameters that are not used in any test case.
Value Assignment
● After selecting a test plan, you can use a switch to lter for the parameters that are empty for this
particular test plan.
● You can also mass-upload value assignments and download the values assigned to a test plan.
Related Information
Test Steps Designer [page 88]
2.14.4 Test Suite Dashboard
As a test manager, you use the Test Suite Dashboard app to monitor the test status of projects and solutions. It
oers a unique way to analyze data step by step from dierent perspectives, to investigate a root cause
through drilldown and to act on transactional content.
The Test Suite Dashboard app oers the following functions:
● Adaptable Overview page
● Interactive details pages for detailed customized reports on test execution and defect status
● Customize and share details pages as a page variant with other users
● Chart visualization to spot relevant data more quickly
● Export data to a spreadsheet le
Procedure
To check the status testing for a project in the Test Suite Dashboard, follow these steps:
1. Start the application by choosing Test Suite Dashboard - Focused Build on the SAP Solution Manager
launchpad.
96
PUBLIC
Focused Build for SAP Solution Manager
End-to-End Implementation Process
Note
If you do not use project management for Focused Build projects, select Test Suite Dashboard - Test
Suite.
2. In the Filter Bar, select at least the project. You can limit the search by selecting additional attributes.
3. Choose Go.
Note
In the My Views dropdown, you can congure, save, and share views:
Choose Save As to save a view. It contains the whole page content.
To load a view, select the view from the list. To change or delete a view, choose Manage.
Cards
In the dashboard, you have access to the following cards:
1. Work Package Test Case Assignment
This card shows the number of work packages by their status in relation to the assigned test cases. You can
switch the view of the card between Absolute or Percentage.
2. Test Status Progress
This card shows the progress of all aggregated test execution status values based on the lters and the
selected time frame
3. Test Status
This card shows the number of test cases by the aggregated test execution status grouped by test plans.
Additionally, it shows the number of test cases that are not passed yet.
4. Critical Test Executions
This card shows a list of test cases in test execution status red sorted by priority and open defects.
5. Test Steps Progress Monitor
This card shows all test steps test cases in relation to the lter settings sorted by status and open steps.
6. Defect Status
This card shows the number of test cases by the aggregated test execution status grouped by test plans.
You can switch the view of the card between Priority or Priority and Status. Additionally, it shows the
number of open defects.
7. Critical Defects
This card shows a list of defects with priority High or Very High sorted by priority and status.
8. Defect Status Progress
This card shows the progress of all aggregated defect status values based on the lters and the selected
time frame.
Focused Build for SAP Solution Manager
End-to-End Implementation Process
PUBLIC 97
Details Pages
From the overview page, you can navigate to the following details pages by selecting the relevant card:
● Work Package Test Case Assignment
● Test Status
● Critical Test Executions
● Defect Status
● Critical Defects
The details pages provide further information for analysis, view building, chart visualisation, sharing/export
mechanisms, ltering, and interactive chart and table data visualization. A details page has a lter bar as well
as a chart and table view.
2.14.5 Test Suite Dashboard (Obsolete)
As a test manager, you use Test Suite Dashboard to monitor the test status of projects.
You can use the views and tiles on the Test Suite Dashboard to do the following:
● Get an overview of the status of all test types
● Monitor the execution status of test plans and test packages
● Monitor the status of the defects reported for the test plans
● Export data to a spreadsheet le
Procedure
To check the status of the test plans for a project in Test Suite Dashboard, proceed as follows:
1. Start the application by choosing Test Suite Dashboard on the SAP Solution Manager launchpad.
2. Under Selection Parameters, select Test Suite for Focused Build.
Note
If you do not use the project management for Focused Build projects, select Test Suite. Select the
solution and the branch.
3. Select the project and the wave. You can limit the search by selecting additional attributes.
4. Select the test plans that you want to analyse with the dashboard:
1. To display the the test plans, choose Search Test Plans.
2. Select the test plans from the table.
5. Choose (Apply).
Note
At Saved Selections, you can congure and save selections:
Choose (Settings) to congure and save a selection.
98
PUBLIC
Focused Build for SAP Solution Manager
End-to-End Implementation Process

To load a saved selection, select the selection in the selector eld.
Tab Pages
Test Suite Dashboard has the following tab pages:
● Overview
For more information, see Overview Tab Page of Test Suite Dashboard [page 99].
● Test Preparation
This tab page provides information about the status of the test planning, especially about the assignment
of test cases to work packages. You can use this tab page to nd out which work packages do not have a
test case assigned and to switch to the Assignment Analysis and Test Plan Generation application.
● Test Execution Status
This tab page provides information about the test execution status of a selected test plan. For more
information, see Test Execution Status Tab Page of Test Suite Dashboard [page 100].
● Defect Status
This tab page provides information about the defects related to selected test plan. For more information,
see Defect Status Tab Page of Test Suite Dashboard [page 101].
● Traceability Matrix
This tab page provides information about the test status of the requirements, work packages, work items,
and defect corrections of the selected wave of a project.
2.14.5.1 Overview Tab Page of Test Suite Dashboard
The Overview tab page displays the following information about the selected test plans:
● Test Plans – Released for Test
The number of test plans that are ready to be tested.
● Test Cases – Currently not Passed
The number of test cases of the selected test plans that still need to be tested or retested. These test cases
that have the status initial, in progress, or error.
● Open Defects – Priority 1 and 2
The number of open defects reported for the test cases of the selected test plans.
● Test Status
This tile shows the test classication categories of the tests in the selected test plans. You see the
percentage of tests for each test classication category.
● Defect Details
The number of defects reported for each test classication category.
● Test Execution Status
This chart shows how many of the test cases have the statuses initial (not tested), in progress, error (tested
with negative result) or OK (tested with positive result). The simplied statuses are indicated by evaluation
colors (gray, yellow, red, green).
● Test Execution Progress
In this chart, the test execution progress is visualized in a timeline. Graphs for the test status categories
initial, in progress, error, and OK indicate how the test status of the test cases has changed over time.
Focused Build for SAP Solution Manager
End-to-End Implementation Process
PUBLIC 99
To change the period of time displayed on the timeline, choose Timeline and select a suitable period.
● Test Execution Status by Test Plans
This chart shows the status of test cases for each test plan.
● Test Execution Progress by Projects
This table gives you an overview of your projects’ execution progress. You can export this table as a CSV
le.
● Open Defects by Priority
The chart shows how many of the defects reported for the selected test plans have which priority.
● Defects by Priority and Status
This bar chart shows the priorities of the defects for each defect correction status.
● Defect TimeLine
● Defects across Projects
● Test Execution Status by Work Package
2.14.5.2 Test Execution Status Tab Page of Test Suite
Dashboard
When you switch to the Test Execution Status tab page, you select one of the test plans. You can later change
this selection in the Selection Parameters section.
The Test Execution Status tab page displays the following information about the selected test plan:
● An overview of the status of the test cases
You see the number of test cases for each of the following status categories:
○ Initial
○ In Progress
○ Error
Tests that found an error
○ OK
Successful tests
To see the detailed statuses of the test cases, go to the Test Execution Status chart.
● Days remaining
The number of days that are left to complete the test plan.
● Test Execution Status
This pie chart displays the test execution statuses of the test cases.
● Test Package Status Overview
A column chart displays the test execution statuses of the test cases for each test package.
● Test Package Status Detail
This table displays the test execution statuses of the test cases and the open defects for the test plan and
each test package. You can export this table as a CSV le.
● Test Execution Progress
Graphs for the four test execution status categories (initial, in progress, error, OK) visualize the test
execution progress on a timeline.
To change the period of time displayed on the timeline, choose Timeline and select a suitable period.
● Test Cases with Errors and related Defects
100
PUBLIC
Focused Build for SAP Solution Manager
End-to-End Implementation Process
● Test Execution Results - Manual Tests
● Test Execution Status by Work Package
2.14.5.3 Defect Status Tab Page of Test Suite Dashboard
When you switch to the Defect Status tab page, you select one of the test plans. You can later change this
selection in the Selection Parameters.
On the Defect Details tab page, you see the following information about the selected test plan:
● Number of open defects
● Number of open defects with priority 1 ("very high")
● Number of open defects with priority 2 (" high")
● Number of defects that require a retest
● Open Defects by Priority
The pie chart shows the number of defects for each priority.
● Defects by Priority and Status
This bar chart shows the priorities of the defects for each defect status.
● Defect Progress
Graphs for the defect statuses visualize the progress of the processing of the defects on a timeline.
You can use lters to display the progress of defects with specic priorities or statuses.
To change the period of time displayed on the timeline, choose Timeline and select a suitable period.
● Defect Status Statistics
This table indicates for each test package the total number of defect, the numbers of defect with the
priority high or very high, and the numbers of open defects. You can export this table as a CSV le.
● Open Defect Status Details
This table lists the open defects reported for the test plan. The table informs about status, priority, and
other defect details. You can do the following:
○ Filter the defects by status and priority
○ Navigate to a defect IT Service Management by choosing the defect ID in the table
○ Download the table as a CSV le
● Defect By Categories
This chart shows the defects by category and status. The chart uses the rst level of the multi-level
categorization scheme for the test plan.
You can set lters for the defect priority and status.
2.14.6 My Test Executions
As a tester, you can use the My Test Executions app to document your test cases and report defects for the test
cases.
You open the My Test Executions app from the SAP Solution Manager launchpad.
Focused Build for SAP Solution Manager
End-to-End Implementation Process
PUBLIC 101

The app opens with the My Packages page. Under Test Packages, you nd the test packages assigned to you,
categorized by status:
● Ready to Test: all test packages with test cases that are ready to test
● Released: all test packages that are not locked
● Protected: all test packages that are locked
● Assigned: all test packages assigned to the current user
Note
To display and access the test packages of another tester, you can choose (On Behalf), search and
select the tester, and log on behalf of this tester.
My Packages
In the Test Packages list, you can do the following:
● Filter and sort the test packages, for example by status, test plan, test package name, or empty test
package priority.
● Select a test package to open the test package in the test package view.
Test Package View
In the test package view, you can do the following:
● View general information about the test package and to read attached documents.
● Get an overview of the status of the test cases in the selected test package.
● Select a test case to manage and document it in the test case view.
Test Case View
In the test case view, you can nd information about the test case and read attached test case descriptions.
For test cases that are ready to test, you can do the following:
● Document the test case execution.
● Record TBOMs for the test document and Test Steps.
● Enter a comment in the Comment eld on the Header tab page.
Note
The Comment eld has to be activated in the Customizing for SAP Solution Manager (transaction
SPRO) at SAP Solution Manager Focused Build Test Suite Extensions Central Settings for Test
Suite
● If this is enabled in the standard Test Suite, testers can also digitally sign test results and test notes.
● Report a new defect for the test case.
Choose Create Defect. Select the defect type Defect, the system, and a priority and enter a defect title and
a description. You can select categories to further specify the defect. If there is an evidence document
attached to the test case, you can choose to take it over as defect attachment.
You can later nd and further specify the defect in the My Defects app. Defects are used to notify
developers of errors that have been identied during testing. If necessary, a defect correction for the defect
can be created in My Defects and later be processed in My Defect Corrections.
102
PUBLIC
Focused Build for SAP Solution Manager
End-to-End Implementation Process
Note
Setting an error for a test case or a test step automatically calls up the Create Defect dialog if in the
Customizing for SAP Solution Manager (transaction SPRO) at SAP Solution Manager Focused Build
Test Suite Extensions Central Settings for Test Suite , the function Open Defect Dialog on Error is
active.
If the other function Allow personalization is set to active, the Create Defect dialog will start only if the
settings in SU01 are either set to Yes or Default.
See also the documentation for the above-mentioned Customizing activity.
The Create Defect dialog shows the defect type (taken from the personalization) and takes over
information on system, client (if the executable is assigned to a test case), and actual and expected
results.
● Report an incident
Choose Create Defect. Select the defect type Incident, the system, and a priority and enter an incident title
and a description. You can select categories to further specify the incidents.
Incidents are processed using IT Service Management.
● Assign an already existing defect to the test case.
Choose Assign Defect. Search for known defects related to the function tested in the test case, select the
defect and assign it to the test case.
● Change the status of the test case.
● Results tab page:
○ Upload les, for example, screenshots, to document the test results.
○ View the results that other testers had for the same test case.
● Attachments tab page:
Upload test result documents for the test case, such as screenshots.
Test Steps
The My Test Executions app displays test steps for test cases that have been created with the Test Step
Designer app. Public result attributes are shown as Previous Results from Test Sequence.
A single Test Steps test case can be executed multiple times. Each time a test case is executed, a new runtime
object is created and the previous objects are saved for reference and documentation purposes.
Related Information
My Defects and My Defect Corrections [page 103]
2.15 My Defects and My Defect Corrections
The My Defects and My Defect Corrections applications, together with My Test Executions, enable the
processing and correction of defects found during the execution of test plans.
Focused Build for SAP Solution Manager
End-to-End Implementation Process
PUBLIC 103

By passing information about the project and wave from the test plan to a defect and then from the defect to
the corresponding defect correction, these applications support the collaboration between testers and
developers.
● If a test case fails, the tester can report a defect in My Test Executions. This creates a defect containing
information from the test plan, such as information about the project and wave, in My Defects.
● The defect can then be further specied, analyzed, and processed in My Defects.
If it turns out that the implementation of a change is necessary for the defect, a defect correction can be
requested in My Defects. This creates a defect correction in My Defect Corrections that automatically
contains information about the release. You can assign defect corrections to developers.
● The defect correction is processed and documented by the assigned developers in the My Defect
Corrections application.
If a developer changes the status of a defect correction, for example by providing a solution for the defect,
this is reported to the tester by a status change of the corresponding defect in My Defects.
Note
For the two workows described below (Defect Correction for SFT/AT and Defect Correction for FIT/RT),
the following prerequisite applies:
Active Import Feedback must be congured. See the Conguration of Focused Build guide, chapter 6.2.7
"Conguring Active Import Feedback" on the Focused Build and Focused Insights for SAP Solution Manager
product page.
Defect Correction for SFT/AT workow:
When a developer has nished their correction assigned to a defect correction that was created for a single
functional test (SFT) or an acceptance test (AT), the developer triggers the Set to Retest with Transport action.
This releases the original transport request, and the defect correction is set to the new status In Delivery
(shown on the top right in the defect correction area).
Normally, the import to the QAS system is scheduled and performed periodically by the Release Batch Import
program /SALM/BATCH_IMPORT_TRIGGER with the import variant /SALM/QAS. When the import is
successful, the Release Batch Import program automatically sets the target status Transport to Testing.
Defect Correction for FIT/RT workow:
If you require a defect correction for a functional integration test (FIT) and a regression test (RT), execute the
Release Batch Import program /SALM/BATCH_IMPORT_TRIGGER with the following variants in the order
shown:
Import variant /SALM/INTEGRATION_TEST_QAS for the import to the QAS system.
Import variant /SALM_INTEGRATION_TEST_PRE for the import to the pre-production system.
Select the Check for complete WP Import option for the program /SALM/BATCH_IMPORT_TRIGGER with the
import variant /SALM_INTEGRATION_TEST_PRE.
The target status Transport to Retesting is only set if the import to the pre-production system was successful.
If you run the release batch import program in dialog mode, you must leave the program completely after the
protocol for the import run is displayed. Otherwise, the CRM documents are locked.
104
PUBLIC
Focused Build for SAP Solution Manager
End-to-End Implementation Process
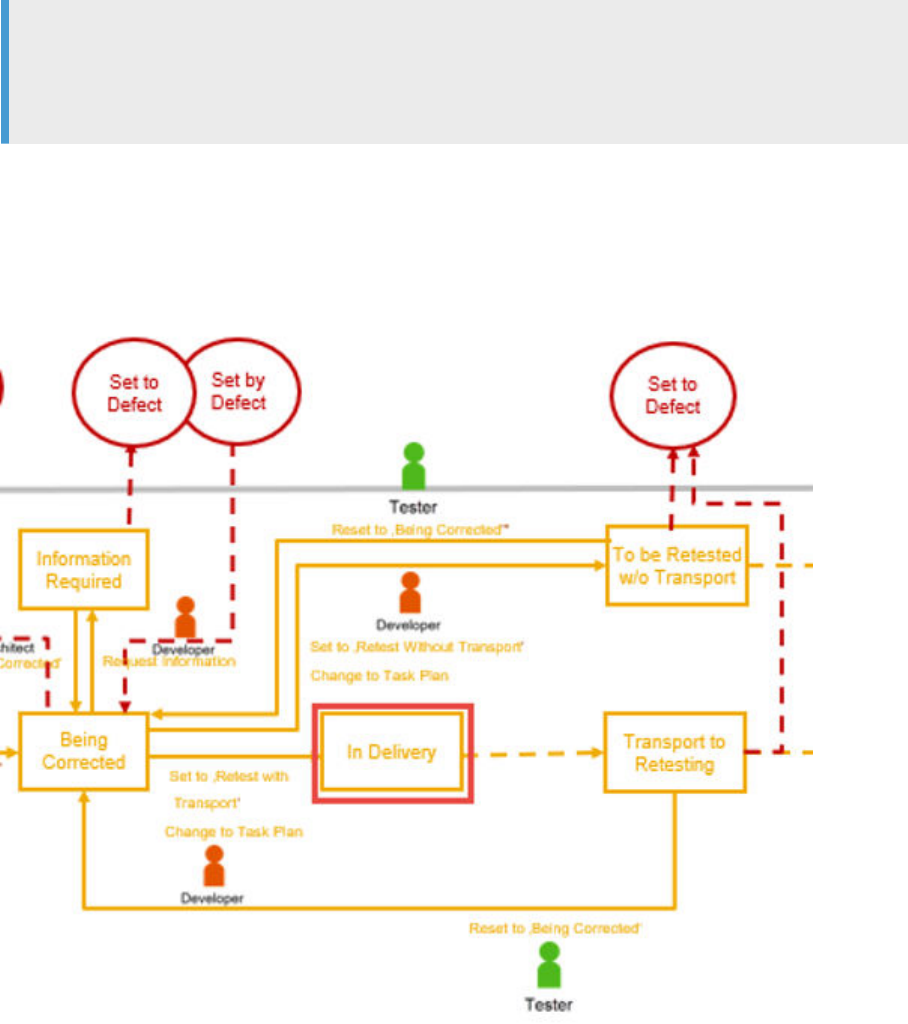
Note
You can also request defect corrections for work packages with the status To Be Tested in the My Work
Packages app. These defect corrections do not have a corresponding defect. You can use this function for
single functional test and acceptance test without integration in the Test Suite.
Flow diagram: Focused Build Defect Correction Workow
Focused Build Defect Correction Workow
My Defects
The My Defects app shows all defects that have been reported by you for a test case in the My Test Executions
app or for which you have been assigned as a processor and all defects assigned to your team. You can use the
My Defects app to further specify, categorize, and process defects. You also use this application to request
defect corrections.
You can open the My Defects application from the SAP Solution Manager launchpad.
Focused Build for SAP Solution Manager
End-to-End Implementation Process
PUBLIC 105
Analyzing and Documenting Defects
Choose the defect in the list under Defects. On the tab pages, you can do the following:
● Details
Shows the active defect correction. You can:
○ Further specify or categorize the defect
○ Assign the defect to a message processor or support team
● Texts
Read and add texts that document the defect
You can use rich text format to enrich the text with formatting and images or screenshots if you have
activated this function in the Customizing for SAP Solution Manager (transaction SPRO). For more
information, see the Conguration Guide at https://help.sap.com/docs/Focused_Build_Focused_Insights?
task=use_task.
● Attachments
Attach les, such as image les or document les
● My Defect Corrections
If you have requested a defect correction: Navigate to the defect correction that has been created for the
defect
● Relations and Related Test Case
The Relations tile shows the entire docow (active and inactive defect corrections)
Check related transactions or the related test case
● Actual Eort
Document the tasks and the time that you spent on the defect
Changing the Status of Defects
To process the defect, change the status of the defect by choosing Action in the tool bar and selecting the
appropriate CRM action to set the wanted follow-on status. For example, you can set a newly created defect to
In Process to start working on it or you can withdraw the defect. Once the defect is set to In Process, you can do
the following:
● Forward the defect to another team if you or your team is not responsible
● Propose a solution for the defect
● Request a defect correction
To request a defect correction for the defect, choose Action and select Create Defect Correction. This
creates the corresponding defect correction in the My Defect Corrections application.
You can only create a defect correction in the action menu of the My Defects app if no defect correction has
been created yet, or if no active defect correction exists. A defect correction with user status Withdrawn is
classied as inactive. This ensures that only one active defect correction related to a defect can exist at any
point in time.
● Request additional information from the testers
Finally, you can close the defect by setting its status to Conrmed. Prerequisite for this is one the following
cases:
● The solution has been accepted by the tester.
● The retest of the correction assigned to the defect correction has been successful.
When you conrm a defect, the defect and the corresponding defect correction are both conrmed if the
assigned transport request has been imported into the target system successfully.
106
PUBLIC
Focused Build for SAP Solution Manager
End-to-End Implementation Process

A defect which is set to the status In Process can be withdrawn. A defect can also be withdrawn in statuses New
and Tester Action. Prerequisite: You can only withdraw the defect if you are also assigned to the partner
function Reporter.
If you are not authorized to withdraw the defect, you receive the following error messages:
● Status was reset by system.
● Withdrawal of defect is not allowed. Current user is not the reporter.
Note
If you are assigned to the defect as Message Processor and execute the action Withdraw, you have to either
empty the Message Processor eld or replace yourself as Message Processor with another business partner
to receive the error messages described.
Otherwise, the status will also be reset by the system. You will then receive an error message from SAP
CRM standard.
My Defect Corrections
The My Defect Corrections application shows all defect corrections assigned to you or your team. You can use
this application to check and document information about the defect corrections, create transport requests for
the defect corrections, and change the status of the defect corrections.
On the tab pages, you can do the following:
● Details
○ Find information about the release
○ Describe or categorize the defect correction
○ Assign the defect correction to the responsible roles
Note
Only defect corrections that were created as part of single functional tests or acceptance tests are
connected to a work package. In these cases, the Handover to Release action can only be set in the
associated work package. A conrmed defect correction is set to Handed Over to Release
automatically.
Defect corrections that were created for functional integration and regression tests are not
connected to work packages. In this case, you need the Handover to Release action to further
process the document.
● Texts
Read and add texts that document the defect correction
● Attachments
Attach les, such as image les or document les
● Documentation
Assign, unassign and move Solution Documentation structures, and change the status of a test step
● Transports
Create transport requests for the defect correction
Focused Build for SAP Solution Manager
End-to-End Implementation Process
PUBLIC 107

● Relations
Check related transactions such as defects, work packages, or releases
● Eorts
Document the tasks and the time that you spent on the defect correction
To process the defect correction, you change the status of the defect correction by choosing Action in the tool
bar and selecting a follow-on status. For example, you can accept a newly created defect correction and start
working on it or you can withdraw the defect correction. Using the status control, you can also request
additional information about the defect or request a retest for the solution that you have provided.
Restriction
The following actions are only available if the predecessor document of the defect correction is a work
package and no defect:
● Conrm Defect Correction
● Conrm Defect Correction with Transport
● Reset to ‘Being Corrected’
If the predecessor document is a defect, the tester must set the status in the defect.
Automatic E-Mail Notications
The system sends automatic e-mail notications for Focused Build defects. This feature is not active by default.
If you want to receive automatic notications, complete the following steps:
● In the action prole for S1DM (Focused Build Defects), set the automatic PPF actions
S1DM_SEND_MAIL_REPORTER and S1DM_SEND_MAIL_PROCESSOR to active. Each automatic defect e-mail
notication type is an automatic PPF-Action.
● Create customer-own mail forms for each automatic e-mail type and assign them to the corresponding
automatic PPF action via the expression MAIL_FORM_TEMPLATE within the method call.
● Add a sender e-mail to each automatic PPF action via the expression DEFAULT_SENDER_EMAIL. The
sender must be authorized for sending e-mails.
● Perform all further conguration steps in the Conguration Guide at https://help.sap.com/docs/
Focused_Build_Focused_Insights?task=use_task, chapter 7.2.9 My Defects: Conguring automatic Actions
for Email Notication.
When the status of a defect changes, an automatic e-mail notication is sent out to the corresponding Focused
Build recipient user.
For the automatic PPF action S1DM_SEND_MAIL_PROCESSOR_CHG, perform the same conguration steps as
described above.
When a new message processor is entered in the defect (without a user status change), an automatic e-mail
notication is sent out to the corresponding Focused Build recipient user.
Related Information
My Test Executions [page 101]
108
PUBLIC
Focused Build for SAP Solution Manager
End-to-End Implementation Process
2.16 Fix Pace
Fix Pace is a x process for Focused Build releases in the Hypercare phase and Operate phase. Fix Pace uses
the following change transaction types:
● Focused Build request for change
● Focused Build standard change
● Focused Build urgent change
These change transactions apply to the same system landscape as the Focused Build release. The Fix Pace is
used for corrections in a release in the phases Hypercare or Operate. When the follow-on release is switched to
Hypercare, the Fix Pace is completed and all changes have to be completed.
The Fix Pace is supported by the My Request for Change and the My Change Documents app. Request for
change and change documents can also be changed in the Mass Change Operations app.
Change Manager
The change manager is the business partner function that is responsible for validating and approving requests
for change.
Release Manager
The release manager is the business partner function that is responsible for importing the changes into the
production system.
Requests for Change
A request for change can be created for an incident message or directly in the WebClient UI or in the My
Request for Change app.
The change manager validates the request for change and denes its scope by specifying which type of change
document (standard change or urgent change) is required and the system in which the change has to be
implemented. Several change documents of the same type can be assigned to a request for change. The
request for change then must pass an approval process before any change can be made. After the change
manager has approved the request for change, the change documents are created and linked to the request for
change.
Standard Changes
Standard changes are used for low-risk changes that are uncritical and frequently used. Standard changes
aect only Customizing objects that are dened as uncritical (allowlisted) on the Allowlist Objects tab of the
Change Request Management Administration Cockpit.
Since standard changes have no technical impact, they can be processed without an approval procedure.
Urgent Changes
Urgent changes are used to quickly x errors in existing functionality.
When urgent changes have been be made in the development system, they need to be successfully tested
before the release manager can set them to Handover to Production to import them to the production system.
Approval Procedures
The delivered default approval procedure consist of only one approval step in which the change manager has to
approve the request for change. In the My Request for Change app, you can assign approval procedures and
Focused Build for SAP Solution Manager
End-to-End Implementation Process
PUBLIC 109
approval steps that you have customized in the standard Change Request Management in SAP Solution
Manager.
In My Requests for Change and My Change Documents, you can also implement the Electronic Signature
extension to use a FDA-compliant digital signature for signing o requests for change or urgent changes.
Related Information
My Requests for Change [page 110]
My Change Documents [page 111]
Electronic Signature [page 131]
2.16.1 My Requests for Change
The My Requests for Change can be used to create and process requests for change as part of the Fix Pace
process in Focused Build:
● Requesters use the app to create requests for change.
● Change managers use the app to validate and approve or reject requests for change.
The My Requests for Change app has the following tab pages:
● Details
View and change details of the request for change.
To change details of the request for change, choose the (edit) icon.
You can assign the request for change to a category and a release and assign the business partner
functions to the relevant people.
● Dates
View and set dates for the request for change
● Texts
View and add texts, such as comments about the change.
● Attachments
Attach documents to the change in the My Requests for Change app by uploading them or using the drag
and drop function.
Attachments are stored only locally for the change in the My Requests for Change app, not in the Solution
Documentation.
● Documentation
On the Documentation tab page, you can assign Solution Documentation structures and thereby the
documents that are already stored at these Solution Documentation structures.
● Scope
On the Scope tab, you dene the required change documents:
Select the type of change (standard change or urgent change) and specify the productive system in which
the change should be implemented.
● Approval
On the Approval tab, you dene the required approval steps or approval procedure.
110
PUBLIC
Focused Build for SAP Solution Manager
End-to-End Implementation Process
● Relations
Related change documents or incident messages
Processing and Approving Requests for Changes
To switch the request for change to another status, use the Action button in the footer and select the next
status in the menu.
The status of a request for change is automatically set to Completed when all change documents in the scope
are in status Productive or further.
2.16.2 My Change Documents
The My Change Documents app can be used to process standard changes and urgent changes as part of the
Fix Pace process in Focused Build. This app is used by developers and, if involved in the testing of urgent
changes, by testers.
The My Change Documents app has the following tab pages:
● Details
View and change details of the change.
To change details of the change, choose the (edit) icon.
You can assign the change to a category and a release and assign the business partner functions to the
relevant people.
● Dates
Display dates.
● Texts
View and add texts, such as comments about the change.
● Attachments
Attach documents to the change in the My Change Documents app by uploading them or using the drag
and drop function.
Attachments are stored only locally for the change in the My Change Documents app, not in the Solution
Documentation.
● Documentation
Assign structure elements of the Solution Documentation and then manage and change the documents
that are already stored in the assigned Solution Documentation structures or upload or create new
documents to store them at the assigned structures.
Change documents inherit the assignment to Solution Documentation structures from their related
requests for change but you can also assign additional structure elements.
● Transports
Create transport requests, transports of copies, or tasks for transport requests for the change.
● Relations
View the related request for change, or other related transactions.
You can also create new dependencies to other transactions.
Changing the Status of Change Documents
To switch the change to another status, use the Action button in the footer and select the next status in the
menu.
Focused Build for SAP Solution Manager
End-to-End Implementation Process
PUBLIC 111
3 Conversion to SAP S/4HANA
SAP supports you in the conversion of an existing SAP ERP system to SAP S/4HANA system.
System Preparation
In the SAP ERP landscape, you must implement the following notes in the latest version:
● SAP Readiness Check 2.0 & Next Generation SAP Business Scenario Recommendations or SAP Innovation
and Optimization Pathnder
2758146
● For more information, see https://rc.cfapps.eu10.hana.ondemand.com/comsaprcweb/index.html.
If you want to analyze additional data in the SAP Readiness Check, the following notes are relevant:
Description
Note
Custom Code Custom Code Analyzer
2185390
SAP S/4HANA Sizing ABAP on HANA sizing report
1872170
Simplication Item Check Simplication Item Check
2399707
Business Process Analytics Business Process Improvement Content for "SAP Readiness
Check 2.0" and "Next Generation SAP Business Scenario
Recommendations" and "SAP Innovation and Optimization
Pathnder"
2745851
IDoc Data INR: Interface Discovery for IDoc
2769657
Data Volume Management FAQ for collecting DVM data during S/4HANA Readiness
Check
2721530
Business Partner/Customer -Vendor Enabling BP/CVI Analysis with Readiness Check 2.0
2811183
112 PUBLIC
Focused Build for SAP Solution Manager
Conversion to SAP S/4HANA
Description Note
Innovation Potential Enabling BP/CVI Analysis with Readiness Check 2.0
2811183
3.1 Simplication Item Management for System
Conversion
In the Simplication Item Management application, you upload the results from the SAP Readiness Check.
During the upload, simplication items that contain one or more activities are created. You can then inspect
and process the activities for conversion.
Context
The SAP Readiness Check provides information about which components are used in the SAP ERP system and
is compared to a simplication item database for SAP S/4HANA provided by SAP. This comparison between
the source system and the target system is used to nd out which steps or changes are necessary for a
successful conversion to SAP S/4HANA.
Simplication items are created and each simplication item is broken down into one or more activities
including additional information. You access these simplication items and activities from the Simplication
Item Management application to plan and schedule your conversion in detail.
Prerequisites
● You have executed the SAP Readiness Check. For more information, see Change Management SAP
Readiness Check SAP Readiness Check 2.0 and 2758146 .
● You have run the analysis of your SAP ERP system and a zip le was created. You can download the zip le
and verify the data before the upload. You nd the relevant information in the Activities and
RelevantSimplicationItems les.
● For the upload, you must provide the zip le in English.
● You have the role SAP_OST_FB_SC_ARCHITECT.
Starting the Application
To open the application, from the launchpad, in the Focused Build - Conversion Project area, choose the
Simplication Item Management tile.
Focused Build for SAP Solution Manager
Conversion to SAP S/4HANA
PUBLIC 113
The overview page displays analyses from SAP Readiness Check that you or other users have uploaded to the
application. You can search for an analysis by entering the name or part of the name into the search bar, or you
can access an analysis by selecting it from the list.
When you open the application for the rst time and no analysis is available, you need to upload an analysis. For
more information, see Upload Analysis [page 114].
3.1.1 Upload Analysis
You upload the zip le that you downloaded from the SAP Readiness Check. The le is analyzed during the
upload and simplication item activities are created.
Procedure
1. In the Focused Build - Conversion Project area, choose the Simplication Item Management tile.
2. In the Overview screen, upload a new readiness check by choosing Upload.
3. Enter a description and choose a le / browse to a le.
4. Choose OK.
Results
Before the simplication items and activities are created, the following checks are executed during the upload:
● Maximum number of activities uploaded
● URL that you provided in SAP Note section
● Values that you provided in the Excel les
● Duplicates: You can upload a readiness check only once.
If one of the checks fails, an error message informs you that the upload failed. As a tool lead, you check and
analyze the application log for further details (object: /SALM/SIM).
Related Information
Conversion Activities [page 115]
114
PUBLIC
Focused Build for SAP Solution Manager
Conversion to SAP S/4HANA
3.1.2 Conversion Activities
You access the uploaded simplication items and activities to plan and schedule your conversion in detail.
Managing Your Simplication Items and Activities
Once the data has been processed, you can start browsing through the results. The dashboard helps you to get
a quick overview of the status of the activities and track the progress in the current conversion project.
1. Search for an analysis by entering a name or part of a name into the search bar or choose from the list.
2. To access the simplication items of an analysis, choose Open Simplication Items ( ). This opens the
Analysis from SAP Readiness Check page.
Note
To get a quick overview of the progress made in processing simplication items and activities, access
the Progress Dashboard by choosing Open Dashboard ( ). Moreover, the Progress Dashboard
provides you with multiple lter options that help you to monitor more easily the progress of key
activities related to your conversion project.
3. In the Filters section, use the lter criteria to identify activities that are related to the technical
infrastructure.
○ By default, you can search for Simplication Item or lter by LOB, Business Area, Activity Type, or
Activity Status.
○ For more lter options, choose Filters More Filters and select your preferred lter options.
4. The dashboard consists of several pages. To navigate between pages, hover over the left or right side of the
dashboard and choose a navigation arrow:
○ (left)
○ (right).
Useful Filters
You can select multiple lters at the same time, for example, phase and condition. When you save your
preferred lter settings as a view, you can lter a new analysis faster.
Focused Build for SAP Solution Manager
Conversion to SAP S/4HANA
PUBLIC 115
Filter Description
Eort Ranking
In the latest version of SAP Readiness Check 2.0, you can
rank the activities by eort to get a better impression of the
expected eort for the upcoming conversion project. The
project lead and the solution architects together check for
which activities the eort must be assessed.
Select Eort Ranking Assessment Required
(default) .
Condition
You must process all activities that match Condition
Mandatory .
You can postpone or reject only activities that match
Optional or Conditional.
Phase
Plan and schedule the required work based on the phase of
the activities.
For example, start with Phase Before or during
conversion project , then change the lter to During
conversion project and so on.
Activity Status
To nd activities that were created after the upload and that
you can process, choose
Activity Status Created .
Activities
Display Activities
The Activities table below the dashboard shows which lters were used and the activities matching these lter
criteria. You can change the displayed columns by choosing
Settings. You can also sort the activities by
choosing Sort.
Process Activities
Select or more activities that you want to process from the Activities table. You can select all activities by
selecting the checkbox next to Simplication Item.
116
PUBLIC
Focused Build for SAP Solution Manager
Conversion to SAP S/4HANA
Activity
Set Status: Postpone or reject
Use the dropdown menus to lter by LoB or Business Area to
identify activities for which you are responsible.
● You can postpone or reject only optional or conditional
activities.
● You cannot postpone or reject mandatory activities.
From the Set Status dropdown menu, select Postponed or
Rejected.
Note
Note that the status Rejected is a nal status that can
not be changed or reactivated.
Select Follow-Up Type
Create a work package or a requirement. You can also assign
an existing build or single project to the activity.
For more information, see Follow-Up Activities [page 117].
Related Information
Follow-Up Activities [page 117]
3.1.3 Follow-Up Activities
As a solution architect, you can select one or more activities and create requirements or work packages as
follow-up activities. You can also assign an existing build or single project to the activity (for example, for
complex activities such as the implementation of SAP SuccessFactors).
Prerequisites
● You successfully uploaded the results from SAP Readiness Check to the Simplication Item Management
application.
● You checked the results from the upload and decided for which activities you want to create a follow-up
activity.
● Note that you can only assign an existing project. If no appropriate project is available, create a new project
before you start creating follow-up activities.
Focused Build for SAP Solution Manager
Conversion to SAP S/4HANA
PUBLIC 117

Assign and Reassign Activities
With the Assignment button, you can assign and reassign activities.
● Select Assign Item to assign an activity without a follow-up document to an already existing work package
or requirement.
● Select Reassign Item to make changes to an existing assignment.
The Relations and Text tabs of the work package show details about the assignment.
Create a Follow-Up Activity
You can merge several activities of the same type into one follow-up document using the Create function.
Note that the user who created a follow-up activity is automatically assigned as the owner.
To create a follow-up activity, do the following:
1. From the Activities list, select one or more activities.
2. Choose (Create).
3. In the Select Follow-Up Type window, select a follow-up action. If one activity is selected, you can choose
the following:
○ Create one Requirement per Activity (1:1)
○ Create one Work Package per Activity (1:1)
○ Assign one Project per Activity (1:1)
If multiple activities are selected, you can choose the following:
○ Create one Requirement per Activity (1:1)
○ Create one Requirement for all selected Activities. (n:1)
The system proposes a title for the follow-up document which can be changed after selecting Save.
○ Create one Work Package per Activity (1:1)
○ Create one Work Package for all selected Activities. (n:1)
○ Assign one Project per Activity (1:1)
4. Choose OK.
The related screen is displayed.
Create Requirements
Note
If you selected several activities from the same simplication item, enter dierent titles for the
requirements. We recommend maintaining unique titles, as they help you identify the requirement more
easily. When you use a title more than once, a message reminds you to change the titles.
1. In the Follow-Up Requirement creation screen, change the title of the requirement (if necessary).
2. To create a requirement, choose Save.
The requirement information is available in the Activities table.
118
PUBLIC
Focused Build for SAP Solution Manager
Conversion to SAP S/4HANA
Create Work Packages
Note
If you selected several activities from the same simplication item, enter dierent titles for the work
packages. We recommend maintaining unique titles, as unique titles help you to identify the work packages
more easily. When you use a title more than once, a message reminds you to change the titles.
1. In the Follow-Up Work Package creation screen, change the title of the work package if necessary.
2. From the dropdown menu, select a Work Package Classication: Gap, WRICEF, Fit, or Non-Functional.
3. Choose Save.
The work package information is available in the Activities table.
Assign Projects
You can assign a project to each activity.
1. In the Project Assignment screen, select an activity.
2. From the dropdown menu, select a project.
Only build projects and single projects that have the status Created or Released are available.
3. To assign the project, choose Save.
The project information is available in the Activities table.
For each follow-up activity that you create, a follow-up ID is automatically generated. The follow-up ID is
displayed as a link in the Activities table, in the Follow-Up ID column. Simply choose a link to access the work
package, requirement, or project in the appropriate application.
Follow-Up Type
Application
Work package My Work Packages
Requirements My Requirements
Projects Project Management
Once a follow-up activity has the activity status status Follow-Up Created in the Simplication Item
Management application, you cannot change its status within this application any more. To change the status,
go to the My Work Packages, My Requirements, or Project Management application (depending on the follow-up
type) and select the item.
Focused Build for SAP Solution Manager
Conversion to SAP S/4HANA
PUBLIC 119
4 Focused Build Standalone Extensions
You can use the Focused Build standalone extensions together with the Focused Build methodology and tools,
but they don't require a full implementation of Focused Build. You can also use them separately to enhance the
standard capabilities of SAP Solution Manager.
For any of the Focused Build standalone extensions, you need to have installed the Focused build for SAP
Solution Manager add-on (ST-OST 200 component).
4.1 ScoreCard
The ScoreCard provides an overview on current process types in the context of Change Request Management.
It is also possible to look into the respective list view and into the details of each individual business
transaction. For this purpose, the ScoreCard provides at least one top-level aggregation attribute (usually the
process type) and several second-level aggregation attributes (for example, priority or status).
The entry allows navigation to the detailed result list that presents all entries of a dedicated group. From there,
the user can navigate directly to a single business transaction.
Prerequisites
You use the business role /SALM/SM_PRO or a copied business role.
Procedure
1. Open the WebClient UI of Change Request Management or IT Service Management.
The ScoreCard is available in both processes.
2. In the ScoreCard assignment block, go to the group you are interested in.
A percentage is displayed for each element in a group. This percentage is calculated with respect to all
elements of this group.
3. Choose a description of a group element.
You will be forwarded to a search result list matching the criteria of the selected element.
120
PUBLIC
Focused Build for SAP Solution Manager
Focused Build Standalone Extensions
4.2 Template Protection
Use template protection to protect workbench and customizing objects of a global template.
Prerequisites
● Template protection only considers transport requests that are managed by Change Request Management
or the Focused Build end-to-end implementation process.
● After the template protection Business Addd-Ins (BAdIs) have been implemented or activated, the default
conguration of template protection is active.
Customizing usually deactivates the default conguration.
● Template protection is built on top of the standard Change Request Management transport-related check
framework.
You must activate the transport-related check framework to use template protection.
You can use template protection together with repack (Focused Build standalone extension). There will be no
issues when protected objects are repacked.
Related Information
Repack [page 132]
Focused Build for SAP Solution Manager
Focused Build Standalone Extensions
PUBLIC 121
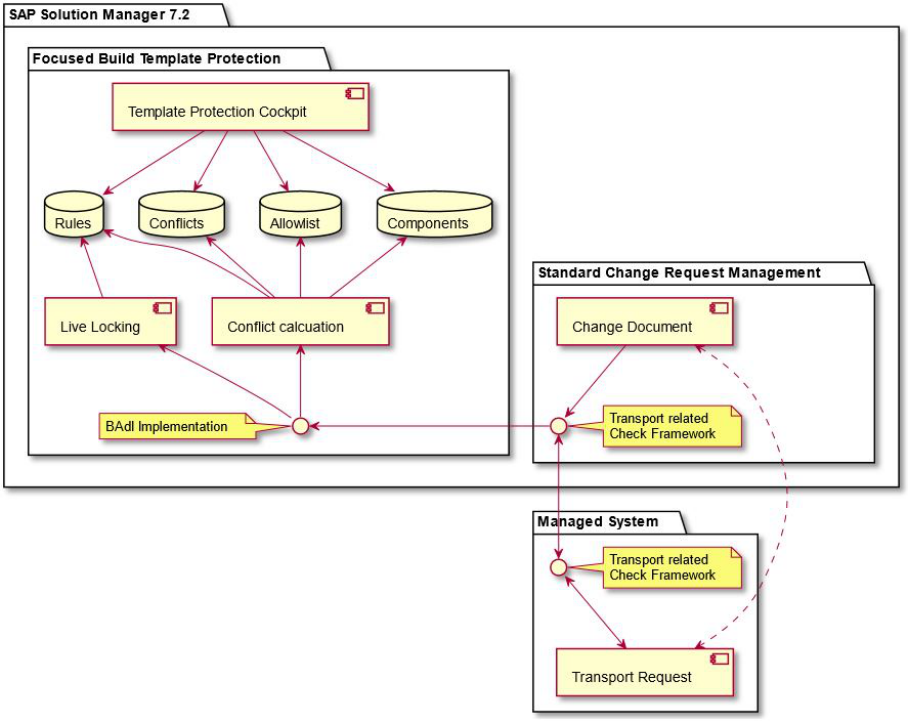
4.2.1 Architecture
Focused Build template protection is an add-on for the standard Change Request Management transport-
related check framework. It is implemented as a Business Add-In (BAdI) for custom checks.
4.2.2 Scenarios
Global Template System
Within the global template system scenario (global/local), a global development system automatically denes
a scope of objects to be protected on the local development systems. This is especially used in rollout/
localization scenarios.
122
PUBLIC
Focused Build for SAP Solution Manager
Focused Build Standalone Extensions
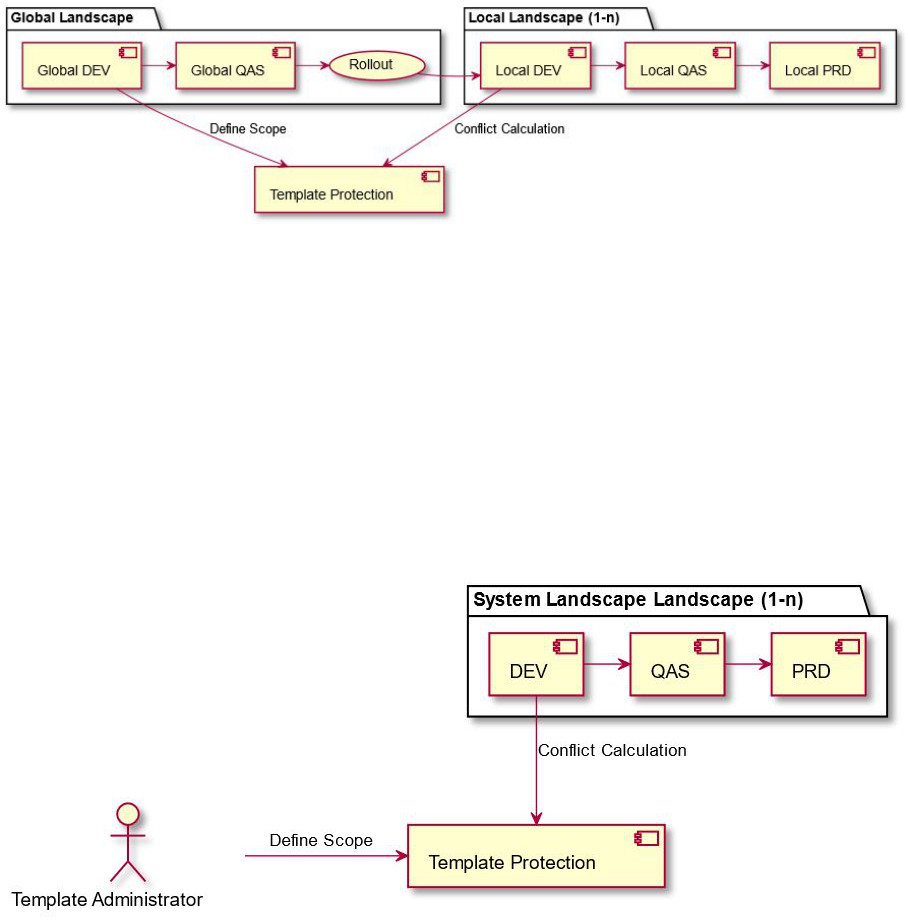
In this scenario:
● Rules are created via live locking based on the global development system.
● One or several local landscapes (for example countries/regions) are protected.
● The process of locking and protecting objects can be fully automated.
Manual Rule Denition
Within the manual rule denition scenario, there is no need to have a dedicated global development system as
rules are created manually via direct input or transport-request-based scoping.
In this scenario:
● Rules are created via manual scoping (direct input or transport request based).
● No live locking is active, as there is no global system (it is only available as a “virtual” system within the
scenario denition).
● One or several landscapes may be protected.
Focused Build for SAP Solution Manager
Focused Build Standalone Extensions
PUBLIC 123
4.2.3 Functions
4.2.3.1 Template Protection Cockpit
The template protection cockpit enables centralized maintenance of the following items:
● Template protection scenario conguration
● Template components
● Template rules
● Conicts
Additionally, you can navigate to the technical administration of template protection.
You can implement a detailed authorization concept for segregation of concerns using the authorization object
FB_TPPC.
Scenario Overview
Within the scenario overview, you can maintain global and local systems as well as allowlists.
Global System
Global systems include one to several template rules, which shall be checked and protected on the connected
local systems.
If a global system exists, template rules can be created based on live locking.
A global system can also be a virtual, non-existent system. In that case, it is just a container for manual rule
denitions.
Local System
A local system is always assigned to a global system and is checked according to the rules dened within the
global system.
A local system may be part of multiple global systems, but a global system may also contain multiple local
systems (m:n relationship between local and global systems).
If live locking should apply to local systems as well (because there is an additional localized landscape), a local
system can also act as a global system in parallel.
Allowlist
You can add an allowlist to the global system. All entries created for the allowlist overrule the template rules, so
that you can dene that specic objects/template rules may never be protected, even though they were added
as part of live locking or manual rule maintenance.
124
PUBLIC
Focused Build for SAP Solution Manager
Focused Build Standalone Extensions

Template Components
A template component clusters template rules across global systems. This means that you can, for example,
dene a template component FICO and assign template rules of dierent global systems to that component.
Template Rules
A template rule contains an object or, if wildcards are used, a set of objects to be protected.
A template rule is always connected to one global system or to its corresponding allowlist.
Within the Template Protection cockpit, you can create, read, update and delete template rules.
Create Template Rules
You can manually create template rules using the Add Template Rule button, which opens the wizard.
Select Global System
It is mandatory to select the global system, for which new rules should be created
Select Template Component
Optionally, you can select a template component.
Select Scope
Template rules can be created for the global system itself, so that the objects are protected or for the
corresponding allowlist to overrule all other template rules.
Select Source
Template rules can either be created from transport requests or via manual input.
Transport-Request-Based Scoping
The transport-request-based scoping shows all transport requests managed by Change Request Management
for the global system. This means it works for existing global systems only.
After you have selected a transport request and conrmed the scoping, a template rule is created for every
object of the transport request. They are bundled via the Source Type TR and the Transport Request Number as
source.
Manual Selection
You can manually create template rules via direct input. The system dierentiates between workbench and
customizing objects, but both types can be scoped in a row.
Copy and paste, for example based on the same structure as in Microsoft Excel, works when you select the
header of the table and press Ctrl + V . Due to restrictions within the SAP UI5 library, this is only supported
for up to 100 entries.
Additional considerations when using the manual selection:
● For workbench objects, you cannot scope LIMU objects (such as function modules). Those depend on a
parent object (such as a function group), which is not known to SAP Solution Manager.
Focused Build for SAP Solution Manager
Focused Build Standalone Extensions
PUBLIC 125
● For customizing objects, it is important to maintain the key length of the database table, as this is not
known to SAP Solution Manager.
If no key length is maintained, a table key is considered as <table_key>*>, so that it also includes
<table_key>_1>.
● Especially when maintaining a lot of manual entries, it can be easier to prepare a specic transport request
and use the transport-request-based scoping instead of scoping all objects manually.
Update Template Rules
You can change the template rules within the template protection cockpit using the buttons in the footer of the
cockpit:
● Edit Template Rule (single maintenance)
You can change object-specic details of a template rule via the single maintenance. To do so, select an
entry and open the edit mode. Beside the object-specic details, you can also change the local lock
handling.
The local lock handling gives the possibility to dene how a rule should react on a specic local system. You
can dene a rule on local system A as a warning, even though the global conguration would see it as an
error.
● Selected Template Rules (mass change)
If you select multiple template rules, the Selected Template Rules mass change allows you to apply certain
changes to all selected rules:
○ Activate/Deactivate Rule
○ Ignore/Unignore Rule
○ Delete Rule
● Filtered Template Rules (mass change)
Via the Filtered Template Rules mass change, you an apply certain changes to all rules that are available
based on the current lter. With that, not every single rule has to be selected, but the changes are applied
to all relevant template rules:
○ Activate/Deactivate Rule
○ Ignore/Unignore Rule
○ Delete Rule
○ Maintain Local Lock Handling
Conicts
Within the Conicts tab, you can maintain template protection conicts. A conict describes a change to a
protected object on a local system.
Conicts are only possible in the conict calculation mode warning, as an error during conict calculation
would not allow to save the change to a transport request.
You can update conicts using the following settings:
● Select Conicts: Updates only selected conicts
● Filtered Conicts: Updates all conicts available for the current lter
You can set various statuses for a conict:
● Approved: The change is approved – release of the transport request is allowed
126
PUBLIC
Focused Build for SAP Solution Manager
Focused Build Standalone Extensions
● Rejected: The change is rejected – the object must be removed from the transport request to allow the
release
● Manually Resolved: The change is rejected, but it is not required to remove the object from the transport
request. With this status, the user conrms that the change has been undone.
Administration
The Administration tab provides a direct link to the view cluster for the central customizing of template
protection.
Housekeeping
You can use report /SALM/_TPP_REORG to delete or reorganize duplicates of template rules.
So far, conicts cannot be deleted. If you want to delete a template rule duplicate for which there are existing
conicts, the recommended procedure is to link the conicts to another template rule that will be continued to
be used. Alternatively, you can delete the template rule while the conict remains in the system with no link to a
template rule.
For more information, see the report documentation.
4.2.3.2 Conict Calculation
Trigger
The conict calculation is triggered in the following situations:
● When a transport request managed by Change Request Management has been changed
● When Change Request Management triggers the release of a transport request
Procedure
Changed objects or objects that are part of the transport request are checked against the template rules for all
global systems to which the development system of the transport request is assigned as a local system.
Depending on the global template protection conguration, the global-system-specic conguration and nally
also the local lock handling, an identied conict is visible as a warning or as an error within the popup of the
transport-related check framework.
Focused Build for SAP Solution Manager
Focused Build Standalone Extensions
PUBLIC 127

In case of an error, the change is not saved to the transport request or the release of the transport request is
canceled.
In case of a warning, you may conrm the conicts. Those conicts are persisted to the Template Protection
tables (Conicts tab in the template protection cockpit) and reevaluated during the release of a transport
request.
Recommendation
We highly recommend that you consider conicts during the release of a transport request as an error, as
this is the last point in time when the conicts are checked. Having the release check set up as a warning
and simply conrming unprocessed conicts results in a lot of unprocessed conicts.
Customizing
Prevent Display of Existing Conicts
If a conict has been found again, this conict is shown in the transport-related check framework popup again.
You can prevent this with the following customizing option so that already-known conicts are not shown
anymore. This applies only for the change of transport requests, as unprocessed conicts must be shown and
conrmed during the release of a transport request.
View cluster /SALM/TPP_VCUST -> Customizing
Parameter
DCNF_INACT
Value X
Threshold for Large Transport Requests
If a transport request contains many objects, an analysis of the transport request before the conict
calculation can increase the system performance. With the transport request analysis, the number of objects
to be checked can be reduced. One use case is a table containing a lot of table keys. If there is no template rule
for the table at all, there is no need to check every single key. With the following customizing activity, you can
set the threshold for large transport requests. If the transport request contains more objects as set in the
customizing, the transport analysis is performed before the actual conict calculation.
View cluster /SALM/TPP_VCUST -> Customizing
Parameter
PERFTH_OBJ
Value Number, default is 1000
Conict Handling Per Global System
You can dene how conicts with objects protected by a global system should react. This conguration applies
to all corresponding template rules but can be overruled by local-system-specic lock handling and template-
rule-specic local lock handling.
View cluster /SALM/TPP_VCUST -> Conict Handling
System
Global system in the format of <system id>:<client>.
Wildcards (such as *:*) are supported.
128 PUBLIC
Focused Build for SAP Solution Manager
Focused Build Standalone Extensions

Event ONRELEASE: when releasing the transport request
ONSAVE: when changing the transport request
Handling Warning. Conicts can be conrmed or ignored.
Error. Activity will be canceled.
Conict Handling Per Local System
You can dene how template rules should react on a local system connected to a global system.
View /SALM/TPP_SG_LCU
Global System GUID
Calculated when global system has been selected
Global System Relevant global system (no wildcards allowed)
Local System GUID Calculated when local system has been selected
Local System Relevant local system
Parameter CONFLICT_ONRELEASE: Check when releasing transport
requests.
CONFLICT_ONSAVE: Check when changing transport
requests.
VALUE: E: Error. Activity will be canceled.
W: Warning. Conicts can be conrmed or ignored.
Template-Rule-Specic Local Lock Handling
Within the template protection cockpit, you can dene how a specic template rule should react for a selected
local system.
4.2.3.3 Live Locking
Trigger
If a development system of a transport request is maintained as a global system within template protection,
the live locking is performed as part of the conict calculation.
Procedure
Every changed object or object part of the transport request is converted in a template rule.
Depending on the customizing option, the template rule is created in status inactive when the transport
request has been changed and is activated during the release of the transport request. This procedure ensures
that temporary changes do not lead to conicts but only nal released changes.
Focused Build for SAP Solution Manager
Focused Build Standalone Extensions
PUBLIC 129
Customizing
Deactivate Live Locking Globally
You can globally deactivate the live locking function for all global systems.
View cluster /SALM/TPP_VCUST -> Customizing
Parameter
LIVE_INACT
Value X
Activate Live Locking During Creation
By default, template rules created as part of live locking are created in status inactive during the change of the
transport request and are activated as part of the release of a transport request. With the following customizing
option, the template rules are always created in status active:
View cluster /SALM/TPP_VCUST -> Customizing
Parameter
LL_ASACT
Value X
4.3 Change Request Management Dashboard
The Change Request Management Dashboard shows information about the current status of a selected change
control landscape. You can use the Change Request Management Dashboard to monitor release cycles or other
change cycles, view details, and easily identify potential problems.
On the home page of the Change Request Management Dashboard, you select a change control landscape to
get an overview of the current status of this change control landscape on various tiles. You can choose a tile to
open a detailed view. You can use the breadcrumb navigation to switch between the detail view and the
dashboard.
Tip
The in-app help (formerly the Web Assistant) provides help for the Change Request Management
Dashboard
app. You can display the in-app help by choosing the icon.
The Change Request Management Dashboard displays the following cards:
● System Landscape
Systems
● Requests for Change / IT Requirements
Requests for change and IT requirements
● Changes
Change documents assigned to requests for change or IT requirements
● Changes Without Assignments
Change documents not assigned to a request for change or an IT requirement
● Defect Corrections
130
PUBLIC
Focused Build for SAP Solution Manager
Focused Build Standalone Extensions
● Transport Requests
● Transport Requests Without Assignment
Transport requests not assigned to a change transaction
To use the Change Request Management Dashboard, you need to have dened the KPIs and other settings in
the Customizing (IMG).
4.4 Electronic Signature
The electronic signature function is primarily intended for FDA-regulated environments where the normal
change process in Change Request Management requires specic approval a FDA-compliant electronic (digital)
signature.
Prerequisites
You have the business role /SALM/SM_PRO or a copied business role.
Context
When you process change transactions, there are two situations where a digital signature may be required:
● During an approval step that uses the approval procedure
● During any status switch within a request for change or change document
Signing Documents
The signature dialog box appears automatically when a digital signature is required.
1. Enter a text in the Comment eld.
2. Fill in your user name and password.
3. ○ To save your signature and your comment in the transaction log, choose Sign&Save.
○ To discard all inputs within the signature dialog box, choose Cancel.
Analyzing Signatures
To analyze if, when and by whom tickets have been signed, call transaction SE38 and execute /SALM/
CM_DS_READ_SIGNATURES.
Focused Build for SAP Solution Manager
Focused Build Standalone Extensions
PUBLIC 131
You see the ID, type, description, status, date, time, and user.
4.5 Repack
The Repack function addresses complex system landscapes where you may work with dual development
tracks delivering into one or more production systems.
Use
A typical use case is having one development track for the maintenance of the production systems and another
one for implementation and enhancement projects. As part of the preparation of a go-live of an implementation
or enhancement project, you must document this as a change to your production systems. Therefore, this
project must be passed as a change through the maintenance track, which adds the additional benet of
performing a "dress rehearsal" in this track.
There are two dierent repack scenarios available:
● Repack by Transport
You can select transport requests freely from the source system.
Use the Repack by Transport function to transport already imported external transports through your
maintenance landscape. You can lter the transports by import date, which is read from the import history.
You can also combine the content of single open transports in the current system into one aggregated
transport.
● Repack by Change Cycle
You can select transport requests assigned to a specic change cycle.
Use the Repack by Change Cycle function during a cut-over process after the import into your maintenance
landscape.
Prerequisites
● You use the business role /SALM/SM_PRO or a copied business role.
● The target change document has the status In Development and is assigned to a change cycle of the
maintenance landscape.
● For repack by transport:
○ The target change document has at least one workbench transport request and one customizing
transport request as the target transport requests for all objects.
○ There are transports in the development system of your current maintenance landscape that were
imported (import history) or currently open.
● For repack by change cycle:
○ The target change document has at least one transport request as the target transport request for all
objects.
132
PUBLIC
Focused Build for SAP Solution Manager
Focused Build Standalone Extensions

○ You have at least one change cycle that imports into the development system of your current
maintenance landscape.
Procedure
1. In your current target change document, go to the Transport Management assignment block.
2. Under More, choose Repack.
3. In the wizard, select the repack scenario (Repack by Transport or Repack by Change Cycle) and choose
Next.
4. Find the transport requests that are to be repacked. For the two scenarios, the available selection criteria
are dierent.
Selection Criteria for Transports to Repack
Repack by Transport
Repack by Change Cycle
Repack System
Select the relevant source system (if there is more than one source system available). The source system is the system
where the repack takes place.
○ Start Date
Select a start date to display transports requests that
were imported into the source system during a partic
ular period of time.
○ End Date
Select an end date to display transports requests that
were imported into the source system during a partic
ular period of time.
○ Show Open Transports
Select this option to display open transport requests
in the result list. (Start date and end date have no ef
fect here).
○ Show ToC
Select this option to display transports of copies in
the result list.
○ Change Cycle
Select the change cycle to display all assigned trans
port requests that were imported into the source sys
tem.
All matching transports are displayed in the result list. The column Repacked identies transports that
have been repacked before.
5. Mark the transports that you want to repack and choose Next.
6. Specify the target transport requests:
○ Workbench Request
Select a target workbench request (if there is more than one available in the current change
document).
○ Customizing Request
Select a target customizing request (if there is more than one available in the current change
document).
Focused Build for SAP Solution Manager
Focused Build Standalone Extensions
PUBLIC 133

7. You can select the following predened repacking options:
○ Change Originality
Change originality of workbench objects to the source system.
○ Add Directory Locks
If transport locks exist for objects that are to be repacked in the source system, this function removes
these locks in order to add the locks for the repack target transport request.
○ Add Cross-System Object Lock
Add cross-system object lock for the target repack transport request
○ Repack Transport of Copies into Customizing Request:
Repack transports of copies into the target customizing transport. (By default, they are repacked into
target workbench transport.)
8. Choose Start Repack.
The results of the repack are displayed in a list. An icon indicates the status for each repacked transport.
9. To close the repack wizard, choose Leave.
You return to the Transport Management assignment block.
Note
To check the summary of the repack, go to the Text assignment block.
In the application log (transaction SLG1), choose /SALM/CM_REPACK to see detailed information about the
repack, for example, the status and any messages.
4.6 Cross-Landscape Distribution
The Cross-Landscape Distribution function (XLD function) is used to distribute transports from one landscape
to another landscape.
Use
This function can be helpful in several scenarios:
● Cross-Landscape Functional Developments
If you develop a custom development package in one landscape and want to distribute the same
functionality to other landscapes, for example, functions for the user maintenance or basis reports that
should be available in all landscapes.
● Global Functional Development
If you have dierent landscapes that depend on each other, but you do not have a direct transport
connection as they dier in some major parts, but you still want to distribute changes from one global
development landscape to other local landscape.
Caution
The Cross-Landscape Distribution function does not check whether the distributed objects are changed in
the target system or not. It always imports the version from the source development system into the target
development system.
134
PUBLIC
Focused Build for SAP Solution Manager
Focused Build Standalone Extensions
Customizing Cross-Landscape Distribution
For cross-landscape distribution, the user has a choice between streamlining all versions of an object or
modifying individual versions. In the system-specic settings, the user can select the following options:
● Strict Mode
In the strict mode, you can provide a list of development packages and customizing tables for checks that
are executed during distribution and change workows to validate which objects are allowed.
● Non-Strict Mode
In the non-strict mode, cross-landscape distribution allows you to distribute any change to any landscape
that is congured in SAP Solution Manager. This mode provides exibility to distribute changes across
dierent landscapes.
● Target Lock
For distribution from one system to another, the user can enable target lock to lock the distributed object.
If a user attempts to change the protected object, the system shows an error message. This gives the user
the choice to receive an object as it was delivered from the source or as a customizable model of the
original.
● Overwrite Original
Ensures that the distributed object overwrites original versions of the same object in the target system.
● Overwrite Objects in Unconrmed Repairs
Overwrites the object if it has been modied in the target system.
Execution Modes
There are two dierent execution modes for cross-landscape distribution:
● Wizard-based execution mode
You can use a wizard to specify a target change document or a target transport request for the transports.
In this mode, you can distribute transports to only one target at a time.
● Automated Cross-Landscape Distribution
In the automated mode, you do not specify a target because the targets for cross-landscape distribution
are congured in customizing.
The automated cross-landscape distribution only works in the strict mode.
The automated cross-landscape distribution distributes the transports to several targets at the same time.
Wizard-Based Execution Mode
In the wizard, you can choose to distribute the contents into a change document, or into a transport request.
Depending on your customizing settings, only one of these two options may be available.
To simplify the repetition of a successful distribution, you can also reload the previous settings.
Distribution into a Change Document
Prerequisites
Focused Build for SAP Solution Manager
Focused Build Standalone Extensions
PUBLIC 135

● The source change document has transport requests assigned that contain objects. By default, these
transports must be released, but in customizing, you can allow the distribution of open transports.
● A target change document in the dened status exists (the transaction types and status that are allowed
are dened in customizing).
● The target change document must have an open transport request assigned.
● You use the business role /SALM/SM_PRO.
Context
You use cross-landscape distribution to copy the content of the transport requests that belong to a change
document into a dierent landscape. The target is a dierent change document.
Procedure
1. In the source change document, in the Transport Management assignment block, open the Cross
Landscape Distribution wizard by choosing Cross Landscape Distribution. You may need to choose More to
see this option.
2. On the rst page of the wizard, choose Next to dene a new distribution.
3. Select the target Change Document of your distribution.
4. Choose the target change cycle.
Note
You can restrict the availability of change cycles in customizing. By default, all change cycles are listed.
5. Select the target change document.
If you cannot nd your target change document in this list, it might have the wrong status.
6. Verify the target cycle and the change document selected in the previous steps and start the distribution.
Distribution into a Transport Request
Instead of copying the content of the transport requests assigned to the source change document into a
change document in a target change cycle, you can also copy the objects directly into a transport request in the
target landscape. In this case, the target of the cross-landscape distribution is an open transport request in the
selected target system.
Prerequisites
● The source change document has transport requests that contain objects assigned. By default, these
transports must be released, but distribution of open transports can be allowed in customizing.
● A target transport request exists and is not released.
● You use the business role /SALM/SM_PRO.
Procedure
1. In the Transport Management assignment block of the source change document, open Cross Landscape
Distribution and dene a new distribution.
2. Instead of selecting Change Document as target of your distribution, select Transport Request.
3. Select a target system and client.
Note
You can restrict the availability of target systems in customizing. By default, all target systems that
have been marked as development system in any of the logical component groups are displayed.
136
PUBLIC
Focused Build for SAP Solution Manager
Focused Build Standalone Extensions
4. Select the target transport request in the selected system and start the distribution.
Repeated Distribution
Prerequisites
● You have already executed a distribution successfully.
● You use the business role /SALM/SM_PRO.
Context
To simplify the repetition of a successful distribution, you can reload the previous settings.
Procedure
1. In the source change document, in the Transport Management assignment block, open the Cross
Landscape Distribution wizard by choosing Cross Landscape Distribution. You may need to choose More to
see this option.
The rst page of the wizard shows an overview of the previous distributions that were executed for this
change document.
2. Select one of the previous distributions and choose Conrm and Start Distribution.
All settings from the selected distribution are reloaded.
3. Verify the target change cycle and change document or the target system and transport request and start
the distribution.
Automated Cross-Landscape Distribution
If you use the Automated Cross-Landscape Distribution function, the target transport requests are created
automatically and assigned to the current change document. Automated cross-landscape distribution only
works in the strict mode.
To execute the automated cross-landscape distribution for the transports of a change document, in the
Transport Management assignment block of the change document, choose Automated Cross Landscape
Distribution. You may need to choose the More button to see this option.
Automated cross-landscape distribution distributes the transports to several targets at the same time.
4.7 Status-Dependent Check Framework
The status-dependent check framework provides two main functions:
● Checking for mandatory inputs
● Locking elds against subsequent changes
Focused Build for SAP Solution Manager
Focused Build Standalone Extensions
PUBLIC 137
Checking for Mandatory Inputs
Prerequisites
You have opened the current transaction (for example, a change document) in the WebClient UI and have
activated the edit mode.
Context
The consistency check for mandatory inputs is not not only performed when you create new documents, but
also later in the process. It can be executed on each status change.
The following checks are available:
● Check for Fast Entry elds
● Check for business partners
● Check of texts
Some standard elds can be examined by the standard status-dependent check, but this framework can be
used in user-dened elds as well.
Procedure
1. Switch the current transaction to the next status either directly or by choosing the appropriate action.
The check is executed in the background. In case a mandatory input is missing, an error message is
displayed.
2. Correct the error by entering the missing value.
3. Repeat the status change.
Locking Fields Against Subsequent Changes
Prerequisites
You have opened the current transaction (for example, a change document) in the WebClient UI.
Context
This functionality provides the possibility to lock elds against changes in a later status (later than the initial
one).
Supported are
● Fast entry elds
● Business partners
Procedure
Activate the edit mode for the transaction or switch the transaction to a new status (while you are in edit
mode). Several elds are still locked or get locked.
138
PUBLIC
Focused Build for SAP Solution Manager
Focused Build Standalone Extensions

4.8 Cutover Checks and Post-Cutover Activities
Cutover Checks and Post-Cutover Activities reduce the manual eort of cutover activities in N + 1 system
landscapes.
Cutover checks and post-cutover activities are performed for a change cycle. If you are using this function,
change cycles that are created in a branch that is not the maintenance branch have an additional assignment
block Cutover Checks and Activities in the WebClient UI, which you can use to execute the cutover checks and
the post-cutover activities.
Once you have executed a cutover check, you can choose Export to Spreadsheet to export the check results to
an Excel spreadsheet.
Prerequisites
● You have the Focused Build add-on (ST-OST 200) installed.
● You are using Change Request Management in a multi landscape.
● You have completed the Customizing activities for cutover checks in Customizing (IMG) under SAP
Solution Manager Implementation Guide SAP Solution Manager Focused Build Change Control
Management Extensions Cutover Management .
● You use the business role /SALM/SM_PRO.
Cutover Checks
You perform the cutover checks before the cutover in order to check and minimize the risks that can arise
during the cutover into the maintenance landscape.
1. In the WebClient UI, open the change cycle document.
2. In the Cutover Checks and Activities assignment block, open the Cutover Checks tab page.
3. Choose Perform Checks.
The cutover checks check the following:
● Have all retrots been executed in the parallel track?
● Are the retrotted changes active?
● Are there objects in the scope of the cutover that are in conict with other objects that are currently
processed in the target system?
If a check fails, the result list gives feedback about the objects, transports, and changes for which a problem
was found. You can then navigate to the aected objects and process them manually.
Post-Cutover Activities
You execute the automated post-cutover activities after the cutover has been performed and all software
changes have been deployed into the maintenance track. You execute the post-cutover activities for each
system of the maintenance landscape individually. Which post-cutover activities are available for a system
depends on the role of the system in the landscape and the order of the systems in the transport track.
1. In the WebClient UI, open the change cycle document.
2. In the Cutover Checks and Activities assignment block, open the Post Cutover Activities tab page.
3. Select a system and choose Execute Selected.
Focused Build for SAP Solution Manager
Focused Build Standalone Extensions
PUBLIC 139
4.9 Multi-Tenancy Enhancement
You can use the Multi-Tenancy function to fully control all data that is used for Change Request Management
and IT Service Management to be separated by respective authorization objects.
This segregation can be realized customer- specic by business partner, or system-specic by conguration
item. Both options can also be combined.
All applications within the WebClient UI for Change Request Management and IT Service Management comply
with these splitting criteria, for example, without authorizations it is not be possible to see the data objects in
their respective search queries or search helps.
You can use the WebClient UI of IT Service Management and Change Request Management usual to process
your incidents, requests for change, or change documents.
Business Partner Dependent Checks
Business partner dependent checks help to control access to the following:
● Business partners in the search help
● CRM transactions through assigned sold-to party
Conguration Item Dependent Checks
Conguration Item dependent checks help to control access to the following:
● Systems in the search help
● CRM Transactions through assigned systems
Status Check for Transaction Types
Additionally, there is the status check for transaction types, which adds an additional authorization check that
provides status-specic control about read and write access to a ticket for additional control.
Whenever the user performs an action, the system checks if the user has the needed authorization.
These actions can be:
● Open or display a document
● Change into edit mode
● Set a document to the next status
4.10 My Checklist Steps
In the My Checklist Steps app, you can manage all not completed checklist steps that are assigned to you. You
can also display all already completed checklist steps that are assigned to you.
On the landing page, choose the icon to toggle between the checklist steps that are assigned to you and
those assigned to your team.
140
PUBLIC
Focused Build for SAP Solution Manager
Focused Build Standalone Extensions

You can lter the displayed checklist steps using the lter parameters in the header:
● Description (Parent)
● Description (Step)
● Process Type (Parent)
● Status (Step)
● To Do By
In edit mode, you can change the business partner assigned to a checklist step, the status of a checklist step,
and the deadline.
Note
If a status eld is grayed out in edit mode, another checklist step must be carried out beforehand.
If a business partner eld and the status eld are grayed out in edit mode, the checklist step is already
completed and cannot be changed anymore.
Moreover, the parent document of each checklist step is accessible by choosing the link in the Parent
Document column. The parent document then opens in one of the following apps:
● Generic App (for parent documents that are specic to Focused Build Requirements-to-Deploy, such
as work packages / work items)
● WebClient UI (for parent documents that are not specic to Focused Build Requirements-to-Deploy)
Each checklist step has a detail view that you can access by choosing the respective row in the Checklist Steps
area. The detail view provides further information about the checklist step in several areas:
● Step Data
● Texts
● Involved Parties
● Change History
In edit mode, you can enter or change the following parameters:
● To do by
● Step status
● Comments and notes
● Business partner
4.11 Focused Build Test Suite Extensions (Standalone)
In Focused Build, the test suite of SAP Solution Manager is extended by additional applications and functions.
For test management, you can use the following Focused Build applications:
● To create Test Steps test cases, use the Test Steps Designer application.
● To dene parameters used as placeholder in test cases or test steps, and the respective variable values for
a test plan, test package, or tester, use the Test Steps Parameters application.
● To execute test cases use the My Test Executions application.
● To monitor the status of the testing, use Test Suite Dashboard.
Focused Build for SAP Solution Manager
Focused Build Standalone Extensions
PUBLIC 141

4.11.1 Test Steps Designer
Use the Test Steps Designer to create and maintain Test Steps test cases, and to describe test activities. In Test
Steps test cases, the test steps (test activities) are assigned to process steps in the Solution Documentation.
You can start the Test Steps Designer from within a solution in Solution Documentation or from the SAP
Solution Manager launchpad.
Features
With the Test Steps Designer, you can do the following:
Create and edit individual test cases
● Create Test Steps test cases based on process steps in the Solution Documentation
Recommendation
It’s recommended that you create Test Steps from within a solution in Solution Documentation
because this method automatically provides the solution context, which is a prerequisite for the
selection of executables.
● Create Test Steps test cases directly in the Test Steps Designer and later assign them to executables in the
Solution Documentation
● Edit Test Step test cases
● Find all test plans, test packages, and sequences that contain the selected test case.
● Copy test cases ( ): Assign a new test case name, select a destination folder, select a status schema,
and a branch. You can also activate the function Copy Solution Assignment to link the test case directly into
the same position in solution documentation.
Manage multiple test cases
● Use parameters as placeholder for test plan-specic values in text elds in the header section of a test
case, or in a test step
● Create template test cases, which make it easy to create, maintain, and update Test Step test cases with
similar content
● Upload test cases from CVS les
● Mass update the header details of multiple test cases.
Use Groups and Folders
Groups and folders help you nd your test cases in the Test Steps Designer app.
There are several groups, for example:
● My Test Cases: Test cases owned or changed by you
● Favorite Test Cases: Test cases bookmarked as favorites
● Recently Changed Test Cases
When creating or editing a test case in the Test Steps Designer, you can select a folder in which the test case
can later be found.
142
PUBLIC
Focused Build for SAP Solution Manager
Focused Build Standalone Extensions
Related Information
Linking Test Cases to Solution Documentation Processes [page 89]
Editing Test Step Test Cases [page 90]
Test Steps Parameters [page 95]
Template Test Cases [page 91]
4.11.1.1 Linking Test Cases to Solution Documentation
Processes
If you want to add executables to a test step, it must be assigned to the Solution Documentation process step.
Recommendation
While you can create a test case directly in Test Steps Designer and assign it later, we recommended
creating it from within a solution. This method automatically provides the solution context for the test
steps.
To create Test Step test cases from within a solution in Solution Documentation, do the following:
1. In the Solution Documentation, navigate to the business process, subprocess, or process for which you
want to create a test case.
2. To create a new test case, right-click on the Solution Documentation elements for which you want to create
the test case and, in the context menu, choose New Test Cases Test Steps (Create) .
The Test Steps Designer opens and you can edit the test case. For each process step, there is a test step on
the Test Steps tab. The executables of the process steps are automatically assigned to the test steps.
3. In the Test Steps Designer, edit, and complete the test case.
You can also assign an existing test case to process steps in Solution Documentation. To do so, in the context
menu, choose
New Test Cases Test Steps (Assign) and select the test case that you want to assign.
4.11.1.2 Editing Test Step Test Cases
In the Test Steps Designer application, each test case has the following tab pages that you can use to change or
further specify the test case:
● Header
Edit general properties and settings, such as the version, version title, testing mode, status, priority, owner,
strict step sequence, duration, description, prerequisites, or exit criteria. Wherever you can enter a long
text, you can use the parameters you dened in the Test Steps Parameters app.
You can edit multiple test cases at once with the mass update function.
Recommendation
It is recommended to add only Test Step test cases with the status Released to test plans.
Focused Build for SAP Solution Manager
Focused Build Standalone Extensions
PUBLIC 143
● Test Steps
Each step is dened with a description, instruction, and expected result. Wherever you can enter a long
text, you can use the parameters you dened in Test Steps Parameters. If the test case is assigned to
Solution Documentation, you can add an executable. You can also do the following:
○ Create substeps
○ Set a ag that the testers must provide evidence for certain steps (for example, by attaching a
screenshot)
○ Set additional test result attributes
You can specify for which test step a result attribute is relevant, whether the result attribute is
mandatory, and for which step it is mandatory. You can set result attributes to Inactive if they are not
used anymore. You can also dene result attributes as Public to make them visible in Test Sequences.
Public result attributes are also shown as Previous Results from Test Sequence in the My Test
Executions app.
○ Upload an attachment for the step. You can use the drag and drop function to upload les and images
and attach them to the step.
● Attachments
You can upload images or document les on this tab page.
● Notes
You can add notes.
● Where-Used (only relevant if you are using template test cases)
In a template test case, you see the test cases derived from the template.
In a test case derived from a template, you see the related template.
● Change Log
You see the changes that were made for the test case.
Adding New Solution Documentation Content to Test Steps
If the Solution Documentation content has been changed, you can display the changed Solution
Documentation content to update the test case. For example, if new process steps have been added, you can
create new test steps accordingly.
To display the Solution Documentation content, on the Test Steps tab page, choose Add from SolDoc and
select the new Solution Documentation content that you want to use in the test case.
Related Information
Test Steps Parameters [page 95]
4.11.1.3 Uploading Test Cases from Files
You can upload test cases that you have prepared as Excel or CSV (UTF-8 encoding only) le to the Test Steps
Designer app. The Test Steps Designer converts them to a Test Step test case, which, for example, can be
executed with My Test Executions.
To upload a test case, on the start page of the Test Steps Designer, simply choose (Upload New Test Case
from File) and follow the steps in the wizard.
144
PUBLIC
Focused Build for SAP Solution Manager
Focused Build Standalone Extensions
Tip
You can download a sample CSV le and use it as a template for your test cases:
1. Choose (Upload New Test Case from File).
2. In the Upload Test Cases wizard, choose Download Sample File.
With the upload function, you can also create new versions of existing test cases that have been created with
the upload function: If you update the test case in the CSV or Excel le and then upload this le with the same
test case title as the existing test case, Test Step Designer creates a new version of the test case.
4.11.1.4 Template Test Cases
Template test cases make it easy to create, maintain and update test cases with similar content:
The Relationship tab page of a template test case displays the test cases that have been created based on the
template. On the Relationship tab page of a test case derived from a template test case, you can choose the
corresponding template test case and choose Pull Updates to import changes made in the template into the
derived test case.
Creating Template Test Cases
You create template test cases as follows:
1. In the Test Steps Designer application, choose + ("Create new test case").
2. In the Test Case Properties, turn the toggle switch at Template Test Case to Yes.
3. Select a solution and a branch.
Note
The solution and the branch are copied into all test cases that are created based on this template test
case.
4. Choose Create.
5. Dene the properties and test steps of the template test case.
6. Release the template test case.
Template test cases are not used for testing. When you change or update a template test cases, the updates
can be imported into all test cases that have been created based on the template test case.
Creating Test Cases Based on Template Test Cases
For the actual testing, you create new test cases based on the template test case.
To create a new test case based on a template test case, do the following:
Focused Build for SAP Solution Manager
Focused Build Standalone Extensions
PUBLIC 145
1. Open the template test case in the Test Steps Designer application.
2. In the tool bar, choose Create New Test Case from Template.
3. Choose whether you want that updates in the template are automatically pushed into the new test case
4. Choose Create.
4.11.2 Test Steps Parameters
When you design Test Steps test cases, enter parameters as placeholders to put test data values directly at the
right place for the right tester during test execution. Use this application to manage the parameters and check
missing assignments.
Basic Terms and Concepts
Parameters make it easy to reuse one common test case with slightly dierent information. You don't need to
create a separate test data sheet with specic instructions for dierent test packages or testers. Instead, you
use the parameters as placeholders in a Test Steps test case and assign specic values to it.
For every test plan that uses a parameter, at least one value must be assigned. You can dene several values for
the same parameter and distinguish them based on test packages and testers. During test execution, the most
specic value is shown. For example, if you assigned dierent values for testers and test packages, the testers
see the value individually assigned to them, regardless of the general test package value.
For test cases with testing mode Shared Results, the value assignment of the test plan or test package level is
considered only. Value assignments on tester level will be ignored. This ensures that testers work with the same
parameter values as they share instructions and results in this kind of test case.
For better overview, every parameter must be in a group. When you design a Test Steps test case with
parameters, groups help you nd and add them.
Prerequisites
● You have installed Focused Build SPS06 or higher.
● For value assignments, there is at least one test plan, containing one or more Test Steps test cases with
parameters.
● To see the change log of value assignments in a test plan, you have been assigned authorization object
FB_TS_CLOG.
Features
The Test Steps Parameters application gives an overview of the test steps parameters that have been created in
SAP Solution Manager, and helps you to nd missing value assignments and empty values.
146
PUBLIC
Focused Build for SAP Solution Manager
Focused Build Standalone Extensions
If a Test Steps test case with parameters is used in a test plan and has no value assigned, the tester only sees
the parameter name in brackets instead of a specic value during test execution. The tester can refer to the
parameter name to inform the test manager about a missing test data value.
Parameter Overview
● You see the existing parameters in their groups, and whether there are test plans without assigned value.
● You can add new groups and parameters, and directly access the value assignment.
● You can delete empty groups.
● You can search for parameter names or parts of names.
Parameter Details
● For each parameter, you see a list of the test cases that use it, and the test plans that contain those test
cases. You can also search for specic test cases and test plans.
● You can directly access to the Test Steps test cases that contain the selected parameter.
After selecting a parameter, under Test Plan Assignment, you can lter the test plan list to nd the test
plans that are missing a value.
● When you select a test case, you go directly to the Test Steps Designer application and you can use the
parameters in long-text elds within the header and test steps.
● You can delete parameters that are not used in any test case.
Value Assignment
● After selecting a test plan, you can use a switch to lter for the parameters that are empty for this
particular test plan.
● You can also mass-upload value assignments and download the values assigned to a test plan.
Related Information
Test Steps Designer [page 88]
4.11.3 Test Suite Dashboard (Obsolete)
As a test manager, you use Test Suite Dashboard to monitor the test status of projects.
You can use the views and tiles on the Test Suite Dashboard to do the following:
● Get an overview of the status of all test types
● Monitor the execution status of test plans and test packages
● Monitor the status of the defects reported for the test plans
● Export data to a spreadsheet le
Focused Build for SAP Solution Manager
Focused Build Standalone Extensions
PUBLIC 147
Procedure
To check the status of the test plans for a project in Test Suite Dashboard, proceed as follows:
1. Start the application by choosing Test Suite Dashboard on the SAP Solution Manager launchpad.
2. Under Selection Parameters, select Test Suite for Focused Build.
Note
If you do not use the project management for Focused Build projects, select Test Suite. Select the
solution and the branch.
3. Select the project and the wave. You can limit the search by selecting additional attributes.
4. Select the test plans that you want to analyse with the dashboard:
1. To display the the test plans, choose Search Test Plans.
2. Select the test plans from the table.
5. Choose (Apply).
Note
At Saved Selections, you can congure and save selections:
Choose (Settings) to congure and save a selection.
To load a saved selection, select the selection in the selector eld.
Tab Pages
Test Suite Dashboard has the following tab pages:
● Overview
For more information, see Overview Tab Page of Test Suite Dashboard [page 99].
● Test Preparation
This tab page provides information about the status of the test planning, especially about the assignment
of test cases to work packages. You can use this tab page to nd out which work packages do not have a
test case assigned and to switch to the Assignment Analysis and Test Plan Generation application.
● Test Execution Status
This tab page provides information about the test execution status of a selected test plan. For more
information, see Test Execution Status Tab Page of Test Suite Dashboard [page 100].
● Defect Status
This tab page provides information about the defects related to selected test plan. For more information,
see Defect Status Tab Page of Test Suite Dashboard [page 101].
● Traceability Matrix
This tab page provides information about the test status of the requirements, work packages, work items,
and defect corrections of the selected wave of a project.
148
PUBLIC
Focused Build for SAP Solution Manager
Focused Build Standalone Extensions
4.11.3.1 Overview Tab Page of Test Suite Dashboard
The Overview tab page displays the following information about the selected test plans:
● Test Plans – Released for Test
The number of test plans that are ready to be tested.
● Test Cases – Currently not Passed
The number of test cases of the selected test plans that still need to be tested or retested. These test cases
that have the status initial, in progress, or error.
● Open Defects – Priority 1 and 2
The number of open defects reported for the test cases of the selected test plans.
● Test Status
This tile shows the test classication categories of the tests in the selected test plans. You see the
percentage of tests for each test classication category.
● Defect Details
The number of defects reported for each test classication category.
● Test Execution Status
This chart shows how many of the test cases have the statuses initial (not tested), in progress, error (tested
with negative result) or OK (tested with positive result). The simplied statuses are indicated by evaluation
colors (gray, yellow, red, green).
● Test Execution Progress
In this chart, the test execution progress is visualized in a timeline. Graphs for the test status categories
initial, in progress, error, and OK indicate how the test status of the test cases has changed over time.
To change the period of time displayed on the timeline, choose Timeline and select a suitable period.
● Test Execution Status by Test Plans
This chart shows the status of test cases for each test plan.
● Test Execution Progress by Projects
This table gives you an overview of your projects’ execution progress. You can export this table as a CSV
le.
● Open Defects by Priority
The chart shows how many of the defects reported for the selected test plans have which priority.
● Defects by Priority and Status
This bar chart shows the priorities of the defects for each defect correction status.
● Defect TimeLine
● Defects across Projects
● Test Execution Status by Work Package
4.11.3.2 Test Execution Status Tab Page of Test Suite
Dashboard
When you switch to the Test Execution Status tab page, you select one of the test plans. You can later change
this selection in the Selection Parameters section.
The Test Execution Status tab page displays the following information about the selected test plan:
Focused Build for SAP Solution Manager
Focused Build Standalone Extensions
PUBLIC 149
● An overview of the status of the test cases
You see the number of test cases for each of the following status categories:
○ Initial
○ In Progress
○ Error
Tests that found an error
○ OK
Successful tests
To see the detailed statuses of the test cases, go to the Test Execution Status chart.
● Days remaining
The number of days that are left to complete the test plan.
● Test Execution Status
This pie chart displays the test execution statuses of the test cases.
● Test Package Status Overview
A column chart displays the test execution statuses of the test cases for each test package.
● Test Package Status Detail
This table displays the test execution statuses of the test cases and the open defects for the test plan and
each test package. You can export this table as a CSV le.
● Test Execution Progress
Graphs for the four test execution status categories (initial, in progress, error, OK) visualize the test
execution progress on a timeline.
To change the period of time displayed on the timeline, choose Timeline and select a suitable period.
● Test Cases with Errors and related Defects
● Test Execution Results - Manual Tests
● Test Execution Status by Work Package
4.11.3.3 Defect Status Tab Page of Test Suite Dashboard
When you switch to the Defect Status tab page, you select one of the test plans. You can later change this
selection in the Selection Parameters.
On the Defect Details tab page, you see the following information about the selected test plan:
● Number of open defects
● Number of open defects with priority 1 ("very high")
● Number of open defects with priority 2 (" high")
● Number of defects that require a retest
● Open Defects by Priority
The pie chart shows the number of defects for each priority.
● Defects by Priority and Status
This bar chart shows the priorities of the defects for each defect status.
● Defect Progress
Graphs for the defect statuses visualize the progress of the processing of the defects on a timeline.
You can use lters to display the progress of defects with specic priorities or statuses.
To change the period of time displayed on the timeline, choose Timeline and select a suitable period.
● Defect Status Statistics
150
PUBLIC
Focused Build for SAP Solution Manager
Focused Build Standalone Extensions

This table indicates for each test package the total number of defect, the numbers of defect with the
priority high or very high, and the numbers of open defects. You can export this table as a CSV le.
● Open Defect Status Details
This table lists the open defects reported for the test plan. The table informs about status, priority, and
other defect details. You can do the following:
○ Filter the defects by status and priority
○ Navigate to a defect IT Service Management by choosing the defect ID in the table
○ Download the table as a CSV le
● Defect By Categories
This chart shows the defects by category and status. The chart uses the rst level of the multi-level
categorization scheme for the test plan.
You can set lters for the defect priority and status.
4.11.4 My Test Executions
As a tester, you can use the My Test Executions app to document your test cases and report defects for the test
cases.
You open the My Test Executions app from the SAP Solution Manager launchpad.
The app opens with the My Packages page. Under Test Packages, you nd the test packages assigned to you,
categorized by status:
● Ready to Test: all test packages with test cases that are ready to test
● Released: all test packages that are not locked
● Protected: all test packages that are locked
● Assigned: all test packages assigned to the current user
Note
To display and access the test packages of another tester, you can choose (On Behalf), search and
select the tester, and log on behalf of this tester.
My Packages
In the Test Packages list, you can do the following:
● Filter and sort the test packages, for example by status, test plan, test package name, or empty test
package priority.
● Select a test package to open the test package in the test package view.
Test Package View
In the test package view, you can do the following:
● View general information about the test package and to read attached documents.
● Get an overview of the status of the test cases in the selected test package.
● Select a test case to manage and document it in the test case view.
Test Case View
In the test case view, you can nd information about the test case and read attached test case descriptions.
Focused Build for SAP Solution Manager
Focused Build Standalone Extensions
PUBLIC 151
For test cases that are ready to test, you can do the following:
● Document the test case execution.
● Record TBOMs for the test document and Test Steps.
● Enter a comment in the Comment eld on the Header tab page.
Note
The Comment eld has to be activated in the Customizing for SAP Solution Manager (transaction
SPRO) at SAP Solution Manager Focused Build Test Suite Extensions Central Settings for Test
Suite
● If this is enabled in the standard Test Suite, testers can also digitally sign test results and test notes.
● Report a new defect for the test case.
Choose Create Defect. Select the defect type Defect, the system, and a priority and enter a defect title and
a description. You can select categories to further specify the defect. If there is an evidence document
attached to the test case, you can choose to take it over as defect attachment.
You can later nd and further specify the defect in the My Defects app. Defects are used to notify
developers of errors that have been identied during testing. If necessary, a defect correction for the defect
can be created in My Defects and later be processed in My Defect Corrections.
Note
Setting an error for a test case or a test step automatically calls up the Create Defect dialog if in the
Customizing for SAP Solution Manager (transaction SPRO) at SAP Solution Manager Focused Build
Test Suite Extensions Central Settings for Test Suite , the function Open Defect Dialog on Error is
active.
If the other function Allow personalization is set to active, the Create Defect dialog will start only if the
settings in SU01 are either set to Yes or Default.
See also the documentation for the above-mentioned Customizing activity.
The Create Defect dialog shows the defect type (taken from the personalization) and takes over
information on system, client (if the executable is assigned to a test case), and actual and expected
results.
● Report an incident
Choose Create Defect. Select the defect type Incident, the system, and a priority and enter an incident title
and a description. You can select categories to further specify the incidents.
Incidents are processed using IT Service Management.
● Assign an already existing defect to the test case.
Choose Assign Defect. Search for known defects related to the function tested in the test case, select the
defect and assign it to the test case.
● Change the status of the test case.
● Results tab page:
○ Upload les, for example, screenshots, to document the test results.
○ View the results that other testers had for the same test case.
● Attachments tab page:
Upload test result documents for the test case, such as screenshots.
152
PUBLIC
Focused Build for SAP Solution Manager
Focused Build Standalone Extensions
Test Steps
The My Test Executions app displays test steps for test cases that have been created with the Test Step
Designer app. Public result attributes are shown as Previous Results from Test Sequence.
A single Test Steps test case can be executed multiple times. Each time a test case is executed, a new runtime
object is created and the previous objects are saved for reference and documentation purposes.
Related Information
My Defects and My Defect Corrections [page 103]
4.12 Simple IT Request
With the Simple IT Request extension, business users can consume any IT service based on SAP Solution
Manager using the service catalog as the single point of entry. The service catalog includes an intuitive user
interface for the postprocessing of consumed services.
Prerequisites
You have installed the Focused Build for SAP Solution Manager add-on (ST-OST 200 component).
Context
Simple IT Request supports the following use cases for the consumption and maintenance of IT services with
SAP Solution Manager 7.2.
● As a requester, you want to consume a service oered by your IT organization.
● As a service manager, you want to create and oer a new service using the service catalog.
Consuming Services
As a requester, you can use the following features to consume a service:
● In the service catalog, the predened content of the transaction templates is displayed as Services. To
access the service catalog, open the Service Catalog - Create Request app on the SAP Solution Manager
launchpad.
● As a requester, you select a service type from the list, enter the required information into the service form,
and submit the request.
When a service is consumed, a dened transaction is created based on predened data from the template
and from the information submitted by the requester. For example, a Missing Authorization service is
dened using an incident template. The requester selects the service in the catalog, adds information
about the authorization that they are missing, and submits the request. This generates an incident
transaction with predened information, such as the support team, as well as the additional information
added by the requester.
Focused Build for SAP Solution Manager
Focused Build Standalone Extensions
PUBLIC 153

Tip
You can save service request templates that you use often as favorites by choosing (Save as a
Favorite) in the request template. The templates saved as favorites are then displayed on the start page
of the Service Catalog - Create Requests app.
● Requests are processed as transactions in the WebClient UI by assigned message processors, support
teams, and others.
● Requesters can use the My Requests SAP Fiori app to communicate with the request processors, for
example, for queries to and from the requester or to delegate a request. Request processors use the
WebClient UI.
Simple IT Request tasks can be integrated into the My Inbox SAP Fiori app, so that request approvers can use
the tasks in the My Inbox SAP Fiori app to approve or reject requests that require an approval.
Maintaining Services
Simple IT Request provides the following features for creating and maintaining the service catalog and its
services using the WebClient UI in SAP Solution Manager:
● The Maintain Service Catalog application can be accessed from the SAP Solution Manager launchpad.
● The service catalog is based on the multilevel categorization of CRM transactions and can be structured
with respect to the business user perspective. The categorization schema can be maintained in the work
center service operations
● The services are based on business transaction templates. They can be created and maintained in the
WebClient UI of IT Service Management and Change Request Management. The following transaction
types are available:
○ Incident template (S4IT)
○ Problem template (S4PT)
○ Service request template (S4ST)
○ Change request template (S4CT)
● When creating or maintaining a service, enter the following information:
○ Description on the general data section. This is the name of your service within the service catalog.
○ Assignment of a category. This is the place within the catalog where the service is shown. If no
category is dened, the service is not displayed.
○ Content in the Description text eld. With this long text eld, you can describe the service or ask the
service consumer to enter information when requesting this service.
○ In the Simple IT Request Setup assignment block, dene how to display the service form in the service
catalog.
○ Enable or disable the upload of attachments.
○ Select elds that you want to be displayed in the service form and dene properties (as
mandatory, for example). If you don’t dene any elds for the service form, the service cannot be
consumed properly.
○ You can dene authorization groups so that a service is visible only for specic user roles.
● When your service is dened properly, you can release it for the service catalog by setting the status of the
transaction template to released.
154
PUBLIC
Focused Build for SAP Solution Manager
Focused Build Standalone Extensions
4.13 Batch Import
The Batch Import function allows a controlled automatic import of transport requests into managed systems.
Features
Each transport request is evaluated as dened in Customizing, with BAdIs, and in the runtime settings. When a
transport request passes the evaluation check, Batch Import initiates the automatic import of the transport
request.
You can launch a Batch Import manually or use the schedule manager.
Transport Checks
Every transport request must pass multiple transport checks before it is imported into a managed system.
Some checks are mandatory, others can be enabled optionally during runtime or in Customizing.
Check
Mandatory or
Optional Description
Buer Check Mandatory Checks that a selected transport exists in the import buer
System Role Check Mandatory Compares the actual system role with the one dened by the
Customizing
Change Document Relation Optional Imports a transport with a task list relation, but not a change
document relation
Change Cycle Status Optional Checks whether the status of the change cycle allows an im
port
Change Document Status Mandatory Checks whether the status of the related change document
allows an import
Downgrade Protection Optional Checks for existing downgrade conicts. If you use the trans
port-related check framework, this includes additional
checks beyond classical DGP check, such as cross reference
check, ABAP test cockpit (ATC), or custom checks.
Relational Check - Work Item Relations Optional If relations between change documents exist, this check
checks that all transports are either already imported or part
of the import set
Relational Check - Full Work Package Im
port
Optional Checks whether transports of all work packages and work
items are either already imported or part of the import set.
This check can be extended by relations between work pack
ages.
Focused Build for SAP Solution Manager
Focused Build Standalone Extensions
PUBLIC 155
BAdIs for Batch Import
Batch Import uses two BAdIs that can extend the functionality of the program:
● BAdI for extending the performed transport checks or import options and adding further transports.
● BAdI for executing user-dened post-import tasks.
Conguration Options
Runtime Settings
The following settings can be adjusted at runtime:
● Transport test restrictions
● Automatic rescheduling of the Batch Import as a background job
● Release denition as transport selection criteria
● Downgrade protection check
● Checks for the relations between change documents and transports
Customizing Options
The transport requests are evaluated according to the setting variants dened in the Customizing. To dene a
variant, you adjust the following settings in the Customizing:
● Status denition for relevant change documents
● Status denition for change cycles of the change documents
● Automated status change information for a change document (post-import)
● Time and frequency settings for the Batch Import initiation
● Import sequence
● RFC connection type
● Landscape information to dene the considered systems
4.14 Retrot Automation
The Retrot Automation function automates and optimizes processes in the dual landscape synchronization
(retrot):
● Automated execution of imports in batch mode
● Retrot target transport creation
● Automatic import into connected consolidation systems
● Extended Retrot functions
● Automatic e-mail notications to transport owners
You can activate Retrot Automation functions for the following scenarios:
● Transport of Copies as Retrot Target: If transports without conicts are retrotted with the Retrot
Automation tool, the retrotted objects are recorded into a ToC which is released and imported into the
test system automatically.
156
PUBLIC
Focused Build for SAP Solution Manager
Focused Build Standalone Extensions
● Original Transport as Retrot Target: If transports without conicts are retrotted with the Retrot
Automation tool, the retrotted objects are recorded into an automatically created transport.
● Change Document as Retrot Target: If transports without conicts are retrotted with the Retrot
Automation tool, the retrotted objects are recorded into an automatically created transport. The
transport is linked to an automatically created change document.
● Retrot for BW Objects: Retrot enablement for critical BW objects. The following object types are
supported: ISFS, ISMP, ISTS, ROUT, RSDS, RSFO, TRFN.
● Full Scope: Extend the Retrot automation scope by auto-import objects from mixed transports
● Stop at Failed Retrot: The Retrot Automation report will cancel the processing of further transports if the
auto-import for a transport was not successful.
● The following additional functions can be added to the menu of the Retrot Automation tool:
○ Display Change Document: Navigate from the Retrot Automation tool into the change document.
○ Call SNOTE Implementation: Navigate from the Retrot Automation tool into transaction SNOTE of the
Retrot system
● Single Retrot Automation: Trigger the retrot automation for a single transport from the retrot list. The
retrot target transport is created automatically based on the active retrot scenario. This feature
supports auto-import and mixed transports. For example, if you have activated transport of copies as a
retrot target, you can use this function to execute auto-imports with ToCs as target requests in the retrot
screen, for example, for mixed requests with green and red objects.
● Create Retrot Target Transport: Create a target transport (original transport) for a single transport from
the retrot list.
● Display Conicts: For a transport request in the retrot list with yellow and red objects, show all objects
with conicts in the retrot system and the corresponding transport requests.
● Analyze BW Transformations: If the BW scenario is activated, you can use this function to compare
transformations between the development and retrot system.
● Traceability Report: Use report /SALM/RETRO_AUTO_TRACEABILITY to see the traceability of automatic
retrots in a list view. This includes the following features:
○ Select by task list or transport ID
○ Select by timeframe
○ Dierent output views matching the retrot automation scenario in use
○ Show source, target, and ToC ID
○ Show export and import status
○ Display the corresponding change document
○ Direct access via retrot list and retrot automation
4.15 Retrot for BW
With the Retrot for BW function, the following critical BW objects can be retrotted using an automatic
retrot:
● File data sources (ISFS)
● Transfer rules (ISMP)
● Transfer structures (ISTS)
● Data source (RSDS)
Focused Build for SAP Solution Manager
Focused Build Standalone Extensions
PUBLIC 157
● Transformation (TRFN)
● Routines (ROUT)
● BW formulas (RSFO)
For more information about the prerequisites and conguration for Retrot for BW, see the Conguration Guide
for Focused Build for SAP Solution Manager.
4.16 Refresh Test Systems
To refresh a test system, you make a system copy of the production system to the test system.
You can use the Refresh Test System scenario to do the following:
● Save your current developments before you execute a system copy of the production system to the test
system.
● Append the saved transports to the import queue of the refreshed test system after the system copy.
By executing a system copy of the production system (source system) to the test system (target system), you
bring the test system into a system status that represents the current status of the production system. To
avoid losing all current developments that have been imported into the test system but not yet into the
production system (newer versions of Workbench objects and Customizing settings), you can use the Refresh
Test System scenario to save the current developments before executing the system copy.
You use the Refresh Test System scenario to perform a delta calculation: All imported transport requests are
compared between the two systems. The system calculates which transport requests were imported into the
test system, but not yet into the production system (or another source system you specied). The delta
calculation is then saved at operating system level.
In the next step, you perform the system copy by using the known AS ABAP functions (not included in the
Refresh Test System scenario).
After a successful system copy, you execute the Re-apply Transports function in the Refresh Test System
scenario to append the saved delta calculation of the transports to the import queue of the refreshed test
system.
For more information about the prerequisites and conguration for the Refresh Test Systems function, see the
Conguration Guide for Focused Build for SAP Solution Manager.
158
PUBLIC
Focused Build for SAP Solution Manager
Focused Build Standalone Extensions
5 Glossary
Build project Project type in multi-project management. A build project is a subproject of a main
project. Build projects are used to coordinate the development tasks.
Cross-wave Special wave in a main project, that is used for testing developments that have been
implemented in the waves of the build projects assigned to the main project.
Defect Change document created during the test phase of a project. Defects are used to notify
developers of errors that have been identied during testing. The developer responsible
can correct the error using a transport request.
Defect correction Small change that corrects an error. A defect correction is implemented in the current
sprint.
Fit Work package that denes what needs to be done to customize or congure of a
component that otherwise does not need to be changed.
Gap Functional part of a solution that is missing and should be included into the SAP standard
and is therefore handed over to SAP development. A gap might be detected during a
discovery workshop or during the scoping process of a work package.
General change Change that doesn't use a transport request. For example, a new work ow, a change in
third-party software or administration changes.
Main project Project type in multi-project management. A main project is the project that is used to
coordinate the subordinate build projects. It contains also cross-wave for testing results of
the waves of the build projects.
Maintenance
project
A maintenance project is a project that is used for correcting errors. It has only a single
wave with a single sprint.
Milestone Milestones are used to mark specic dates in a project plan. Milestones can be,for
example, the start and end date of the project, a need for an external review, or input and
budget checks. In many instances, milestones do not impact the project duration. Instead,
they focus on major progress points that must be reached to achieve success. Therefore, a
milestone has a clearly dened due date.
Normal change Change that uses a transport request.
Quality gate or q-
gate
Special milestone in a software build project. A quality gate is scheduled during the hand-
over from one project phase or wave to the next. All project stakeholders review the
deliverables of the previous phase or wave and decide collaboratively whether the project
can move into the next phase or wave. The character of a quality gate is more formal than
a review, for instance, as the availability of documents is checked rather than their
content. A quality gate has a clearly dened due date.
Requirement What must be delivered to provide or increase a company’s business value. Requirements
are gathered during the discovery workshop. They can be linked to processes, process
steps, capabilities, modules or end-to-end processes. There are also requirements that are
not linked to any other artefacts.
Focused Build for SAP Solution Manager
Glossary
PUBLIC 159
Release State of a software component that represents an important milestone or a considerable
enhancement of a software component's functionality.
Release
component
The systems and applications of the solution that are related to a release.
Risk An event or condition that, if it occurs, could have a negative eect on one or more project
objectives.
Scope change Unforeseen new requirement that changes the initial scope. For a scope change, the
eorts and the budget need to be newly estimated and negotiated with the customer.
Scope extension Additional work that needs to be done to implement a requirement. If the need for
additional work has been identied after a quality gate or a user acceptance test, the initial
scope can be extended. A scope extension is a smaller than a scope change. A scope
extension does not exceed the eorts and the budget planned for the initial scope.
Sprint In agile development, a sprint is a dened period of time during which software
development has to provide deliverables for review. The backlog of a sprint is based on the
prioritization of backlog items, that is requirements.
Test case A document that describes what shall be tested, how the test sequence is to be executed
by the tester, and what results are expected at the end of the test sequence.
Test package Part of a test plan containing all test cases assigned to a tester. A test package contains all
the test cases that a tester is to perform within a specic time period.
Wave Well-dened functional scope of work packages that belong to a release and are
implemented during a dened period of time. A wave is formally signed-o by customer
key-users.
Work item Document that describes a normal or a general change. A work item is derived from a
work package. A work item can be divided into single tasks that can be assigned to
developers.
Work package Document that denes what needs to be done to implement a requested feature. A work
package is usually based on a requirement, but it can also be created directly. The solution
architect uses the work package to plan and document the implementation of the
requirement. A work package is broken down into work items.
WRICEF WRICEF is the abbreviation of work ows, reports, interfaces, conversions, enhancements,
and forms. A WRICEF is a requirement that goes beyond the scope of a customizing or
conguration and requires that components of a standard process are enhanced or that
new components are development and documented.
160 PUBLIC
Focused Build for SAP Solution Manager
Glossary

Important Disclaimers and Legal Information
Hyperlinks
Some links are classied by an icon and/or a mouseover text. These links provide additional information.
About the icons:
● Links with the icon : You are entering a Web site that is not hosted by SAP. By using such links, you agree (unless expressly stated otherwise in your
agreements with SAP) to this:
● The content of the linked-to site is not SAP documentation. You may not infer any product claims against SAP based on this information.
● SAP does not agree or disagree with the content on the linked-to site, nor does SAP warrant the availability and correctness. SAP shall not be liable for any
damages caused by the use of such content unless damages have been caused by SAP's gross negligence or willful misconduct.
● Links with the icon : You are leaving the documentation for that particular SAP product or service and are entering a SAP-hosted Web site. By using such
links, you agree that (unless expressly stated otherwise in your agreements with SAP) you may not infer any product claims against SAP based on this
information.
Videos Hosted on External Platforms
Some videos may point to third-party video hosting platforms. SAP cannot guarantee the future availability of videos stored on these platforms. Furthermore, any
advertisements or other content hosted on these platforms (for example, suggested videos or by navigating to other videos hosted on the same site), are not within
the control or responsibility of SAP.
Beta and Other Experimental Features
Experimental features are not part of the ocially delivered scope that SAP guarantees for future releases. This means that experimental features may be changed by
SAP at any time for any reason without notice. Experimental features are not for productive use. You may not demonstrate, test, examine, evaluate or otherwise use
the experimental features in a live operating environment or with data that has not been suciently backed up.
The purpose of experimental features is to get feedback early on, allowing customers and partners to inuence the future product accordingly. By providing your
feedback (e.g. in the SAP Community), you accept that intellectual property rights of the contributions or derivative works shall remain the exclusive property of SAP.
Example Code
Any software coding and/or code snippets are examples. They are not for productive use. The example code is only intended to better explain and visualize the syntax
and phrasing rules. SAP does not warrant the correctness and completeness of the example code. SAP shall not be liable for errors or damages caused by the use of
example code unless damages have been caused by SAP's gross negligence or willful misconduct.
Bias-Free Language
SAP supports a culture of diversity and inclusion. Whenever possible, we use unbiased language in our documentation to refer to people of all cultures, ethnicities,
genders, and abilities.
Focused Build for SAP Solution Manager
Important Disclaimers and Legal Information
PUBLIC 161

www.sap.com/contactsap
© 2022 SAP SE or an SAP aliate company. All rights reserved.
No part of this publication may be reproduced or transmitted in any form
or for any purpose without the express permission of SAP SE or an SAP
aliate company. The information contained herein may be changed
without prior notice.
Some software products marketed by SAP SE and its distributors
contain proprietary software components of other software vendors.
National product specications may vary.
These materials are provided by SAP SE or an SAP aliate company for
informational purposes only, without representation or warranty of any
kind, and SAP or its aliated companies shall not be liable for errors or
omissions with respect to the materials. The only warranties for SAP or
SAP aliate company products and services are those that are set forth
in the express warranty statements accompanying such products and
services, if any. Nothing herein should be construed as constituting an
additional warranty.
SAP and other SAP products and services mentioned herein as well as
their respective logos are trademarks or registered trademarks of SAP
SE (or an SAP aliate company) in Germany and other countries. All
other product and service names mentioned are the trademarks of their
respective companies.
Please see https://www.sap.com/about/legal/trademark.html for
additional trademark information and notices.
THE BEST RUN
